In a typical Silverlight application, a client web service requests a web service and waits for the response from the service and then processes it. This is distinctly a one way communication, in which a client must initiate every conversation.
The problem with one way communication is that we can't build a chat application with it or implement features such as notifications. Well there is a solution: Duplex Services.
How Duplex Services Works in Silverlight:
Silverlight includes a feature for creating duplex services, which allow two-way communication (meaning the server can contact your client when needed). The client's network request is left open but in an inactive state that doesn't hassle the server. It stays open until it times out, 90 seconds later, at which point the client connects again.
So let's start creating a duplex WCF service at server side and let Silverlight access it at the client side.
Step 1: Create a Silverlight application and name it "DuplexService".
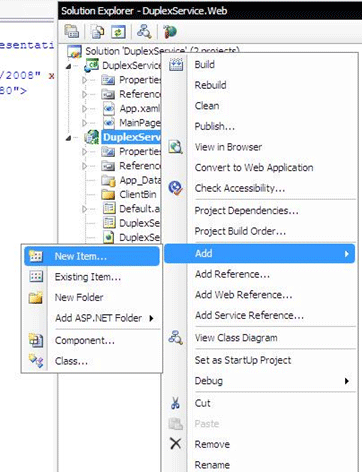
Step 2: Add a WCF Service from DuplexService.Web Hosting project
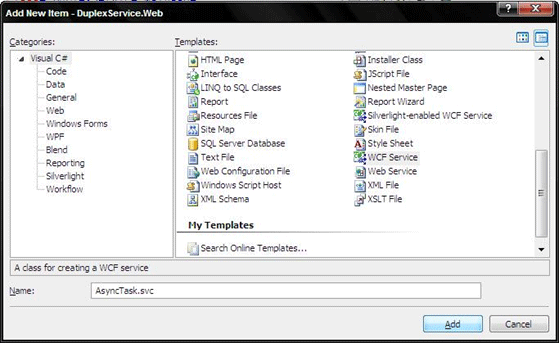
Step 3: Select WCF Service and name it "AsyncTask.svc"
Step 4: We will first create an interface: In order for a client application to have a two-way conversation with a web service, the client needs to know something about the web service, and the web service needs to know something about the client. When calling the service, the client uses the service interface (which, in this example, is named IAsyncTaskService). When calling the client, the service uses the client interface (which is named IAsyncTaskClient)
So open IAsyncTask.cs, and let's create these interfaces
[ServiceContract(CallbackContract = typeof(IAsyncTaskClient))]
public interface IAsyncTaskService
{
[OperationContract(IsOneWay = true)]
void SubmitTask(TaskDescription task);
}
[ServiceContract]
public interface IAsyncTaskClient
{ [OperationContract(IsOneWay = true)]
void ReturnResult(TaskResult result);
}
The second thing which we need to concentrate upon are as below;
-
The OperationContract that decorates the SubmitTask() method sets the IsOneWay property to true. This makes it a one-way method. When calling a one-way method, the client will disconnect after the request message is sent, without waiting for a response. This also makes the server-side programming model easier. Rather than starting a new thread or running a timer, the SubmitTask() can carry out its time-consuming work from start to finish, safe in the knowledge that the client isn't waiting.
-
The ServiceContract attribute that decorates the interface declaration. It sets the CallbackContract property to indicate the interface that the client will use. The client interface also consists of a single one-way method. This method is named ReturnResult(), and the server calls it to pass back the result to the client when the operation is complete.
Step 5: Now let's create the respective classes.
[DataContract()]
public class TaskDescription
{
[DataMember()]
public string DataToProcess{ get; set; }
}
[DataContract()]
public class TaskResult
{
[DataMember()]
public string ProcessedData { get; set; }
}
The TaskDescription class encapsulates the information in the task request that the client sends to the server
The TaskResult class encapsulates the final, processed data that the server returns to the client.
Step 6: Now it's time to create the service:
public class AsyncTask : IAsyncTaskService
{
#region IAsyncTaskService Members
public void SubmitTask(TaskDescription taskDescription)
{
}
#endregion
}
The service implements the IAsyncTaskService, and provides the code for the SubmitTask() method. It isn't decorated with the ServiceContract attribute, because that attribute is already present on the interface.
The actual code in the SubmitTask() method carries out the operation and prepares the return value. The difference is that the return value is passed by explicitly calling the IAsyncTaskClient.ReturnResult() method.
The full implementation looks like below.
[AspNetCompatibilityRequirements(RequirementsMode=AspNetCompatibilityRequirementsMode.Allowed)]
public class AsyncTask : IAsyncTaskService
{
#region IAsyncTaskService Members
public void SubmitTask(TaskDescription taskDescription)
{
// Simulate some work with a delay.
Thread.Sleep(TimeSpan.FromSeconds(5));
// Reverse the letters in string.
char[] data = taskDescription.DataToProcess.ToCharArray();
Array.Reverse(data);
// Prepare the response.
TaskResult result = new TaskResult();
result.ProcessedData = new string(data);
// Send the response to the client.
try
{
IAsyncTaskClient client = OperationContext.Current.GetCallbackChannel<IAsyncTaskClient>();
client.ReturnResult(result);
}
catch
{
// The client could not be contacted.
// Clean up any resources here before the thread ends.
}
// Incidentally, you can call the client.ReturnResult() method mulitple times to
// return different pieces of data at different times.
// The connection remains available until the reference is released (when the method
// ends and the variable goes out of scope).
}
#endregion
}
Step 7: Time for Configuring Web.Config.
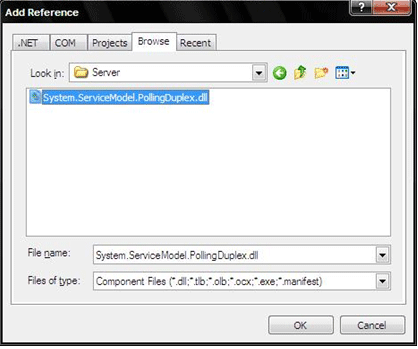
Before going any further, we need to add an assembly reference to the System.ServiceModel.PollingDuplex.dll assembly that has the duplexing support we need. You can find it in a folder like C:\Program Files\Microsoft SDKs\Silverlight\v3.0\Libraries\Server.
Click on browse and trace this path
C:\Program Files\Microsoft SDKs\Silverlight\v3.0\Libraries\Server.
Once you've taken care of that, you're ready to make the first modification to the web.config file. Find the <system.serviceModel> element, and add this inside it.
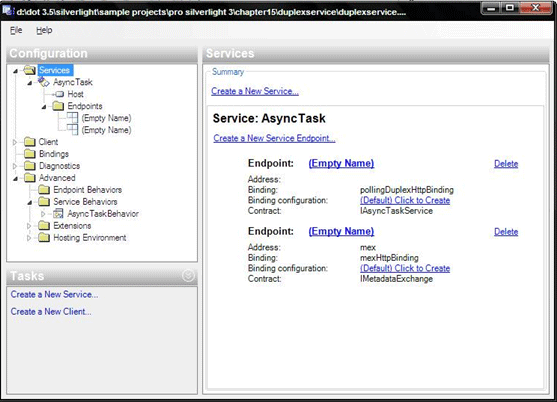
Now our service is ready to be exposed via these endpoints.
Step 8: Run without debugging by clicking Ctrl + F5.
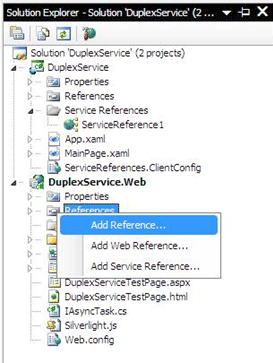
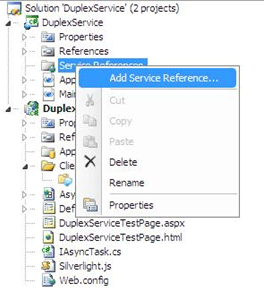
Step 9: Come back to DuplexService project and click to reference to add a Service Reference.
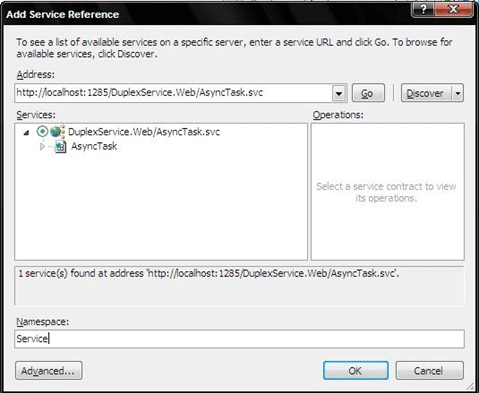
Step 10: Add Service in this client project and name it "Service"
Step 11: Now we need a reference to the System.ServiceModel.PollingDuplex.dll assembly. Here we can't use the server-side version. Instead, we can find the Silverlight version in the folder C:\Program Files\Microsoft SDKs\Silverlight\v3.0\Libraries\Client.
Step 12: Now, when creating the proxy object, we need to explicitly create the duplex binding,
public MainPage()
{
InitializeComponent();
EndpointAddress address = new EndpointAddress("http://localhost:" +
HtmlPage.Document.DocumentUri.Port + "/DuplexService.Web/AsyncTask.svc");
PollingDuplexHttpBinding binding = new PollingDuplexHttpBinding();
client = new AsyncTaskServiceClient(binding, address);
client.ReturnResultReceived += client_ReturnResultReceived;
}
While consuming an ordinary web service, we attach an event handler to the completed event. Using a duplex service is similar, but we get one event for each method in the client interface, and the word Received is added to the end instead of Completed. In the current example, the IAsyncTaskClient interface defines a single method named ReturnResult(), and so the proxy class includes an event named ReturnResultReceived().
client.ReturnResultReceived += client_ReturnResultReceived;
The interface looks like this.
Step 13: Here's the code for submit.
private void cmdSubmit_Click(object sender, RoutedEventArgs e)
{
TaskDescription taskDescription = new TaskDescription();
taskDescription.DataToProcess = txtTextToProcess.Text;
client.SubmitTaskAsync(taskDescription);
lblStatus.Text = "Asynchronous request sent to server.";
}
private void client_ReturnResultReceived(object sender, ReturnResultReceivedEventArgs e)
{
try
{
lblStatus.Text = "Response received: " + e.result.ProcessedData;
}
catch
{
lblStatus.Text = "Job processing failed.";
}
}
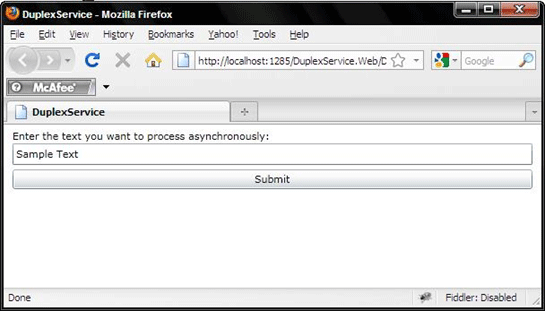
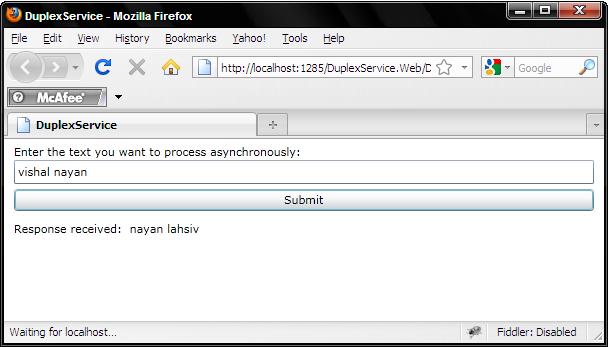
Step 14: Time to test, so start by clicking F5, and type any string, and you will get that string reversed by the service side written business logic.
Benefit of Duplex Service:
-
The client doesn't wait for the server's response, but polls for it periodically.
-
The server can call different client methods from the same web service method. In fact, the service can call any method that's defined in the client interface.
Hope you enjoyed reading ..
Cheers.