

I am using Microsoft Enterprise Library to perform the database operation. Microsoft provides this library to perform the database operations which is very flexible to use with the web application.
- Creating Solution
- Perform Database Operation
- Working with Microsoft Enterprise Library
- Binding Model with View
- Binding Data with View using jQuery
Prerequisites
There are the following prerequisite before getting started with the scenario,
- Visual Studio 2013 or Visual Studio 2015
Note: I am creating this project in Visual Studio 2015.
Creating Solution
In this section we will create a blank solution and in the blank solution we will categorize the project into different categories as “Web”, “Models” and “Infrastructure”. In the Web folder we will create the web application with the help of ASP.NET MVC 5 Project Template and in the rest two solution folders we will create the “Class Library” for Models and “Core” for database operations. So let’s start with the following steps:
Step 1: Open Visual Studio 2015 and click on “New Project”,
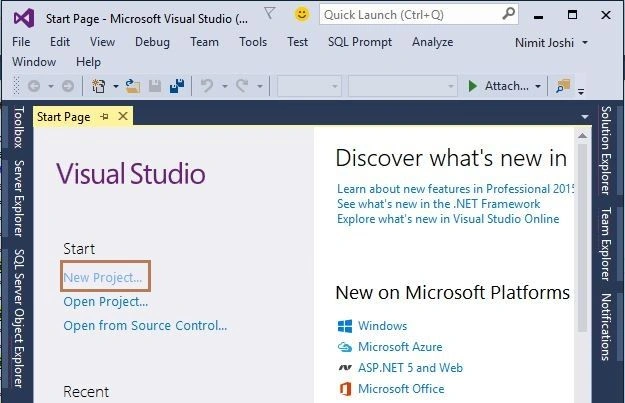
Figure 1: Visual Studio Start Page
Step 2: Select Visual Studio Solutions from the left pane and select the “Blank Solution” named “CricketMasters”.

Figure 2: Creating Blank Solution
Step 3: Right click on the “CricketMasters” from the Solution Explorer and add a “New Solution Folder” named “Web”,
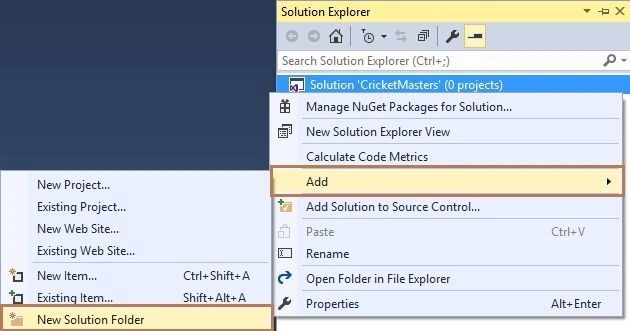
Figure 3: Adding New Solution Folder
Create two more solutions folder named “Infrastructure” and “Models”.
Step 4: Right click on the “Web” folder and select “New” and click “Add New Project”,

Figure 4: Adding New Project In Solution
Step 5: Select the Web from the left pane in the next wizard and click on the “ASP.NET Web Application” to create web application named “CricketMastersWeb”
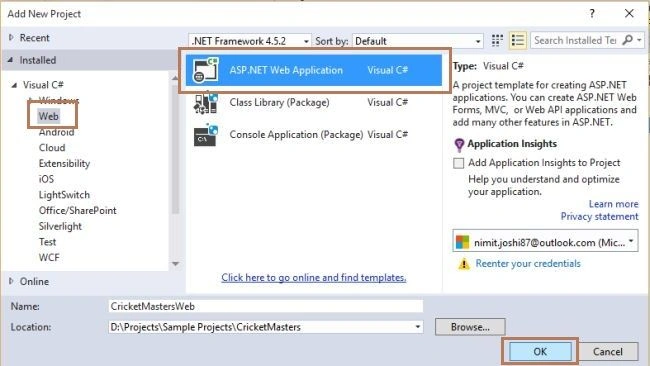
Figure 5: Adding Web Application Project
Step 6: In the next “ASP.NET” wizard select the “MVC Project Template” to create ASP.NET MVC Application.
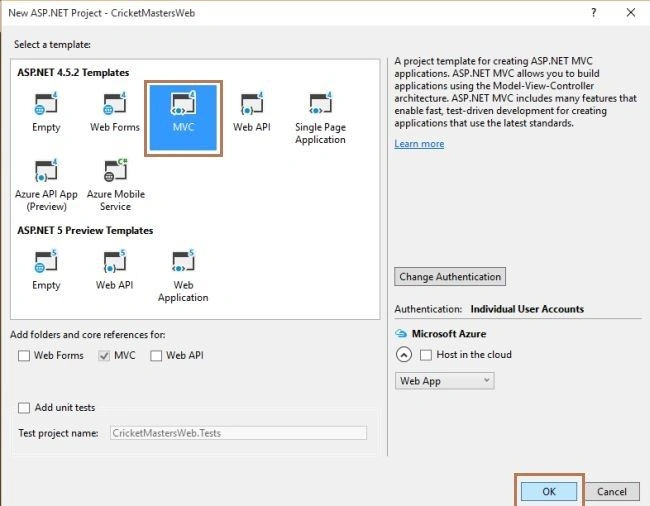
Figure 6: MVC Project Template
Now your web project created successfully.
Perform Database Operation
In this section we will create the database for the application and tables with the records. We will create stored procedures for getting records from the database. Begin with the following steps:
Step 1: Create a database with the following query:
- CREATE DATABASE Cricketer
- USE [Cricketer]
- GO
- /****** Object: Table [dbo].[CricketerProfile] Script Date: 12/13/2015 1:33:41 PM ******/
- SET ANSI_NULLS ON
- GO
- SET QUOTED_IDENTIFIER ON
- GO
- SET ANSI_PADDING ON
- GO
- IF NOT EXISTS (SELECT * FROM sys.objects WHERE object_id = OBJECT_ID(N'[dbo].[CricketerProfile]') AND type in (N'U'))
- BEGIN
- CREATE TABLE [dbo].[CricketerProfile](
- [ID] [int] IDENTITY(1,1) NOT NULL,
- [Name] [varchar](50) NULL,
- [ODI] [int] NULL,
- [Tests] [int] NULL,
- [ODIRuns] [int] NULL,
- [TestRuns] [int] NULL,
- CONSTRAINT [PK_CricketerProfile] PRIMARY KEY CLUSTERED
- (
- [ID] ASC
- )WITH (PAD_INDEX = OFF, STATISTICS_NORECOMPUTE = OFF, IGNORE_DUP_KEY = OFF, ALLOW_ROW_LOCKS = ON, ALLOW_PAGE_LOCKS = ON) ON [PRIMARY]
- ) ON [PRIMARY]
- END
- GO
- SET ANSI_PADDING OFF
- GO
- SET IDENTITY_INSERT [dbo].[CricketerProfile] ON
- GO
- INSERT [dbo].[CricketerProfile] ([ID], [Name], [ODI], [Tests], [ODIRuns], [TestRuns]) VALUES (1, N'Sachin Tendulkar', 463, 200, 18426, 15921)
- GO
- INSERT [dbo].[CricketerProfile] ([ID], [Name], [ODI], [Tests], [ODIRuns], [TestRuns]) VALUES (2, N'Saurav Ganguly', 311, 113, 11363, 7212)
- GO
- INSERT [dbo].[CricketerProfile] ([ID], [Name], [ODI], [Tests], [ODIRuns], [TestRuns]) VALUES (3, N'Rahul Dravid', 344, 164, 10889, 13228)
- GO
- INSERT [dbo].[CricketerProfile] ([ID], [Name], [ODI], [Tests], [ODIRuns], [TestRuns]) VALUES (4, N'V.V.S. Laxman', 86, 134, 2338, 8781)
- GO
- INSERT [dbo].[CricketerProfile] ([ID], [Name], [ODI], [Tests], [ODIRuns], [TestRuns]) VALUES (5, N'Virendar Sehwag', 251, 104, 8273, 8586)
- GO
- SET IDENTITY_INSERT [dbo].[CricketerProfile] OFF
- GO
- /****** Object: StoredProcedure [dbo].[CC_GetCricketerDetailsById] Script Date: 12/13/2015 1:33:41 PM ******/
- SET ANSI_NULLS ON
- GO
- SET QUOTED_IDENTIFIER ON
- GO
- IF NOT EXISTS (SELECT * FROM sys.objects WHERE object_id = OBJECT_ID(N'[dbo].[CC_GetCricketerDetailsById]') AND type in (N'P', N'PC'))
- BEGIN
- EXEC dbo.sp_executesql @statement = N'CREATE PROCEDURE [dbo].[CC_GetCricketerDetailsById] AS'
- END
- GO
- ALTER Proc [dbo].[CC_GetCricketerDetailsById]
- @ID int
- AS
- Begin
- select * from CricketerProfile (NOLOCK) where ID = @Id
- End
- GO
- /****** Object: StoredProcedure [dbo].[CC_GetCricketerList] Script Date: 12/13/2015 1:33:41 PM ******/
- SET ANSI_NULLS ON
- GO
- SET QUOTED_IDENTIFIER ON
- GO
- IF NOT EXISTS (SELECT * FROM sys.objects WHERE object_id = OBJECT_ID(N'[dbo].[CC_GetCricketerList]') AND type in (N'P', N'PC'))
- BEGIN
- EXEC dbo.sp_executesql @statement = N'CREATE PROCEDURE [dbo].[CC_GetCricketerList] AS'
- END
- GO
- ALTER Proc [dbo].[CC_GetCricketerList]
- AS
- Begin
- select ID,Name from CricketerProfile (NOLOCK)
- End
- GO
In this section we will install the Microsoft Enterprise Library from the Manage NuGet Packages in the “CricketMasters.Core” project and create the class library for the web application. So, let’s start with the following steps:
Step 1: In the Solution Explorer, right click on the Models and add a “Class Library Project” by clicking on “New Project” in the Add sub menu as “CricketMasters.Models”
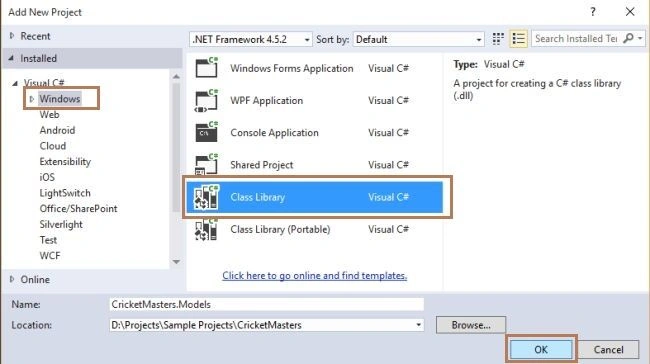
Figure 7: Adding Class Library Project
Step 2: Add a new class in the Models project.
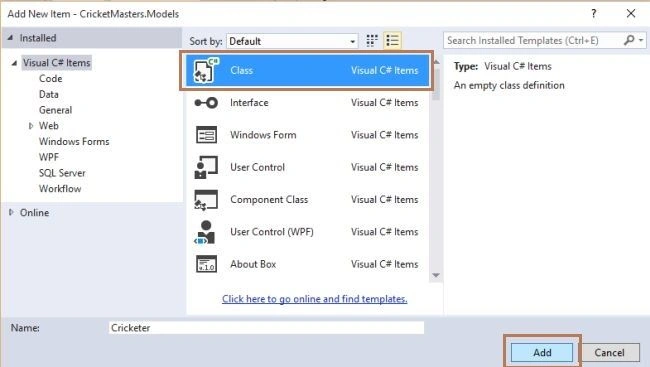
Figure 8: Adding New Class in Project
Step 3: Replace the class with the following code of class:
- namespace CricketMasters.Models
- {
- #region Cricketer Class
- /// <summary>
- /// This class is used for the cricketers
- /// </summary>
- public class Cricketer
- {
- #region Properties
- /// <summary>
- /// get and set the ID
- /// </summary>
- public int ID { get; set; }
- /// <summary>
- /// get and set the Name
- /// </summary>
- public string Name { get; set; }
- /// <summary>
- /// get and set the ODI
- /// </summary>
- public int ODI { get; set; }
- /// <summary>
- /// get and set the Tests
- /// </summary>
- public int Tests { get; set; }
- /// <summary>
- /// get and set the OdiRuns
- /// </summary>
- public int OdiRuns { get; set; }
- /// <summary>
- /// get and set the TestRuns
- /// </summary>
- public int TestRuns { get; set; }
- /// <summary>
- /// get and set the Cricketers
- /// </summary>
- public List<Cricketer> Cricketers { get; set; }
- #endregion
- }
- #endregion
- }
Step 4: In the Solution Explorer, right click on the Infrastructure folder and add a “New Project” named “CricketMasters.Core”.
Step 5: Right click on the project in the Infrastructure folder and add two new folders names“BLL” and “DAL”.

Figure 9: Adding New Folder in Project
Step 6: Right click on the “References” in the core project and add a reference of the Models project.
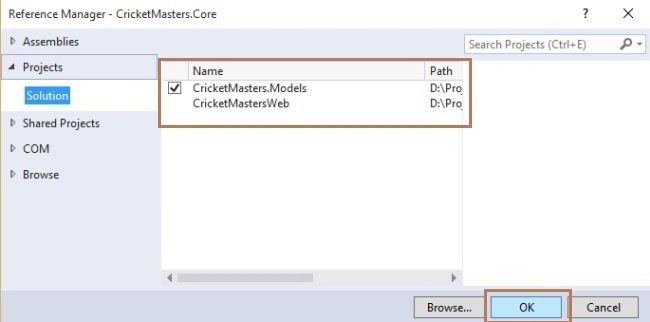
Figure 10: Adding Model Reference
Step 7: Right click on the core project and click on “Manage NuGet Packages”

Figure 11: Adding NuGet Package
Step 8: Search “Enterprise Library” and install the library,

Figure 12: Adding Microsoft Enterprise Library
Step 9: Add a class in the DAL folder.

Figure 13: Adding New Class in Folder
Step 10: Replace the DAL class code with the following code:
- using CricketMasters.Models;
- using Microsoft.Practices.EnterpriseLibrary.Data;
- using Microsoft.Practices.EnterpriseLibrary.Data.Sql;
- using System;
- using System.Collections.Generic;
- using System.Configuration;
- using System.Data;
- using System.Data.Common;
- using System.Linq;
- using System.Reflection;
- namespace CricketMasters.Core.DAL
- {
- #region Cricketer DAL
- /// <summary>
- /// This class is used for Cricketer Data Access Class
- /// </summary>
- public class CricketerDAL
- {
- #region Variable
- /// <summary>
- /// Specify the Database variable
- /// </summary>
- Database objDB;
- /// <summary>
- /// Specify the static variable
- /// </summary>
- static string ConnectionString;
- #endregion
- #region Constructor
- /// <summary>
- /// This constructor is used to get the connectionstring from the config file
- /// </summary>
- public CricketerDAL()
- {
- ConnectionString = ConfigurationManager.ConnectionStrings["CricketerConnectionString"].ToString();
- }
- #endregion
- #region Database Method
- public List<T> ConvertTo<T>(DataTable datatable) where T : new()
- {
- List<T> Temp = new List<T>();
- try
- {
- List<string> columnsNames = new List<string>();
- foreach (DataColumn DataColumn in datatable.Columns)
- columnsNames.Add(DataColumn.ColumnName);
- Temp = datatable.AsEnumerable().ToList().ConvertAll<T>(row => getObject<T>(row, columnsNames));
- return Temp;
- }
- catch
- {
- return Temp;
- }
- }
- public T getObject<T>(DataRow row, List<string> columnsName) where T : new()
- {
- T obj = new T();
- try
- {
- string columnname = "";
- string value = "";
- PropertyInfo[] Properties;
- Properties = typeof(T).GetProperties();
- foreach (PropertyInfo objProperty in Properties)
- {
- columnname = columnsName.Find(name => name.ToLower() == objProperty.Name.ToLower());
- if (!string.IsNullOrEmpty(columnname))
- {
- value = row[columnname].ToString();
- if (!string.IsNullOrEmpty(value))
- {
- if (Nullable.GetUnderlyingType(objProperty.PropertyType) != null)
- {
- value = row[columnname].ToString().Replace("$", "").Replace(",", "");
- objProperty.SetValue(obj, Convert.ChangeType(value, Type.GetType(Nullable.GetUnderlyingType(objProperty.PropertyType).ToString())), null);
- }
- else
- {
- value = row[columnname].ToString();
- objProperty.SetValue(obj, Convert.ChangeType(value, Type.GetType(objProperty.PropertyType.ToString())), null);
- }
- }
- }
- }
- return obj;
- }
- catch (Exception ex)
- {
- return obj;
- }
- }
- #endregion
- #region College
- /// <summary>
- /// This method is used to get the cricketer data
- /// </summary>
- /// <returns></returns>
- public List<Cricketer> GetCricketerList()
- {
- List<Cricketer> objGetCricketers = null;
- objDB = new SqlDatabase(ConnectionString);
- using (DbCommand objcmd = objDB.GetStoredProcCommand("CC_GetCricketerList"))
- {
- try
- {
- using (DataTable dataTable = objDB.ExecuteDataSet(objcmd).Tables[0])
- {
- objGetCricketers = ConvertTo<Cricketer>(dataTable);
- }
- }
- catch (Exception ex)
- {
- throw ex;
- return null;
- }
- }
- return objGetCricketers;
- }
- /// <summary>
- /// This method is used to get cricketers details by cricketer id
- /// </summary>
- /// <returns></returns>
- public List<Cricketer> GetCricketerDetailsById(int Id)
- {
- List<Cricketer> objCricketerDetails = null;
- objDB = new SqlDatabase(ConnectionString);
- using (DbCommand objcmd = objDB.GetStoredProcCommand("CC_GetCricketerDetailsById"))
- {
- try
- {
- objDB.AddInParameter(objcmd, "@ID", DbType.Int32, Id);
- using (DataTable dataTable = objDB.ExecuteDataSet(objcmd).Tables[0])
- {
- objCricketerDetails = ConvertTo<Cricketer>(dataTable);
- }
- }
- catch (Exception ex)
- {
- throw ex;
- return null;
- }
- }
- return objCricketerDetails;
- }
- #endregion
- }
- #endregion
- }
- using CricketMasters.Core.DAL;
- using CricketMasters.Models;
- using System;
- using System.Collections.Generic;
- namespace CricketMasters.Core.BLL
- {
- public class CricketerBL
- {
- public List<Cricketer> GetCricketerList()
- {
- List<Cricketer> ObjCricketers = null;
- try
- {
- ObjCricketers = new CricketerDAL().GetCricketerList();
- }
- catch (Exception)
- {
- throw;
- }
- return ObjCricketers;
- }
- /// <summary>
- /// This method is used to get cricketers details by cricketer id
- /// </summary>
- /// <returns></returns>
- public List<Cricketer> GetCricketerDetailsById(int Id)
- {
- List<Cricketer> ObjCricketerDetails = null;
- try
- {
- ObjCricketerDetails = new CricketerDAL().GetCricketerDetailsById(Id);
- }
- catch (Exception)
- {
- throw;
- }
- return ObjCricketerDetails;
- }
- }
- }
Binding Model with View
In this section we will create the empty MVC 5 controller and add a view for displaying the details. We will also bind the view from the data by passing the data from the model to the controller. So, let’s begin with the following steps:
Step 1: In the Web Project, right click on the Controllers folder go to Add and click on the “New Scaffolded Item”
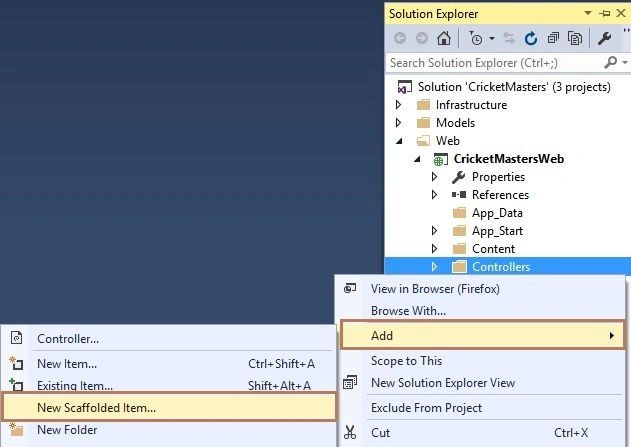
Figure 14: Adding New Scaffolded Item
Step 2: In the next wizard, select the “MVC 5 Empty Controller”.
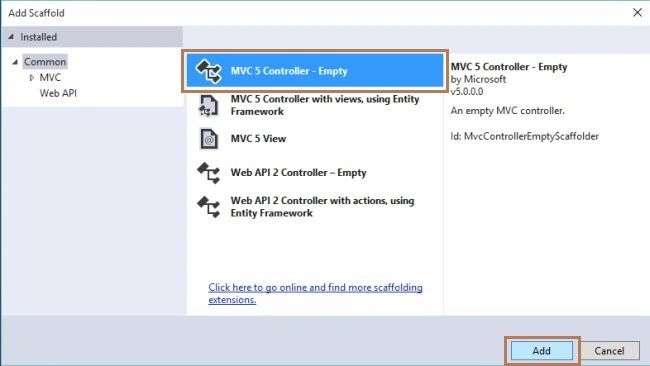
Figure 15: Add Scaffold Wizard
Specify the controller name as “CricketersController”
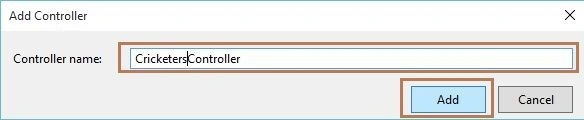
Figure 16: Adding New Controller
Step 3: Add a reference of Models and Core Project in the Web Project.
Step 4: In the CricketersController, replace the code with the following code:
- using CricketMasters.Core.BLL;
- using CricketMasters.Models;
- using System;
- using System.Collections.Generic;
- using System.Linq;
- using System.Web.Mvc;
- namespace CricketMastersWeb.Controllers
- {
- public class CricketersController : Controller
- {
- #region Variable
- /// <summary>
- /// This varaible is used for Cricketer BL
- /// </summary>
- public CricketerBL cricketerBL;
- #endregion
- #region Cricketer
- /// <summary>
- /// This method is used to get all cricketer names
- /// </summary>
- /// <returns></returns>
- [HttpGet, ActionName("GetAllCricketer")]
- public ActionResult GetAllCricketer()
- {
- List<Cricketer> objCricketer = new List<Cricketer>();
- var response = new CricketerBL().GetCricketerList();
- if (!object.Equals(response, null))
- {
- objCricketer = response.ToList();
- }
- return View("~/Views/Cricketers/Cricketer.cshtml", new Cricketer { Cricketers = objCricketer });
- }
- #endregion
- }
- }
Step 5: Now add a view, by right click on the Views, then Cricketers
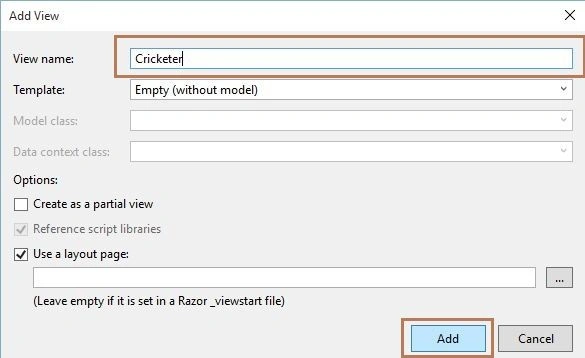
Figure 17: Adding View
Step 6: Replace the view code with the following code:
- @model CricketMasters.Models.Cricketer
- @{
- ViewBag.Title = "Cricketer";
- }
- <h2>Cricketer Statistics</h2>
- <div class="row">
- <div class="col-md-8">
- <hr />
- @Html.ValidationSummary(true, "", new { @class = "text-danger" })
- <div class="form-group">
- @Html.LabelFor(m => m.Name, new { @class = "col-md-2 control-label" })
- <div class="col-md-10">
- @Html.DropDownListFor(m => m.Name, new SelectList(Model.Cricketers, "ID", "Name"), new { @id = "playerNameList", @class = "form-control" })
- </div>
- </div>
- </div>
- </div>
- <add name="CricketerConnectionString" connectionString="Data Source=Your Server Name;Initial Catalog=Cricketer;User ID=Your User ID;Password=Your Password" providerName="System.Data.SqlClient" />
Step 8: Build the solution and now open Views, Shared, then _Layout.cshtml file and change the code with the highlighted code below:
- <!DOCTYPE html>
- <html>
- <head>
- <meta charset="utf-8" />
- <meta name="viewport" content="width=device-width, initial-scale=1.0">
- <title>@ViewBag.Title - Cricket Masters Application</title>
- @Styles.Render("~/Content/css")
- @Scripts.Render("~/bundles/modernizr")
- </head>
- <body>
- <div class="navbar navbar-inverse navbar-fixed-top">
- <div class="container">
- <div class="navbar-header">
- <button type="button" class="navbar-toggle" data-toggle="collapse" data-target=".navbar-collapse">
- <span class="icon-bar"></span>
- <span class="icon-bar"></span>
- <span class="icon-bar"></span>
- </button>
- @Html.ActionLink("Cricket Masters", "Index", "Home", new { area = "" }, new { @class = "navbar-brand" })
- </div>
- <div class="navbar-collapse collapse">
- <ul class="nav navbar-nav">
- <li>@Html.ActionLink("Home", "Index", "Home")</li>
- <li>@Html.ActionLink("About", "About", "Home")</li>
- <li>@Html.ActionLink("Contact", "Contact", "Home")</li>
- <li>@Html.ActionLink("Cricketers", "GetAllCricketer", "Cricketers")</li>
- </ul>
- @Html.Partial("_LoginPartial")
- </div>
- </div>
- </div>
- <div class="container body-content">
- @RenderBody()
- <hr />
- <footer>
- <p>© @DateTime.Now.Year - Cricket Masters</p>
- </footer>
- </div>
- @Scripts.Render("~/bundles/jquery")
- @Scripts.Render("~/bundles/bootstrap")
- @RenderSection("scripts", required: false)
- </body>
- </html>
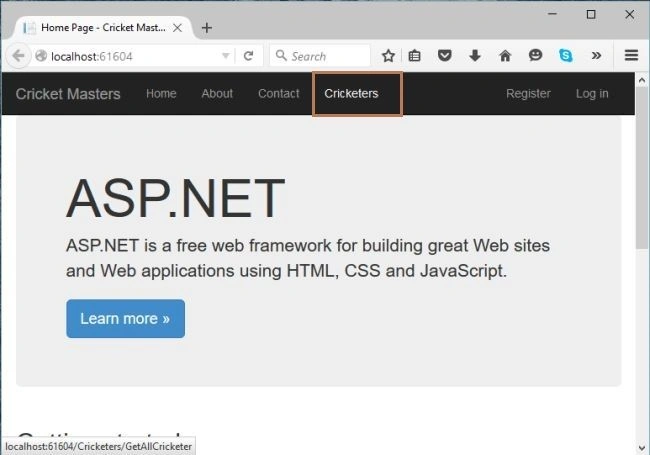
Figure 18: Opening View in MVC 5
When you click on the “Cricketers” link, you can see that your DropDownList has the values which has been passed using the model. Take a look.
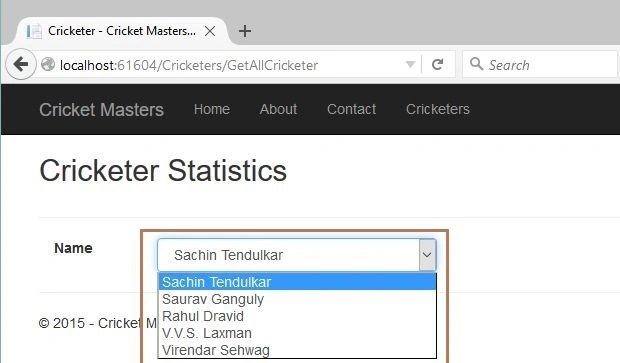
Figure 19: Binding Data in DropDownList Using Model
Binding Data with View using jQuery
In this section we will bind the details of the particular player in the table. We will use jQuery to send the id to the database to fetch the details of the player. So, let’s begin with the following steps:
Step 1: Add the following method in the “CricketersController”.
- /// <summary>
- /// This method is used to get all cricketer details based on the cricketer id
- /// </summary>
- /// <param name="CricketerId"></param>
- /// <returns></returns>
- [HttpGet, ActionName("GetCricketerDetailsById")]
- public JsonResult GetCricketerDetailsById(int CricketerId)
- {
- List<Cricketer> objCricketerDetails = new List<Cricketer>();
- var response = new CricketerBL().GetCricketerDetailsById(CricketerId);
- if (!object.Equals(response, null))
- {
- objCricketerDetails = response.ToList();
- }
- return Json(objCricketerDetails, JsonRequestBehavior.AllowGet);
- }
Step 2: By adding the elements of table data your final view code is as in the following,
- @model CricketerApp.Model.Cricketer
- @{
- ViewBag.Title = "Cricketer";
- }
- <script src="~/Scripts/jquery-1.10.2.min.js"></script>
- <h2>Cricketer Statistics</h2>
- <div class="row">
- <div class="col-md-8">
- <hr />
- @Html.ValidationSummary(true, "", new { @class = "text-danger" })
- <div class="form-group">
- @Html.LabelFor(m => m.Name, new { @class = "col-md-2 control-label" })
- <div class="col-md-10">
- @Html.DropDownListFor(m => m.Name, new SelectList(Model.Cricketers, "ID", "Name"), new { @id = "playerNameList", @class = "form-control", @Onchange = "return GetCricketerDetails();" })
- </div>
- </div>
- </div>
- </div><br />
- <div class="row">
- <div class="form-group">
- <div id="CricketerList" class="col-md-8"></div>
- </div>
- </div>
- <script type="text/javascript">
- $(document).ready(function () {
- GetCricketerDetails();
- });
- function GetCricketerDetails() {
- var cricketerId = $('#playerNameList option:selected').val();
- $.ajax({
- url: '@Url.Action("GetCricketerDetailsById", "Cricketers")',
- type: "GET",
- dataType: "json",
- data: { CricketerId: cricketerId },
- success: function (data) {
- $('#CricketerList').html(" ");
- var html = "";
- html += "<table class=\"table\">";
- html += "<tr>";
- html += "<th>";
- html += "@Html.DisplayNameFor(model=>model.Name)";
- html += "</th>";
- html += "<th>";
- html += "@Html.DisplayNameFor(model=>model.ODI)";
- html += "</th>";
- html += "<th>";
- html += "@Html.DisplayNameFor(model=>model.Tests)";
- html += "</th>";
- html += "<th>";
- html += "@Html.DisplayNameFor(model=>model.OdiRuns)";
- html += "</th>";
- html += "<th>";
- html += "@Html.DisplayNameFor(model=>model.TestRuns)";
- html += "</th>";
- html += "</tr>";
- $.each(data, function (index, item) {
- html += "<tr>";
- html += "<td>";
- html += "<lable>" + item.Name + "</lable>"
- html += "</td>";
- html += "<td>";
- html += "<lable>" + item.ODI + "</lable>"
- html += "</td>";
- html += "<td>";
- html += "<lable>" + item.Tests + "</lable>"
- html += "</td>";
- html += "<td>";
- html += "<lable>" + item.OdiRuns+ "</lable>"
- html += "</td>";
- html += "<td>";
- html += "<lable>" + item.TestRuns + "</lable>"
- html += "</td>";
- html += "</tr>";
- html += "</table>";
- });
- $('#CricketerList').append(html);
- }
- });
- return false;
- }
- </script>
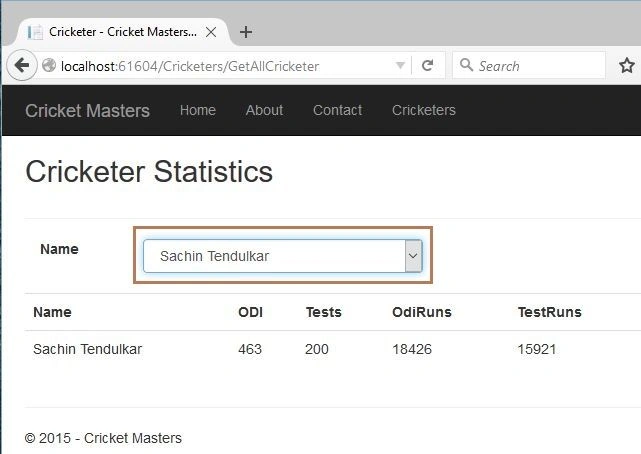
Figure 20: Binding Data in View using jQuery
You can now change the selection and you will get the output.
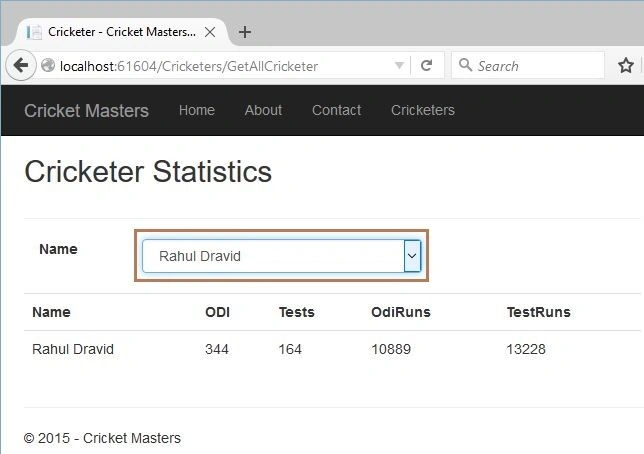
Figure 21: Binding Data in View in MVC 5
That’s it.
Summary
This article described how to bind the data to the view by passing the model in the controller. We also learned to bind the data using the jQuery to the table in the View. Thanks for reading the article.
Luca Spano'Posted Dec 16, 2015, 5:42 PM
Nice. There's a bit of everything in this article
Raja TPosted Dec 15, 2015, 6:58 AM
Nice, Thanks for sharing
Praveen KumarPosted Dec 15, 2015, 6:28 AM
Very Nice...
Humayun Kabir MamunPosted Dec 15, 2015, 4:51 AM
Nice...
Manas MohapatraPosted Dec 15, 2015, 4:46 AM
This is a combination of MVC and Enterprise Library. Good Article