

Introduction
In this article we are going to see how to change an image using a Control Template in Windows 8 Silverlight.
Step 1 : First of all you will create a new Metro Style Application. Let us see the description with images of how you will create it.
- Open Visual Studio 2011
- File -> New -> Project
- Choose Template -> Visual C# ->Silverlight Application
- Rename this Application :

Step 2 : In the Solution Explorer there are two files that we will primarily work with; MainPage.xaml and MainPage.xaml.cs files.

Step 3 : The MainPage.xaml file is as in the following code.
Code : Let us see the code which is given below.
<UserControl x:Class="SilverlightApplication1.MainPage"
xmlns="http://schemas.microsoft.com/winfx/2006/xaml/presentation"
xmlns:x="http://schemas.microsoft.com/winfx/2006/xaml"
xmlns:d="http://schemas.microsoft.com/expression/blend/2008"
xmlns:mc="http://schemas.openxmlformats.org/markup-compatibility/2006"
mc:Ignorable="d"
d:DesignHeight="300" d:DesignWidth="400">
<UserControl.Resources>
<ControlTemplate x:Key="ButtonTemplate" TargetType="Button">
<Grid>
<VisualStateManager.VisualStateGroups>
<VisualStateGroup x:Name="CommonStates">
<VisualState x:Name="Disabled"/>
<VisualState x:Name="Normal"/>
<VisualState x:Name="MouseOver">
<Storyboard>
<ObjectAnimationUsingKeyFrames Storyboard.TargetProperty="(UIElement.Visibility)" Storyboard.TargetName="mouseOverImage">
<DiscreteObjectKeyFrame KeyTime="0">
<DiscreteObjectKeyFrame.Value>
<Visibility>Visible</Visibility>
</DiscreteObjectKeyFrame.Value>
</DiscreteObjectKeyFrame>
</ObjectAnimationUsingKeyFrames>
<ObjectAnimationUsingKeyFrames Storyboard.TargetProperty="(UIElement.Visibility)" Storyboard.TargetName="normalImage">
<DiscreteObjectKeyFrame KeyTime="0">
<DiscreteObjectKeyFrame.Value>
<Visibility>Collapsed</Visibility>
</DiscreteObjectKeyFrame.Value>
</DiscreteObjectKeyFrame>
</ObjectAnimationUsingKeyFrames>
</Storyboard>
</VisualState>
<VisualState x:Name="Pressed">
<Storyboard>
<ObjectAnimationUsingKeyFrames Storyboard.TargetProperty="(UIElement.Visibility)" Storyboard.TargetName="mouseOverImage">
<DiscreteObjectKeyFrame KeyTime="0">
<DiscreteObjectKeyFrame.Value>
<Visibility>Collapsed</Visibility>
</DiscreteObjectKeyFrame.Value>
</DiscreteObjectKeyFrame>
</ObjectAnimationUsingKeyFrames>
<ObjectAnimationUsingKeyFrames Storyboard.TargetProperty="(UIElement.Visibility)" Storyboard.TargetName="normalImage">
<DiscreteObjectKeyFrame KeyTime="0">
<DiscreteObjectKeyFrame.Value>
<Visibility>Collapsed</Visibility>
</DiscreteObjectKeyFrame.Value>
</DiscreteObjectKeyFrame>
</ObjectAnimationUsingKeyFrames>
<ObjectAnimationUsingKeyFrames Storyboard.TargetProperty="(UIElement.Visibility)" Storyboard.TargetName="mousePressedImage">
<DiscreteObjectKeyFrame KeyTime="0">
<DiscreteObjectKeyFrame.Value>
<Visibility>Visible</Visibility>
</DiscreteObjectKeyFrame.Value>
</DiscreteObjectKeyFrame>
</ObjectAnimationUsingKeyFrames>
</Storyboard>
</VisualState>
</VisualStateGroup>
</VisualStateManager.VisualStateGroups>
<Image x:Name="normalImage" Margin="0" Source="1.jpg" Stretch="Fill" />
<Image x:Name="mouseOverImage" Margin="0" Source="2.jpg" Stretch="Fill" Visibility="Collapsed" />
<Image x:Name="mousePressedImage" Margin="0" Source="3.jpg" Stretch="Fill" Visibility="Collapsed" />
</Grid>
</ControlTemplate>
</UserControl.Resources>
<Grid x:Name="LayoutRoot" Background="Pink">
<Button Content="Hello" HorizontalAlignment="Center" VerticalAlignment="Top" Width="300" Height="300" Template="{StaticResource ButtonTemplate}" Margin="2,50,0,25" />
</Grid>
</UserControl>
Step 4 : After running this code we get the following output.


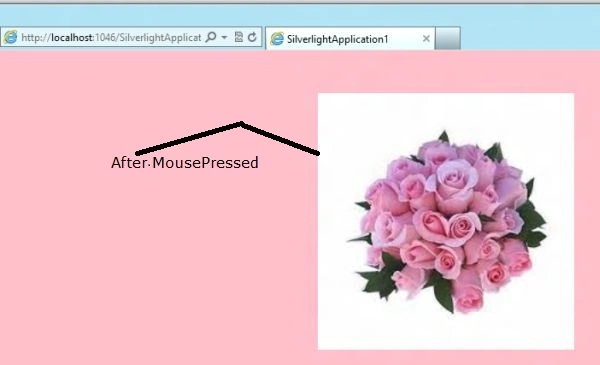
Vipendra VermaPosted Apr 23, 2012, 7:23 PM
How can i change picture dynamically often every 10 second in application.