

Introduction
Today in this article I will show you how to use SQLite a built-in database in android with GridView. I am using this reference class SQLiteOpenHelper on android official site. Let's start.
Note- Now you can read it on my blog. I have updated this article on my personal blog here.
Prerequisites
- Basic knowledge of Android
- Familiar with Eclipse IDE
- SQL statements
Introduction
SQLite
Why SQLiteOpenHelper?
GridView

Figure 1
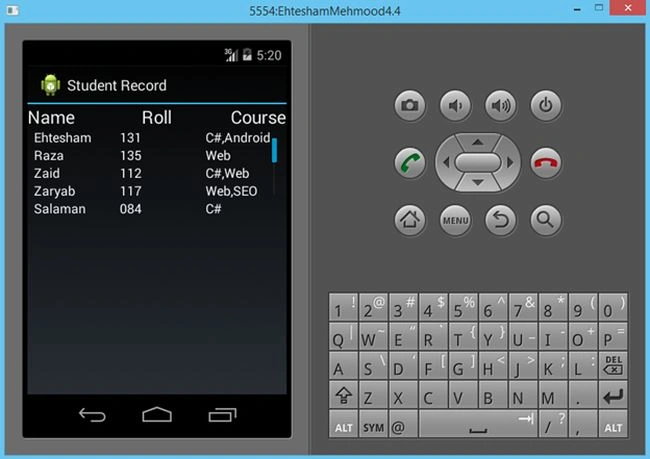
Figure 2
- <?xml version="1.0" encoding="utf-8"?>
- <RelativeLayout xmlns:android="http://schemas.android.com/apk/res/android"
- android:layout_width="match_parent"
- android:layout_height="match_parent" >
- <Button
- android:id="@+id/DisplayButton"
- android:layout_width="wrap_content"
- android:layout_height="wrap_content"
- android:layout_alignBaseline="@+id/InsertButton"
- android:layout_alignBottom="@+id/InsertButton"
- android:layout_marginLeft="44dp"
- android:layout_toRightOf="@+id/InsertButton"
- android:text="Display" />
- <TextView
- android:id="@+id/textView1"
- android:layout_width="wrap_content"
- android:layout_height="wrap_content"
- android:layout_alignParentLeft="true"
- android:layout_alignParentTop="true"
- android:text="Student Name"
- android:textAppearance="?android:attr/textAppearanceMedium" />
- <EditText
- android:id="@+id/NameEditText"
- android:layout_width="wrap_content"
- android:layout_height="wrap_content"
- android:layout_alignParentLeft="true"
- android:layout_alignParentRight="true"
- android:layout_below="@+id/textView1"
- android:layout_marginTop="18dp"
- android:ems="10" />
- <TextView
- android:id="@+id/textView2"
- android:layout_width="wrap_content"
- android:layout_height="wrap_content"
- android:layout_alignParentLeft="true"
- android:layout_below="@+id/NameEditText"
- android:text="Roll No"
- android:textAppearance="?android:attr/textAppearanceMedium" />
- <EditText
- android:id="@+id/RollEditText"
- android:layout_width="wrap_content"
- android:layout_height="wrap_content"
- android:layout_alignParentLeft="true"
- android:layout_alignParentRight="true"
- android:layout_below="@+id/textView2"
- android:layout_marginTop="24dp"
- android:ems="10" />
- <TextView
- android:id="@+id/textView3"
- android:layout_width="wrap_content"
- android:layout_height="wrap_content"
- android:layout_alignParentLeft="true"
- android:layout_below="@+id/RollEditText"
- android:text="Major Course"
- android:textAppearance="?android:attr/textAppearanceMedium" />
- <EditText
- android:id="@+id/CourseEditText"
- android:layout_width="wrap_content"
- android:layout_height="wrap_content"
- android:layout_alignParentLeft="true"
- android:layout_alignParentRight="true"
- android:layout_below="@+id/textView3"
- android:layout_marginTop="19dp"
- android:ems="10" >
- <requestFocus />
- </EditText>
- <Button
- android:id="@+id/InsertButton"
- android:layout_width="wrap_content"
- android:layout_height="wrap_content"
- android:layout_alignParentBottom="true"
- android:layout_marginBottom="58dp"
- android:layout_toRightOf="@+id/textView2"
- android:text="Insert" />
- </RelativeLayout>
Step 3
Gridview.xml File
- <?xml version="1.0" encoding="utf-8"?>
- <RelativeLayout xmlns:android="http://schemas.android.com/apk/res/android"
- android:layout_width="match_parent"
- android:layout_height="match_parent" >
- <TextView
- android:id="@+id/textView1"
- android:layout_width="wrap_content"
- android:layout_height="wrap_content"
- android:layout_alignParentLeft="true"
- android:layout_alignParentTop="true"
- android:text="Name"
- android:textAppearance="?android:attr/textAppearanceLarge" />
- <TextView
- android:id="@+id/textView2"
- android:layout_width="wrap_content"
- android:layout_height="wrap_content"
- android:layout_alignParentTop="true"
- android:layout_centerHorizontal="true"
- android:text="Roll"
- android:textAppearance="?android:attr/textAppearanceLarge" />
- <TextView
- android:id="@+id/textView3"
- android:layout_width="wrap_content"
- android:layout_height="wrap_content"
- android:layout_alignParentRight="true"
- android:layout_alignParentTop="true"
- android:text="Course"
- android:textAppearance="?android:attr/textAppearanceLarge" />
- <GridView
- android:id="@+id/gridView1"
- android:layout_width="match_parent"
- android:layout_height="wrap_content"
- android:layout_alignParentLeft="true"
- android:layout_below="@+id/textView1"
- android:fastScrollAlwaysVisible="true"
- android:fastScrollEnabled="true"
- android:numColumns="3" >
- </GridView>
- </RelativeLayout>
Step 4
- public class MainActivity extends Activity {
- //Data members
- private EditText nameEditText;
- private EditText rollEditText;
- private EditText courseEditText;
- private Button insertButton;
- private Button displayButton;
- //object of DatabaseHandler class
- DatabaseHandler handler;
- @Override
- protected void onCreate(Bundle savedInstanceState) {
- super.onCreate(savedInstanceState);
- setContentView(R.layout.main);
- nameEditText=(EditText) findViewById(R.id.NameEditText);
- rollEditText=(EditText) findViewById(R.id.RollEditText);
- courseEditText=(EditText) findViewById(R.id.CourseEditText);
- insertButton=(Button) findViewById(R.id.InsertButton);
- displayButton=(Button) findViewById(R.id.DisplayButton);
- insertButton.setOnClickListener(new View.OnClickListener() {
- @Override
- public void onClick(View v) {
- String name=nameEditText.getText().toString();
- String roll=rollEditText.getText().toString();
- String course=courseEditText.getText().toString();
- handler=new DatabaseHandler(getBaseContext());//getting the context object
- handler.open();
- long id=handler.InsertData(name, roll, course);
- Toast.makeText(getBaseContext(), "Your data in inserted",Toast.LENGTH_LONG).show();
- nameEditText.setText("");
- rollEditText.setText("");
- courseEditText.setText("");
- handler.close();
- }
- });
- displayButton.setOnClickListener(new View.OnClickListener() {
- @Override
- public void onClick(View v) {
- Intent i=new Intent(MainActivity.this,GridViewActivity.class);
- startActivity(i);//start gridview activity to show the records.
- }
- });
- }
- }
Step 5
GridViewActivity.java File
- public class GridViewActivity extends Activity
- {
- private GridView gridView;
- private ArrayList<String> list;
- private ArrayAdapter<String> adapter;
- DatabaseHandler handler;
- @Override
- protected void onCreate(Bundle savedInstanceState) {
- super.onCreate(savedInstanceState);
- setContentView(R.layout.gridview);
- //GridView
- gridView=(GridView) findViewById(R.id.gridView1);
- //ArrayList
- list=new ArrayList<String>();
- adapter=new ArrayAdapter<String>(getApplicationContext(),android.R.layout.simple_spinner_item,list);
- String name, roll, course;
- name="";
- roll="";
- course="";
- handler=new DatabaseHandler(getBaseContext());//getting the context object
- handler.open();
- try
- {
- //for holding retrieve data from query and store in the form of rows
- Cursor c=handler.DisplayData();
- //Move the cursor to the first row.
- if(c.moveToFirst())
- {
- do
- {
- name=c.getString(c.getColumnIndex("name"));
- roll=c.getString(c.getColumnIndex("roll"));
- course=c.getString(c.getColumnIndex("course"));
- //add in to array list
- list.add(name);
- list.add(roll);
- list.add(course);
- gridView.setAdapter(adapter);
- }while(c.moveToNext());//Move the cursor to the next row.
- }
- else
- {
- Toast.makeText(getApplicationContext(), "No data found", Toast.LENGTH_LONG).show();
- }
- }catch(Exception e)
- {
- Toast.makeText(getApplicationContext(), "No data found"+e.getMessage(), Toast.LENGTH_LONG).show();
- }
- handler.close();
- //Toast.makeText(getBaseContext(),"Name: "+name+"Roll No: "+roll+"Course: "+course , Toast.LENGTH_LONG).show();
- }
- }
Step 6
DataBaseHandler.java File
- public class DatabaseHandler
- {
- //Variables
- public static final String NAME="name";
- public static final String ROLL="roll";
- public static final String COURSE="course";
- public static final String TABLE_NAME="studenttable";
- public static final String DATABASE_NAME="studentdb";
- public static final int DATABASE_VERSION=1;
- //Table query
- public static final String TABLE_CREATE="create table studenttable(name text not null, roll text not null, course text not null);";
- DataBaseHelper dbhelper;
- Context context;
- SQLiteDatabase db;
- public DatabaseHandler(Context ctx)
- {
- this.context=ctx;
- dbhelper=new DataBaseHelper(context);
- }
- private static class DataBaseHelper extends SQLiteOpenHelper
- {
- //Create a helper object to create, open, and/or manage a database.
- public DataBaseHelper(Context ctx)
- {
- super(ctx,DATABASE_NAME,null,DATABASE_VERSION);
- }
- @Override
- //Called when the database is created for the first time.
- public void onCreate(SQLiteDatabase db)
- {
- db.execSQL(TABLE_CREATE);//Here create a table
- }
- @Override
- //Called when the database needs to be upgraded.
- public void onUpgrade(SQLiteDatabase db, int oldVersion, int newVersion) {
- db.execSQL("DROP TABLE IF EXIST studenttable");
- onCreate(db);
- }
- }
- public DatabaseHandler open()
- {
- //Create and/or open a database that will be used for reading and writing.
- db=dbhelper.getWritableDatabase();
- return this;
- }
- public void close()
- {
- //Close any open database object.
- dbhelper.close();
- }
- //Insert record in the database
- public long InsertData(String name, String roll,String course)
- {
- //This class is used to store a set of values
- ContentValues content=new ContentValues();
- content.put(NAME, name);
- content.put(ROLL, roll);
- content.put(COURSE, course);//Adds a value to the set.
- return db.insertOrThrow(TABLE_NAME,null, content);
- }
- //Display record from the database
- public Cursor DisplayData()
- {
- //Select query
- return db.rawQuery("SELECT * FROM studenttable", null);
- //return db.query(TABLE_NAME, new String[]{NAME, ROLL,COURSE}, null, null, null, null, null);
- }
- }
Step 7
- <?xml version="1.0" encoding="utf-8"?>
- <manifest
- xmlns:android="http://schemas.android.com/apk/res/android"
- package="com.example.sqlitepractice"
- android:versionCode="1"
- android:versionName="1.0" >
- <uses-sdk
- android:minSdkVersion="8"
- android:targetSdkVersion="19" />
- <application
- android:allowBackup="true"
- android:icon="@drawable/ic_launcher"
- android:label="@string/app_name"
- >
- <activity
- android:name="com.example.sqlitepractice.MainActivity"
- android:label="Student Record App" >
- <intent-filter>
- <action android:name="android.intent.action.MAIN" />
- <category android:name="android.intent.category.LAUNCHER" />
- </intent-filter>
- </activity>
- <activity
- android:name=".GridViewActivity"
- android:label="Student Record"
- ></activity>
- </application>
- </manifest>
Gowtham RajamanickamPosted Apr 21, 2015, 2:49 AM
it will be help ful for us
Gowtham RajamanickamPosted Apr 21, 2015, 2:49 AM
can u plz share ur source code
Gowtham RajamanickamPosted Apr 21, 2015, 2:48 AM
god one
Hamid NCHPosted Dec 21, 2014, 7:49 AM
Please share your source code, if possible. Best Regards.