

Introduction
In this article, we are going to learn about the SVG Tag in HTML 5. SVG stands for Scalable Vector Graphics and is used to define vector-based graphics for the Web. It defines the graphics in XML format and the XML is then rendered by an SVG viewer. SVG is a W3C recommendation. SVG files can be embedded into HTML pages with <embed>, <object>, or <iframe>.
Browser Support
Internet Explorer 9, Firefox, Opera, Chrome, and Safari support inline SVG.
The complete list of predefined shapes in SVG:
- Rectangle <rect>
- Circle <circle>
- Ellipse <ellipse>
- Line <line>
- Polyline <polyline>
- Polygon <polygon>
- Path <path>
But, here we take a look at SVG Filters.
SVG Filters:
In this tutorial, we will only demonstrate a fraction of the effects that are possible.
The <filter> element is used to define an SVG filter.
The <filter> element has a required id attribute that identifies the filter and all internet SVG filters are defined within an <defs> element.
feGaussianBlur
Example 1
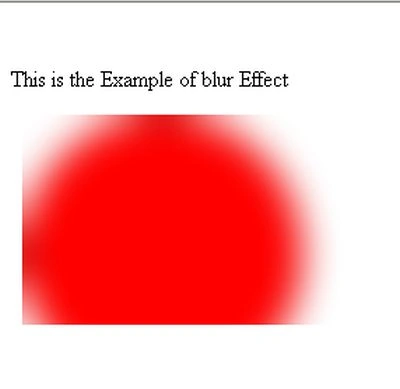
The <feGaussianBlur> element is used to create blur effects:
Here is the SVG code
- <html>
- <body>
- <p> This is the Example of blur Effect </p>
- <svg xmlns="http://www.w3.org/2000/svg" version="1.1">
- <defs>
- <filter id="f1" x="0" y="0">
- <feGaussianBlur in="SourceGraphic" stdDeviation="14" />
- </filter>
- </defs>
- <circle cx="100" cy="100" r="100" stroke="black"
- stroke-width="1" fill="red" filter="url(#f1)" />
- </svg>
- </body>
- </html>
- <html>
- <head>
- <style type="text/css">
- #svg-el-blur { height: 60px; width: 100%; }
- #svg-el-blur text { fill: green; filter:url(#blur-effect-1); font: 50px sans-serif; }
- #svg-el-blur text:hover { filter:url(#blur-effect-2); }
- .lt-ie9 #svg-el-blur text { color: green; }
- </style>
- </head>
- <body>
- <svg id="svg-el-blur">
- <text x="0" y="50">
- SVG Blur
- </text>
- </svg>
- <svg id="svg-effects">
- <filter id="blur-effect-1">
- <feGaussianBlur stdDeviation="0.9" />
- </filter>
- <filter id="blur-effect-2">
- <feGaussianBlur stdDeviation="2" />
- </filter>
- </svg>
- </body>
- </html>

After the mouse hover

feOffset
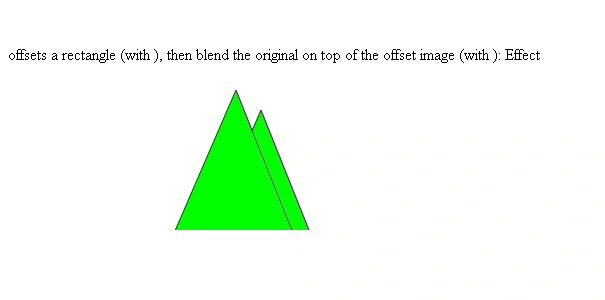
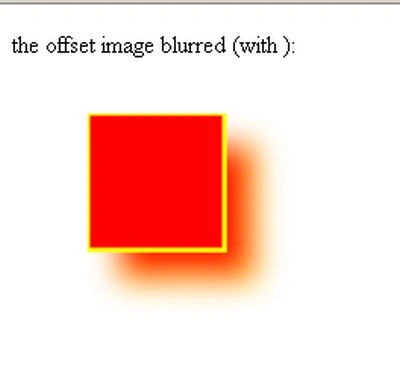
The <feOffset> element is used to create drop shadow effects. The idea is to take an SVG graphic (image or element) and move it a little bit in the xy plane.
feBlend
The <feBlend> element is used tofilter for combining images.
Example - 1
Here is the SVG code:
- <html>
- <body>
- <p> offsets a rectangle (with <feOffset>), then blend the original on top of the offset image (with <feBlend>): Effect </p>
- <svg xmlns="http://www.w3.org/2000/svg" version="1.1">
- <defs>
- <filter id="f1" x="0" y="0" width="200%" height="200%">
- <feOffset result="offOut" in="SourceGraphic" dx="25" dy="20" />
- <feBlend in="SourceGraphic" in2="offOut" mode="normal" />
- </filter>
- </defs>
- <polygon points="220,10 300,210 170,250 123,234"
- style="fill:lime;stroke:purple;stroke-width:1" filter="url(#f1)" />
- </svg>
- </body>
- </html>
- <html>
- <body>
- <p></b> the offset image blurred (with <feGaussianBlur>):</p>
- <svg xmlns="http://www.w3.org/2000/svg" version="1.1">
- <defs>
- <filter id="f1" x="0" y="0" width="200%" height="200%">
- <feOffset result="offOut" in="SourceGraphic" dx="20" dy="20" />
- <feGaussianBlur result="blurOut" in="offOut" stdDeviation="10" />
- <feBlend in="SourceGraphic" in2="blurOut" mode="normal" />
- </filter>
- </defs>
- <rect width="90" height="90" stroke="yellow" stroke-width="3" fill="red" filter="url(#f1)" />
- </svg>
- </body>
- </html>
Sam HobbseditedPosted Apr 26, 2012, 3:56 PMEdited Apr 26, 2012, 3:57 PM
The code works for me in Google Chrome. It works somewhat in Seamonkey 2.8; I think Seamonkey is Fiorefox. It does not work for me iin IE 9 and in Safari 5.1.5. So if others get those results then perhaps we are entering the sample code incorrectly but if so then I did too.