


Introduction
This article shows how to install MongoDB in Windows and communicate using ASP.NET. We will create a simple ASP.NET application that retrieves data from MongoDB.
Create a simple ASP.NET application that retrieves data. You can have a look at my other articles on MongoDB from here.
Installing MongoDB
Installing MongoDB in Windows is very easy and simple. Use the following procedure to get it running
Step 1. Download MongoDB for Windows from "http://www.mongodb.org/downloads".
Step 2. After downloading, create a folder named MongoDB and extract the Zip file into that folder.
That’s all. MongoDB is now installed. We can find many files in the folder, but the key files are
- mongod.exe: The Mongo database
- mongo.exe: The administrative shell
- Mongos.exe: The sharding controller (Sharding is the process of storing data records across multiple machines and is MongoDB’s approach to meeting the demands of data growth.)
Now let's get started by setting up the server and creating a database; use the following procedure to do that.
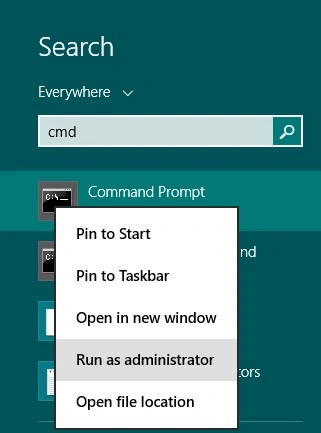
- Step 1. Open the command prompt in administrator mode as shown and go to MongoDB’s directory. (The folder where we extracted the Zip content.) For mine, the folder name is Mongodb.
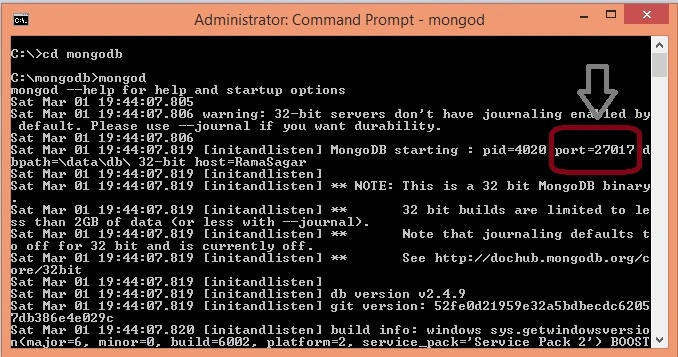
- Step 2. Type "mongod" and press Enter. And MongoDB has started. It uses port 27017 by default, as shown below.
- Step 3. Now open another command prompt and go to MongoDB’s directory. Type"mongo". This command will connect to the default test database.
MongoDB is schemaless and contains no table or relation. It maintains a collection of data. So, for now, to keep things simple, Let's create a “Students” collection in the “test” database with a student “studentId = P1 and Name = Anonymous”. Just type the following command
db.students.insert({studentId:"P1",Name:"Anonymous"})

Let's check whether or not the student's collection was created by issuing the command
show collections

Let us find the data in the collection by issuing
db.students.find()

We can see our data in the collection.
Now let's retrieve the data using an ASP.NET application.
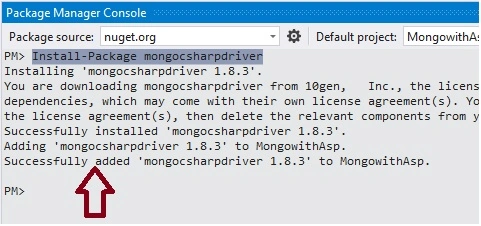
Create an ASP.NET application and add the mongocsharpdriver using the package manager console, as shown below.
Install-Package mongocsharpdriver
Now let's define the connection string for the MongoDB server. By default, it runs on port 27017, So define the connection string inside the "web.config" file as in the following
<?xmlversion="1.0"encoding="utf-8"?>
<!--
FormoreinformationonhowtoconfigureyourASP.NETapplication,pleasevisit
http://go.microsoft.com/fwlink/?LinkId=169433
-->
<configuration>
<system.web>
<compilationdebug="true"targetFramework="4.5"/>
<httpRuntimetargetFramework="4.5"/>
</system.web>
<appSettings>
<addkey="connectionString"value="Server=localhost:27017"/>
</appSettings>
</configuration>
Our application is now ready to communicate with MongoDB.
Now create a helping class named "studentinfo" that contains "_id" that is an ObjectId type and uses MongoDB. Bson, studnetId, and Name; all are string types.
using MongoDB.Bson;

namespaceMongowithAsp
{
publicclassstudentsinfo
{
publicObjectId_id{get;set;}
publicstringstudentId{get;set;}
publicstringName{get;set;}
}
}
Now, create a simple button and a label, as shown below
<%@PageLanguage="C#"AutoEventWireup="true"CodeBehind="retreivedata.aspx.cs"Inherits="MongowithAsp.retreivedata"%>

<!DOCTYPEhtml>

<htmlxmlns="http://www.w3.org/1999/xhtml">
<headrunat="server">
<title>ASP.NETwithMongo</title>
</head>
<body>
<formid="form1"runat="server">
<div>
<h1></h1>
<asp:ButtonID="showButton"runat="server"Text="ShowStudents"OnClick="showButton_Click"/>
</div>
<asp:LabelID="nameLabel"runat="server"></asp:Label>
</form>
</body>
</html>
And write the following code for the button click event
using MongoDB.Driver;
using System;
using System.Collections.Generic;
using System.Configuration;

namespace MongowithAsp
{
    public partial class retreivedata : System.Web.UI.Page
    {
        string name = "";

        protected void Page_Load(object sender, EventArgs e)
        {

        }

        protected void showButton_Click(object sender, EventArgs e)
        {
            List<studentsinfo> names = new List<studentsinfo>();
            MongoServer server = MongoServer.Create(ConfigurationManager.AppSettings["connectionString"]);
            MongoDatabase myDB = server.GetDatabase("test");
            MongoCollection<studentsinfo> Students = myDB.GetCollection<studentsinfo>("students");

            foreach (studentsinfo Astudent in Students.FindAll())
            {
                name = name + " " + Astudent.Name;
                names.Add(Astudent);
            }

            nameLabel.Text = name;
        }
    }
}
We have created an instance of MongoServer using the connection string, and by iterating through the collection, we are getting the individual student and adding it to the "names" list.
Let's debug to check the output.

Summary
In this article we saw how to use MongoDB with an ASP.NET application. I hope you have understood how easy it is to access MongoDB in an ASP.NET application.
Join the conversation! Your thoughts help the community grow.