

Introduction
In this article, I describe how to work a button in Android when it is clicked or pressed. In this article, I develop an action that can be performed by a button, as you will see in the output of my application.
Here, first of all, we must create a new Android application project in Android. Then we will use the instructions provided here.
Step 1
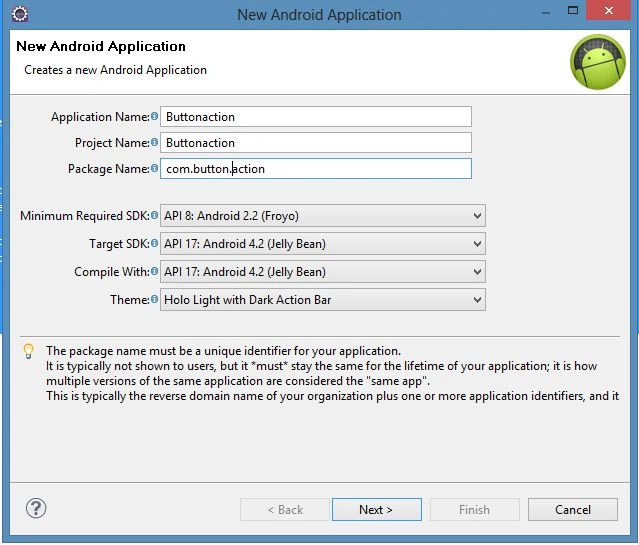
In this step create a new application as shown below using "File" -> "New" -> "Android Application Project".
Step 2
In this step we will open "activity_main.xml" and update it as in the following:
- <RelativeLayout xmlns:android="http://schemas.android.com/apk/res/android"
- xmlns:tools="http://schemas.android.com/tools"
- android:layout_width="match_parent"
- android:layout_height="match_parent"
- tools:context=".MainActivity" >
- <Button
- android:id="@+id/button1"
- android:layout_width="wrap_content"
- android:layout_height="wrap_content"
- android:layout_alignParentTop="true"
- android:layout_centerHorizontal="true"
- android:layout_marginTop="16dp"
- android:text="@string/click_btn" />
- <TextView
- android:id="@+id/textView1"
- android:layout_width="wrap_content"
- android:layout_height="wrap_content"
- android:layout_alignParentBottom="true"
- android:layout_alignParentLeft="true"
- android:layout_alignParentRight="true"
- android:layout_below="@+id/button1"
- android:text="@string/txt_view"
- android:textAppearance="?android:attr/textAppearanceMedium" />
- </RelativeLayout>
Step 3
In this step I will open "string.xml" and update it as in the following:
- <?xml version="1.0" encoding="utf-8"?>
- <resources>
- <string name="app_name">ButtonAction</string>
- <string name="hello_world">Hello world!</string>
- <string name="menu_settings">Settings</string>
- <string name="click_btn">Click Here</string>
- <string name="txt_view"></string>
- </resources>
Step 4
In this step, I will open my "MainActivity.java" file from my project and I will update it with my logic as in the following:
- package com.example.buttonaction;
- import android.app.Activity;
- import android.os.Bundle;
- import android.view.Menu;
- import android.view.View;
- import android.view.View.OnClickListener;
- import android.widget.Button;
- import android.widget.TextView;
- public class MainActivity extends Activity {
- int flage=1;
- Button btn;
- TextView tv;
- int i=1;
- @Override
- protected void onCreate(Bundle savedInstanceState) {
- super.onCreate(savedInstanceState);
- setContentView(R.layout.activity_main);
- btn=(Button) findViewById(R.id.button1);
- tv=(TextView) findViewById(R.id.textView1);
- btn.setOnClickListener(new OnClickListener() {
- @Override
- public void onClick(View v) {
- // TODO Auto-generated method stub
- if(flage==1)
- {
- switch(i)
- {
- case 1:
- tv.setText(i+" You Clicked Successfully ");
- break;
- case 2:
- tv.setText(i+" You Clicked Successfully ");
- break;
- case 3:
- tv.setText(i+" You Clicked Successfully ");
- break;
- case 4:
- tv.setText(i+" You Clicked Successfully ");
- break;
- case 5:
- tv.setText(i+" You Clicked Successfully ");
- break;
- case 6:
- tv.setText(i+" You Clicked Successfully,\n Now you are going to finish this app. ");
- break;
- default:
- }
- flage=0;
- i++;
- }
- else if(flage==0)
- {
- tv.setText(" ");
- if(i>6)
- {
- finish();
- }
- flage=1;
- }
- }
- });
- }
- @Override
- public boolean onCreateOptionsMenu(Menu menu) {
- // Inflate the menu; this adds items to the action bar if it is present.
- getMenuInflater().inflate(R.menu.activity_main, menu);
- return true;
- }
- }
Step 5
And if we need an update in "Manifest.xml" I will also update it as in the following code.
- <?xml version="1.0" encoding="utf-8"?>
- <manifest xmlns:android="http://schemas.android.com/apk/res/android"
- package="com.example.buttonaction"
- android:versionCode="1"
- android:versionName="1.0" >
- <uses-sdk
- android:minSdkVersion="8"
- android:targetSdkVersion="17" />
- <application
- android:allowBackup="true"
- android:icon="@drawable/ic_launcher"
- android:label="@string/app_name"
- android:theme="@style/AppTheme" >
- <activity
- android:name="com.example.buttonaction.MainActivity"
- android:label="@string/app_name" >
- <intent-filter>
- <action android:name="android.intent.action.MAIN" />
- <category android:name="android.intent.category.LAUNCHER" />
- </intent-filter>
- </activity>
- </application>
- </manifest>
Output
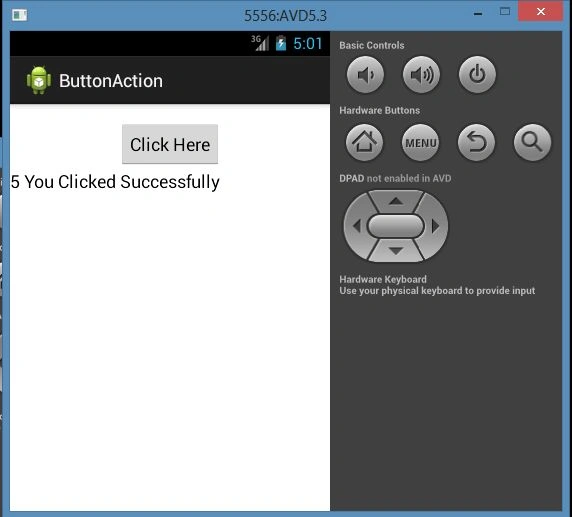
In the output, you will see on the first 5-6 clicks that this button will work and after 6 clicks it will self-destroy because here I use the finish() method.
You can see the Output below.
Output on the first click:

Output on 5th click:
Output on 6th click:

Output after 6th click and before Auto Destroy:

Join the conversation! Your thoughts help the community grow.