Microsoft provides a host of project template wizards for creating your initial projects. These include template wizards for creating a Console Application, a Windows Service, a Windows Form Application, a Control Library and much more. So what do these project wizards consist of? The table below illustrates the list of files included in a typical Project Wizard Template.
| Template Component |
Description
|
.vsz File
|
This file is a text file containing information on which Wizard Dispatch interface to call, and the parameters to pass to the wizard. The default wizard is VsWizard.VsWizardEngine |
.vsdir file
|
A File containing a list of Wizards and where there vsz files are located. It also contains information on where to find icons for the wizard. This file is used in the initial project template selection screen. |
| Html file |
File containing the UI Form of the wizard |
| Script Files |
A series of Java Script files used to customize the wizards behavior |
Template file
|
A file such as template.cs that contains keywords that can be substituted by the wizard to customize the code to the class, namespace, project, etc. |
| Templates.inf |
A list of templates provided by the wizard |
Table 1 Components of a Wizard Template
Lets examine one of the project template wizards in detail in order to understand how they work. In an effort to learn how the template functions, we will examine the CSharpWinService Wizard. The CSharpEx.vsdir file that contains a list of CSharp template projects is located in C:\Program Files\Microsoft Visual Studio .NET\VC#\CSharpProjects and The CSharpWinService.vsz file for this project can be found there as well. Below is the line in the CSharpEx.vsdir file that contains the information about the Windows Service Wizard:
CSharpWinService.vsz|{FAE04EC1-301F-11d3-BF4B-00C04F79EFBC}|#2349|80
|#2350|{FAE04EC1-301F-11d3-BF4B-00C04F79EFBC}|4556| |WindowsService
Each field in the VSDir file is delimited by the | character. The first field is required and tells the name of the visual studio wizard parameter file(or the vsz file). The next field is an optional GUID that points to a resource file for the wizard. The last GUID appearing in the file points to a dll containing an icon for the project template (this can also be a full path to a dll). The field appearing directly after the icon dll is a resource id to the icon inside the dll. The last field is a default name for the project and appears in the dialog when the project template wizard launches.
Lets take a look now at the vsz file shown below:
VSWIZARD 7.0
Wizard=VsWizard.VsWizardEngine
Param="WIZARD_NAME = CSharpWindowsServiceWiz"
Param="WIZARD_UI = FALSE"
Param="PROJECT_TYPE = CSPROJ"
This file takes the form of the old INI file (you may recall this from way back in the days of Windows 3.1). The second line indicates the program ID of the wizard engine to use. This program ID is read from the Windows registry and associated with a program with a Dispatch interface. The default wizard engine is the one shown in this file. You can use your own wizard simply by changing the dispatch program id that represents your custom dll. Well show you how to do this later in the article. The last 3 lines are parameters for the engine. Below are descriptions of some parameters in this file used by the default Wizard Engine.
| Parameter for Wizard Engine |
Description
|
SCRIPT_PATH
|
Where the wizard's java script files are located. By default, its a subfolder directly under the WIZARD_NAME folder called Scripts
(In our exampleCSharpWindowsServiceWiz\Scripts\1033). The default java script is called default.js. It also uses a file called common.js for some common scripting functionality (located in \Microsoft Visual Studio .NET\VC#\VC#Wizards\1033) |
TEMPLATES_PATH
|
Where the wizard's template files are located. By default, its a subfolder directly under the WIZARD_NAME folder called Templates. (e.g.CSharpWindowsServiceWiz\Templates\1033) |
WIZARD_NAME
|
The name of the relative Wizard Folder containing the template information. In our example the relative folder is CSharpWindowsServiceWiz and the absolute folder would be: C:\Program Files\Microsoft Visual Studio .NET\VC#\VC#Wizards\CSharpWindowsServiceWiz |
| WIZARD_UI |
A Boolean indicating whether the wizard has a User interface or not. |
PROJECT_TYPE
|
Indicates what programming language folder the wizard is grouped under. For Visual C# (CSPROJ) the wizard is located under C:\Program Files\Microsoft Visual Studio .NET\VC#\VC#Wizards |
Table 2 - VSWizard Parameter Options
So to reiterate the vsz and vsdir file go into C:\Program Files\Microsoft Visual Studio .NET\VC#\CSharpProjects. The vsdir contains the COM Dispatch program id of which wizard engine to use. The vsz file contains the name of the folder of where to locate the templates and the scripts (indicated by the WIZARD_NAME variable). The scripts are located in \Microsoft Visual Studio .NET\VC#\VC#Wizards\[WIZARD_NAME]\Scripts\1033 and by default the script is default.js.
The Java Script in the script folder called default.js extends the behavior in the common.js file and allows you to perform custom functionality for your wizard as well as respond to events thrown by the wizard. Below the default java script provided by Microsoft responds to the OnFinish event of the VSWizard (Ive added some comments to help the reader understand what is going on):
Listing 1 The OnFinish event handler from default.js
function OnFinish(selProj, selObj)
{
var oldSuppressUIValue =
true;
try
{
oldSuppressUIValue = dte.SuppressUI;
// Get the Project path from the wizard
var strProjectPath = wizard.FindSymbol("PROJECT_PATH");
// Get the Project name from the wizard
var strProjectName = wizard.FindSymbol("PROJECT_NAME");
// create a safe name from the project name (this call is in
// common.js)
var strSafeProjectName = CreateSafeName(strProjectName);
// Add an additional symbol called SAFE_PROJECT_NAME and associate it
// with the safe project name we created
wizard.AddSymbol("SAFE_PROJECT_NAME", strSafeProjectName);
var bEmptyProject = 0;
//wizard.FindSymbol("EMPTY_PROJECT");
// Create the CSharpPRoject pasing in the Project Name, the Project
// Path, and the default project name (this call is in common.js)
var proj = CreateCSharpProject(strProjectName, strProjectPath,
"DefaultWinExe.csproj");
// Create the template information file containing the list of template
// files.
var InfFile = CreateInfFile();
if (!bEmptyProject)
{
// Add references specific to Windows Services
AddReferencesForWinService(proj);
// Render each template and add Files specific to the CSharp Project
// that are listed in the template inf file.
AddFilesToCSharpProject(proj, strProjectName, strProjectPath,
InfFile, false);
}
// Save the project
proj.Save();
}
catch(e)
{
if( e.description.length > 0 )
SetErrorInfo(e);
eturn e.number;
}
finally
{
dte.SuppressUI = oldSuppressUIValue;
if( InfFile )
InfFile.Delete();
}
}
Upon completion, the wizard calls the OnFinish Event to fill in the templates and generate the project. You can modify OnFinish to suit the needs of your particular project.
You can also modify the template files themselves so they contain specifics for details of the files in your project. Below is a portion of a the template file file1.cs in the CSharp Windows Service Wizards template folder:
Listing 2 Part of a template for creating a class
using
System;
using System.Collections;
using System.ComponentModel;
using System.Data;
using System.Diagnostics;
using System.ServiceProcess;
namespace [!output SAFE_NAMESPACE_NAME]
{
public class [!output SAFE_CLASS_NAME] : System.ServiceProcess.ServiceBase
{
/// <summary>
/// Required designer variable./// </summary>
private System.ComponentModel.Container components = null;
public [!output SAFE_CLASS_NAME]()
{
// This call is required by the Windows.Forms Component
// Designer.
InitializeComponent();
// TODO: Add any initialization after the InitComponent
// call
}
The [!output SAFE_CLASS_NAME] would be replaced by the java script with a class name derived from the target name. Below is the code from the function AddFilesToCSharpProject in the common.js file that generates the class name.
Listing 2 Code from common.js that renders the template
if
(!AddItemFile)
{
strTarget = GetCSharpTargetName(strName, strProjectName);
}
else
{
strTarget = wizard.FindSymbol("ITEM_NAME");
}
var fso;
fso = new ActiveXObject("Scripting.FileSystemObject");
var TemporaryFolder = 2;
var tfolder = fso.GetSpecialFolder(TemporaryFolder);var strTempFolder = fso.GetAbsolutePathName(tfolder.Path);
var strFile = strTempFolder + "\\" + fso.GetTempName();
var strClassName = strTarget.split(".");
wizard.AddSymbol("SAFE_CLASS_NAME", strClassName[0]);
In the code above, the target is first derived from the project name and then the class name is derived by stripping the file extension. Finally the class name is associated with the SAFE_CLASS_NAME keyword for rendering the template.
So now you get the idea of how the java script and the template works together in the default wizard. As we stated before, it's possible to bypass all of the java scripting and create the wizard completely in C#. The way to do this is simply to create our own automation object in .NET that inherits the IDTWizard dispatch interface. The IDTWizard is an interface with exactly one method, Execute. Overriding this method allows us to execute the wizard in any way you wish and passes in parameters that help us in accomplishing the task of wizarding the IDE. The steps to creating our wizard are simple. First create a simple dll library in .NET using the New->Project menu and choosing class library.
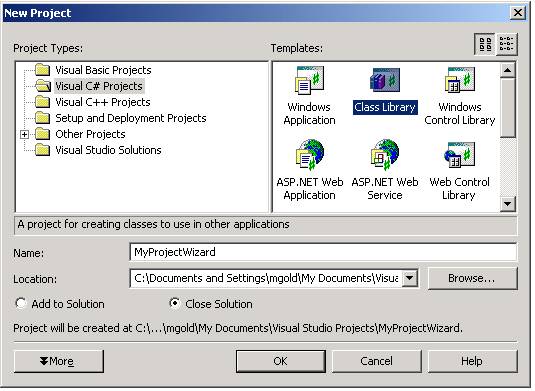
Figure 1 Choosing the project for the custom Wizard dll
In order to use the Windows Forms and EnvDTE assemblies, you will need to manually add these references. To add the references, right click on your solution in the solution explorer and choose Add Reference. Then find the references and add them to your project.
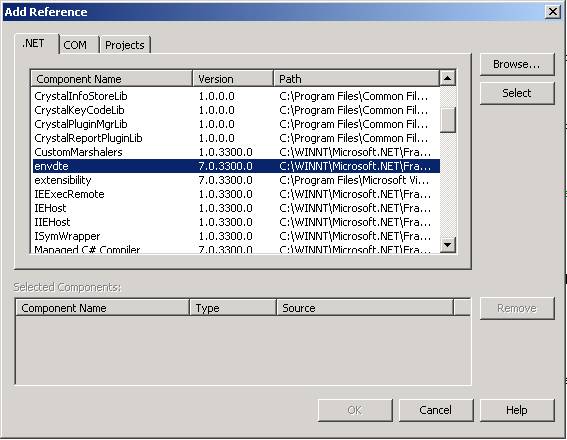
Figure 2 Choosing the references that are not already part of the library
Next, replace class1 with the following code. The class below implements the IDTWizard interface. Notice it contains a program dispatch id attribute above the class definition that allows the vsz file to recognize the wizard:
Listing 3 Class that implements the template wizard functionality
using
System;
using EnvDTE;using System.Windows.Forms;
using System.Runtime.InteropServices;
namespace MyWizard1
{
/// <summary>
/// Summary description for Class1.
/// </summary>
[ProgId("VSWizard.VSCustomWizardEngine")]
public class Class1 : IDTWizard
{
public Class1()
{
//
// TODO: Add constructor logic here
//
}
public void Execute(object Application, int hwndOwner, ref object[] ContextParams, ref
bject[] CustomParams, ref EnvDTE.wizardResult retval)
{
_DTE IDEObject = (_DTE)Application;
WizardPage TheFirstPage = new WizardPage();
if (TheFirstPage.ShowDialog() == DialogResult.OK)
{
CreateProject(IDEObject, TheFirstPage.ProjectName,
TheFirstPage.DirectoryName);
}
}
After you build the project, youll also need to register the dispatch interface using egasm.exe so that the IDE can find the wizard through the vsz file. Simply run regasm.exe on your MyWizard1.dll assembly. Also, I noticed that the wizard dll assembly has to either be in the local path with the devenv.exe (the absolute path is C:\Program Files\Microsoft Visual Studio .NET\Common7\IDE\devenv.exe) or you need to make MyWizard1.dll a strong named assembly that is placed in the GAC(anotherwords a shared assembly). Otherwise the development environment has no clue where to find the wizard. (You would think it wouldnt matter since we registered it in the registry, but with .NET, what really gets registered by regasm is the mscoree.dll with the absolute name of the assembly and public key token). In the Visual Studio IDE, I changed the output path of my project to point to the IDE directory so the assembly is kept local and so I didn't have to keep copying the file all the time:
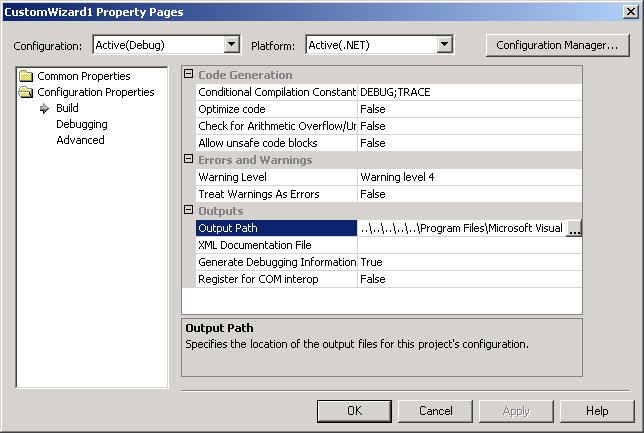
Figure 3 - Project Properties window with Output Path changed
Also the name of the wizard engine needs to be updated in the vsz file shown below:
VSWIZARD 7.0
Wizard=VSWizard.VSCustomWizardEngine
Param="WIZARD_NAME = CSharpCustomServiceWiz"
Param="WIZARD_UI = FALSE"
Param="PROJECT_TYPE = CSPROJ"
As we stated before, you'll also need to list the CSharpCustomServiceWiz in the vsdir file with the other CSharp Project Templates so the IDE can find the vsz file. You don't need scripts in this case, because all of the functionality is handled by the custom engine.
Thats all there is to plugging your Wizard into the framework. Now you can add any code you wish to the Execute method to create a project. You can use the Application object parameter passed into Execute to help build your project. The Application object is the root automation object of the IDE and can be unboxed with the extensibility (_DTE) class to be used to manipulate the environment.
For example: Say we wanted to create a solution from a solution project template and save it to the disk. Also we want to provide our own wizard interface and not the one provided by the VSWizard. Inside our wizard project, we can simply create a dialog based on a Window Form and then prompt for the information our wizard needs. Then well take advantage of the Extensibility interface to create our solution.
Our WizardPage dialog is created simply by adding a Windows Form to our Wizard Project. The Dialog is shown below:
