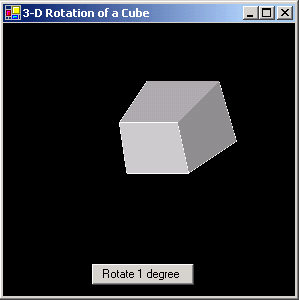
Figure 1 - 3-D Rotation of a Cube on a Windows Form
As I was trying to think of an article to write on GDI+, I started looking through some of my old programming books and came across Tricks of the Game Programming Guru. There are good explanations in this book of the Ray Tracing Algorithm, the Painter's Algorithm, Z-Buffering, 3-D Sprite Manipulation, and (relevant to this article) dealing with a 3-D Coordinate System. The 3-D Coordinate system is shown below:
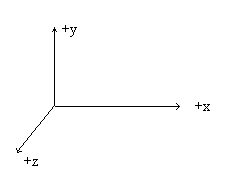
Figure 2 - 3D Coordinate system
This coordinate system consists of an x, a y and a z axis. The z axis is coming out from the screen towards you. As with a 2D Coordinate system, translation, scaling and rotation can all be handled using Matrix mathematics. The only difference is we are now translating, rotating, and scaling in 3 dimensions instead of 2. Translation, Scaling, and Rotation are all handled by 4x4 matrices.
To Translate a 3-D Object, you would multiply each vertices of the object by the matrix below:
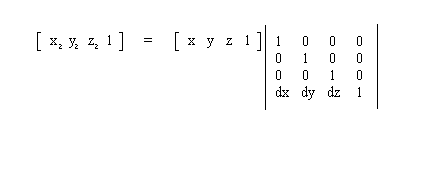
Figure 3 - Translation in 3-D Space
Scaling is done with a scale factor multiplied by the identity matrix:
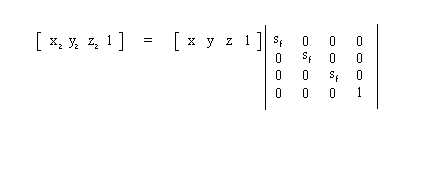
Figure 4 - Scaling a Point in 3D Space
And Rotation is done with trigonometric functions in the matrix. Because Rotation can be done either along the x, y, or z axis, there is a different rotation matrix for each of the axises:
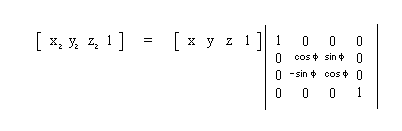
Figure 6a - Rotation around the X axis
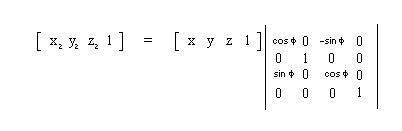
Figure 6b - Rotation around the Y axis
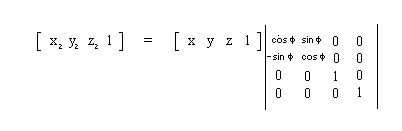
Figure 6c - Rotation around the Z axis
After looking at all these 3D equations, a question may arise in your mind. How the heck do I show a 3D object on a 2 Dimensional PC Monitor? The way this is done is with a clever mapping that fools the eye into seeing depth called perspective projection. Perspective projection relies on the fact that smaller things seem farther away. To project our 3D object onto a 2D screen we need to "throw away" the z component and scale the x and y components based on the z component. Therefore the points that have a larger z component, will appear farther away from the viewer. Also we need to multiply by a viewing distance factor to scale the image into view. Below is the formula for calculating the coordinates:
x p = distance_value * x/z;
y p = distance_value * y/z;
Hence we have a "3-D" coordinate in 2D Space so we can plot it on the computer.
Now that we have all the tools we need to play around in a 3-D coordinate system, let's lay out a simple design for drawing 3-D Objects. This architecture is a simple composite design consisting of an Object which consists of polygons which consists of points. There is also a matrix class used to do the transformations on the points. Methods for rotating, translating, and scaling the points are propogated through the shape to the polygon class and finally to the 3-D point class. The 3-D projection mentioned above is automatically calculated when drawing the shape.

Figure 7 - UML Design of Simple 3-D Library reverse engineered using WithClass 2000
We use the library to construct a simple cube by passing the coordinates of 6 square polygons. Then we translate and scale the cube so that we can see it large enough on the form:
private void CreateCube()
{
TheCube.AddPolygon(new ThreeDPoint[]{
new ThreeDPoint(0, 0, 0),
new ThreeDPoint(0, 1, 0),
new ThreeDPoint(1, 1, 0),
new ThreeDPoint(1, 0, 0),
new ThreeDPoint(0, 0, 0)
});
TheCube.AddPolygon(new ThreeDPoint[]{
new ThreeDPoint(0, 0, 0),
new ThreeDPoint(0, 0, 0.5f),
new ThreeDPoint(0, 1, 0.5f),
new ThreeDPoint(0, 1, 0),
new ThreeDPoint(0, 0, 0)});
TheCube.AddPolygon(new ThreeDPoint[]{
new ThreeDPoint(0, 0, 0),
new ThreeDPoint(0, 0, 0.5f),
new ThreeDPoint(1, 0, 0.5f),
new ThreeDPoint(1, 0, 0),
new ThreeDPoint(0, 0, 0)});
TheCube.AddPolygon(
new ThreeDPoint[]{
new ThreeDPoint(1, 1, 0),
new ThreeDPoint(1, 1, 0.5f),
new ThreeDPoint(0, 1, 0.5f),
new ThreeDPoint(0, 1, 0),
new ThreeDPoint(1, 1, 0)
});
TheCube.AddPolygon(
new ThreeDPoint[]{
new ThreeDPoint(1, 0, 0),
new ThreeDPoint(1, 0, 0.5f),
new ThreeDPoint(1, 1, 0.5f),
new ThreeDPoint(1, 1, 0),
new ThreeDPoint(1, 0, 0)
});
TheCube.AddPolygon(
new ThreeDPoint[]{
new ThreeDPoint(0, 0, 0.5f),
new ThreeDPoint(0, 1, 0.5f),
new ThreeDPoint(1, 1, 0.5f),
new ThreeDPoint(1, 0, 0.5f),
new ThreeDPoint(0, 0, 0.5f)
});
// scale the cube 50x
TheCube.Scale(50);
// translate the cube to position 100, 100, 100
TheCube.Translate(new float[]{100, 100, 100});
}
Listing 1 - Creating the 3D Object
The translate, rotate, and scale functions use a Vector multiplication method found in the Matrix class which multiplies a 3-D Point by the transformation matrix:
public float[] VectorMultiply(float[] vector)
{
float[] result = new float[4];
// Multiply the vector by the matrix multiplying the transposed matrix elements and summing
// to form a new element
for (int i = 0; i < 4; i++)
{
for (int j = 0; j < 4; j++)
{
result[i] += vector[j] * Elements[j,i];
}
}
return result;
}
Listing 2 - Multiplying the 3-D Point by the transformation matrix
Painting the Object
Another aspect of drawing a 3-D Shape is painting it so it looks more realistic and not just some wire sculpture. Texturing and painting is accomplished by filling in the polygons that make up the 3D Object. The thing is, you can't just fill the polygons in using some random order because then the surfaces in the front could be overshadowed by the surfaces in the back simply because many of the polygons overlap. Therefore we need to put the polygons in an order we can paint them so that the polygons that are hidden are supposed to be hidden and those that are exposed are supposed to be exposed to give a correct view of the object. There are a few suggested ways to approach this problem. One is to use the painter's algorithm, which tests different cases of whether the polygons overlap or not and orders them appropriately. The other is to use Z-Buffering which uses the plane equation to find a normal vector of the polygon, and use this vector to order the painting of the pixels. Z-Buffering is often, these days built into graphics boards that utilize fast polygon painting.
In my example, I take the ultra simple approach which works to some extent. I compare each polygon based on the sum of the Z coordinates of each vertices. I use the IComparable interface to sort the polygons in an ArrayList based on whether this sum is greater or less than the previous polygon. This algorithm of course falls apart if you are implementing it on an object that is not concave and has many different shaped polygons, but for a cube it seems to work for the most part.
Shading is accomplished by assigning a grayscale color (where in argb, r = g = b) to each of the facets based on the order of the polygons. The lightest color is assigned to the polygon that is painted last (the polygon in the front). This gives the illusion that the cube is illuminated from the front. Below is the code in the ThreeDObject class that draws all the polygons
public void Draw(Graphics g)
{
// draw each polygon in the ArrayList's order and fill them
for (int i = 0; i < Polygons.Count; i++)
{
((ThreeDPolygon)Polygons[i]).Draw(g);
// Fill the polygon with lighter and lighter grayscale colors
((ThreeDPolygon)Polygons[i]).Fill(g, Color.FromArgb(i*30 + 50, i*30 + 50, i*30 + 50));
}
}
The form includes a button that rotates the 3-D Cube each time it is pressed. This library currently has support for rotating around the X axis:
// Button Handling Event
private void button1_Click(object sender, System.EventArgs e)
{
// Sort the polygons for painting
TheCube.SortPolygonsInZOrder();
// Rotate the cube around its center 1 degrees around the X Axis
TheCube.RotateAt(TheCube.GetCenter(), 1);
Invalidate();
}
Improvements
The Painting algorithm can be improved to implement one of the painting algorithms mentioned in this article. Also, the next step in this library is to add texturing capability so you can draw some really cool object. Anyway, have fun in the 3-D World!