Hi all. Thank you for the response you gave for my previous publish "Authenticating users and Role Management in ASP.NET 2.0 Using SqlServer-2005: Part I"
In this article, I want to share some more information related to Role Management in ASP.NET 2.0 Using Sql Server 2005. As I had already discussed the basic concepts in the role management, now its time to go for even more clear picture of that.
"Role Management" is the concept used to ease the perspectives different users have on the same application.
For example, a (normal) user cannot have the authentication to view what type of privileges the administrator has on the application; he (user) cannot also view the privileges other users have on the application.
To Achieve that using ASP.NET 2.0, we need to use "Web Administration Tool" to create the users and then assign roles to them.
As we have already seen how to create single users and multiple users (in the previous publish), now we will go for the role management for each user.
To have a clear picture of that, first we need to create separate pages for administrator and users or you can also assign the pages to different users.
Go to "web administration tool" once again and add different users as shown below:
(To navigate to the web administration tool, the simple way is right click on login control, which is on your default page, and select smart tag. In the smart tag you can find "Administer Website". Click on that and you will be directed to the Tool.)
Step 1: Click on Security tab.
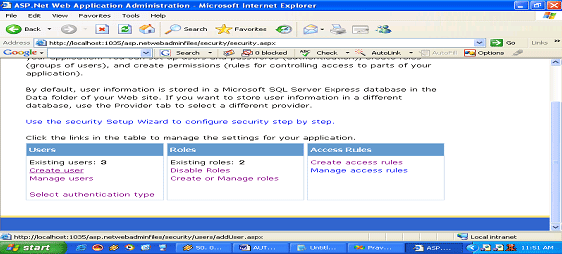
Step 2: In the Users option, Click on "Create Users" Link to create new users. (Refer fig: Step 2 below)
Fig step 2:
Step 3: A screen will appear to add a new user. (Refer fig step 3 below)
(Refer my previous publish to have an idea of creating a new user.)
Fig step 3:

Step 4: Give all the details required and remember the password constraints SqlServer-2005 provides for entering the passwords(that we had already discussed.)
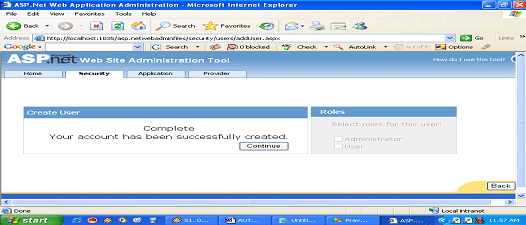
Step 5: After successfully creating the user, you will be getting a confirmation page(similar to fig :step 5) that the user is added.
Press "continue" button to create another user / "Back" button to navigate to the "Security Tool " main page.
I suggest you to add another user so that we can have a view of how to assign roles to users of the same category.(for example user1,user2 ...)
Fig step 5:
To check out the number of users existing, you can have a view at the security main page "Existing Users".
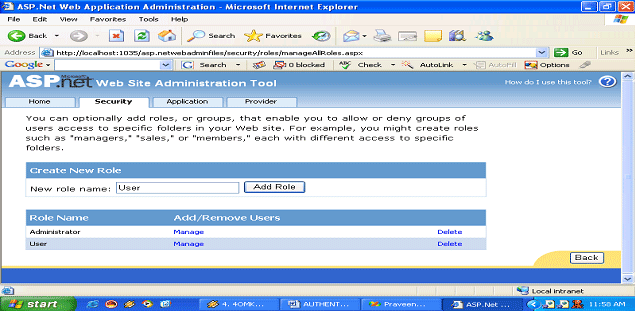
Step 6: Now that you have created two types of users .Now click on Add roles /Create or Manage Roles in the "Roles".
Fig step 6:

Step 7: You will be directed to a screen something similar to the one shown below(Refer Fig Step 7)
If you don't have a role called "User" then type "User" in the text box (as shown in the fig step 7) and press Add role. You can see the role added in the same page.
Fig Step 7:
Step 8: After adding the roles, click on back to navigate to the Security Home Page.
Step 9: So up to now you are done with creating users and adding roles to the users. Now we need to create access rules for each user or a group of users depending on your requirement.
Step 10: Click on "Create Access Rules" to add access rules for different users.
Before navigating to create access rules just move to your development window and add a folder and name it as "user1". (To add a folder to the project, right click on the item just below the "solution" in the solution explorer the one higlighted in blue color(c:\website2\) in ref fig step 10).
Fig Step 10

Add another folder in the same manner and name it as "user2".
Note: This is only to differentiate different users as per the user role basis; it's not a compulsion that this has to be done only in this way. You can have your own way of doing that.
Step 11: By adding the folders your project solution explorer looks similar to the one in fig: step 10.
Step 12: Now Revert back to Web Application Administrator Tool and click on the "create access rules" link. (Ref fig step 12).
Fig Step 12:

Step 13: You will be redirected to a page similar to the one shown below (refer fig step 13)

Step 14: in this page as you can observe we have three different options:
- Select a different directory for this rule
- Rule applies to
- Permissions.
We will see each option in detail:
- "Select a different directory for this rule"-is the one where we you can select or deselect the directories you assign for each user or to the administrator.
For example, if you want to assign the directory "user1" only to user1 and not user2, then you can select that directory and select user1 from "Rule applies to" and allow option from "Permissions".
- "Rule applies to"---is the one where you will be selecting the user /users /admin for that specific directory to access.
- "Permissions"---is the one where you will be giving the actual permissions i.e. to accept or deny the user for that particular directory.
If you are not exactly clear of what Iam telling lets see an example also.
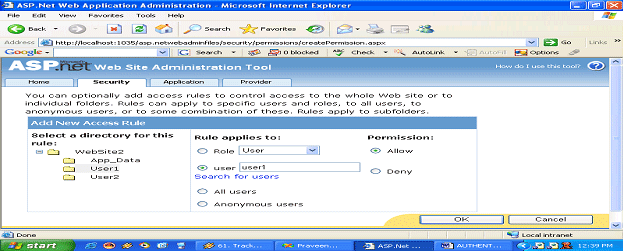
Here I am trying to assign user1 directory only to user1 and administrator whereas user2 cannot access that directory. Lets see how to do that.
Step 15: Select user1 directory from "Select a different directory for this rule". Whenever you select a directory that will be visualized as gray in color. (Ref fig step 15 to observe that).

Step 16: Now our job is to assign that directory to user1 and Administrator. So select "Administrator" from Rule applies to and Select "Allow" from Permissions. Now the screen should look something similar to the one above (fig step 15). Press ok and that role will be assigned with the specified one.
As soon as you click "OK" button, you will be automatically redirected to the "Security Home Page". Now click on "Create access rules" again to assign the same to User1 also. (Refer fig: step 12).
Step 17: Now select "user" from the role dropdown box and type "user1" in the textbox provided beside user. Again select "allow" from permissions as you have did earlier.
The screen will be similar to the one below (fig step 17).
Fig Step 17:
Step 18: So now that you have assigned that directory to user1 and administrator. Now we need to restrict user2 to access that directory.
To achieve that you repeat the same process as you have done for "user1", but at Permissions select "Deny" instead of "Allow".
The page will look similar to the one below (fig step 18).
Fig Step 18:

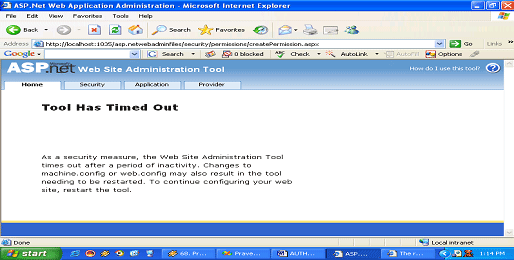
(Note: If you are working with the Web Administration Tool" for much a long time you may get an timeout page, similar to the one below. Don't worry; it's not an error. It is implemented only as per the security aspects. If you come across that type of page, close the page and again open that from the Login Control "Smart Tag" option.)
Now we are done with assigning the things at the web administration tool. Now come back to your development page to test that.
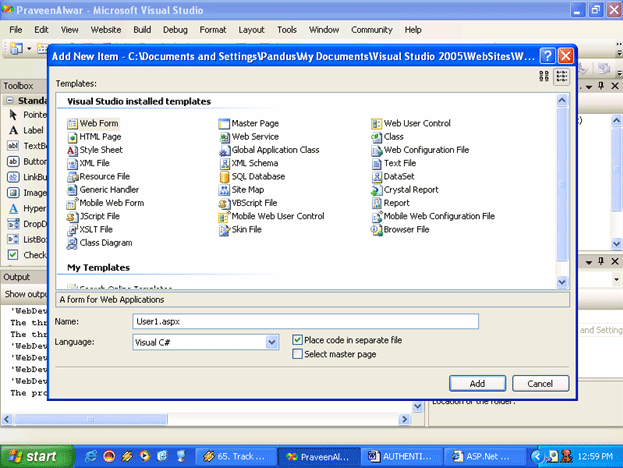
Step 19: Navigate to "Solution Explorer" and select "User1" directory. Right click on that and select "Add New Item" and from the items select "WebForm" and name that form as "User1.aspx". (Refer to the fig step 19). Click on "Add" to add that page.
Repeat the same process and a page to "User2" directory also.
Fig Step 19:
Step 20: You can see a new page is been added to your "User1" directory. I am not doing anything with that page as if now. Initially we will only check the role functionalities. So, I am leaving that page empty.
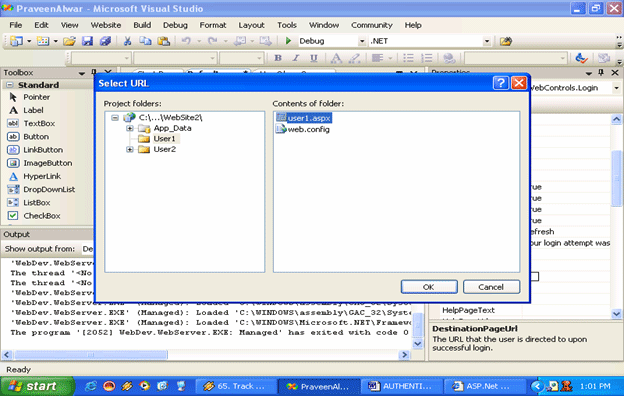
Step 21: Navigate to the page where you have placed your login control and select the login control and press "f4" to view the properties of that control. If you observe clearly, you can find a property "Destination Page URL". And In the property value, you can find a button to select which page you want to refer. You can click on that to select the page. You can find a pop up window similar to the one after doing that. Select "user1" directory from Project Folders and select "user1.aspx" from the Contents of the folder ss shown below. (Fig step 21). Click on "OK".
Fig Step 21:
Step 22: Navigate to "Website" Menu and select "Start Options" to set the login page as our initial page to execute in our application. You will see a page similar to the one below.
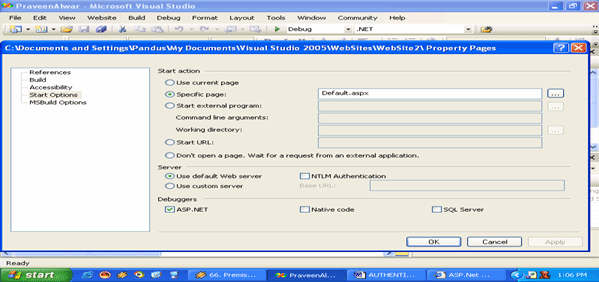
Select the page where you placed your login control .i have selected "default.aspx" because I have placed login control on to that page. After selecting the page, Click on "OK" below to save the changes. Yup, everything is over and now its time to execute the application. Just execute the application and you can see the login page as your default page.
Login to the application as "user1" with the password you gave while creating the user and you can see the page will be redirected to the user1.aspx in the address bar.
Try the same by logging as "administrator". You can see the same page.

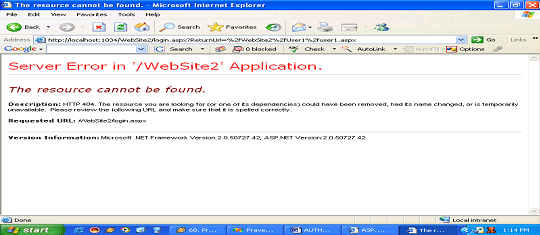
Now its time to check if user2 can access the same page as user1 and administrator are doing.
This time try logging as "user2" with the password you specified while creating this user.
You will be seeing an error page similar to this.
I think its clear for you all as to how to assign different pages/directories to different users.
In my next publish; I will discuss how to assign the pages by overcoming the error pages.