In this FAQ we will quickly run through and get a feel of how WWF (Windows Workflow Foundation) will help you in making custom work flows in your project.
Happy job hunting......
WWF is a programming model for building workflow-enabled applications on windows. System. Workflow namespace has all the necessary modules to develop any type of workflow.
A Workflow is a set of activities, which is stored as model and they depict a process. Below figure depicts clearly the difference between Workflow and Activity. Every task is an activity and group of activity depicts a complete workflow. Workflow is run by the Workflow runtime engine.

Figure 1: - Work Flow Foundation Architecture
Workflow model can be written in pure .NET code, pure XAML or Mix of XAML and .NET Code. A workflow model is compiled and can execute under windows, ASP.NET, Web services or windows services application.
There are two basics type of workflow Sequential Workflow and State machines workflow.
A sequential workflow has clear start and finish boundaries. Workflow controls execution in Sequential workflow. In sequential execution, one task is executed after other. Sequential workflow is more rigid in format and execution path has a deterministic nature.
A State machine workflow is more dynamic in nature. Workflow has states and the state waits for events to help it move to next state. In State machine execution path is undeterministic nature.
Below figure shows visual conceptualization of fundamentals. You can see in Sequential workflow the execution path is very determent. Shiv performs the entire task sequentially and these tasks are very determent. Now have a look at the second workflow. Every state goes to other state when it receives some external events. For instance when Shiv is seeing star trek there is an event of flashing news which triggers him to see the flashing new.
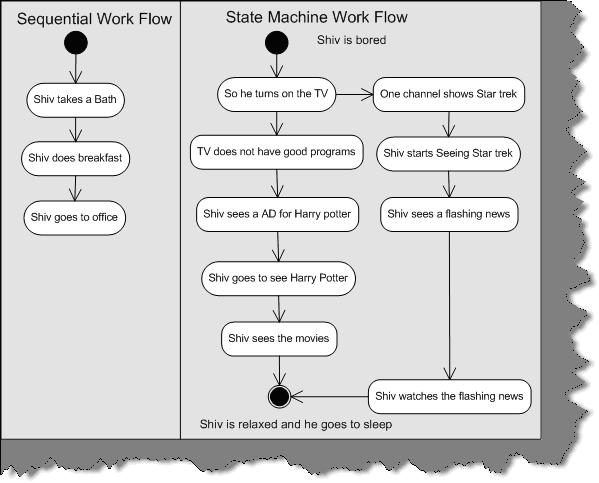
Figure 2: - Sequential and State machine workflow
If the workflow is very rigid then you go for sequential workflow and if the workflow is dynamic then go for State machine workflow. For instance you have placed an order and the order will not pass until your supervisor approves is a rigid flow. Because your order has to be approved by, a supervisor or else it will not be approved. But what if your order moves from one place to other place. For instance, it moves from approval to waiting and then clarification a state machine workflow model is more appropriate.
Below is a simple code snippet which shows practically how to use sequential workflow. Let try to understand step by step as marked in the figure:-
1 - First you need to select System. Workflow namespace.
2, 3, and 4 - In these three steps we created code object and linked them with activity.
5, 6, 7, and 8 - We start the workflow and create workflow instance object to run the sequential workflow. You can see the output in 8. Depending on how you add the activity in section 3, it executes sequentially. Because we have added codeactivity1, first it executes the first activity first. The sequence on how you add the activity to the activities collection the activities are run.
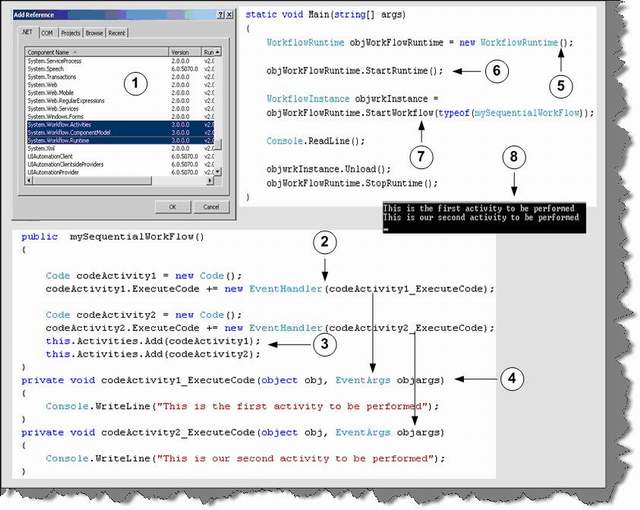
Figure: - 3 Code snippet for workflow
Note: - The above code snippet was developed with out using designer. The whole point was to make you understand what happens behind the scenes. In real projects you will be dependent on designer rather than coding manually. You can find the above code in SimpleWorkFlowSampleManual folder.
As said previously it is very easy to design workflows using designer. So we will answer this question by actually doing a small sample. Below is the code snippet and image snapshot which shows how we can use the designer to create workflows. So lets understand all the below numbered snapshot.
- First select a sequential workflow project. In this case, we have selected Sequential workflow console application to keep the sample simple.
- When you are done with creating the project you will see the solution explorer as shown in the second snapshot. There are two files one the WorkFlow1.cs and the other Workflow1.designer.cs.If you click on the WorkFlow1.cs you will get a designer pane as shown in snapshot 3. If you double click on Workflow1.designer.cs, you will get behind code as shown in snapshot 4.
- So let us drag drop a code activity on the workflow designer and associate this activity with a method called as
MyActivity1. This association is done by entering the method name in Execute Code property. In MyActivity1, we have just displayed in the console that this is my first activity. Again, we have added one more code activity, which points to MyActivity2. If you see the designer pane we have sequenced code1 first and code2 next. So in short, code1 will execute first and the code2. This is clear from the output displayed below.
- This is the behind code of the workflow.
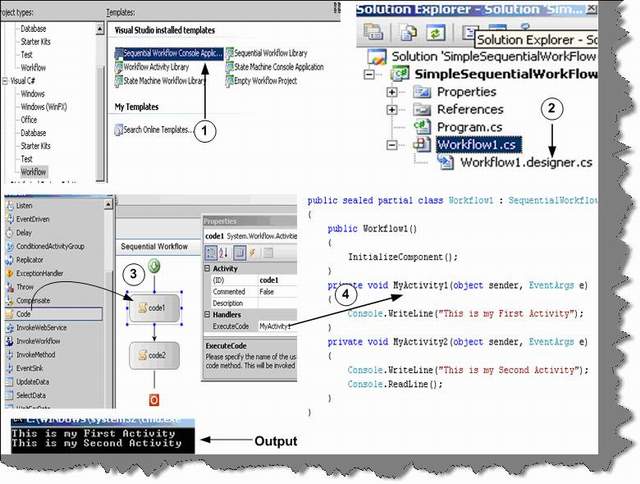
Figure 4 Sequential workflow using designer
Yes, you can define conditions in workflow by using conditionedActivitygroup. Below is the numbered snapshot, which shows how to use conditionedActivitygroup.
- You can see in this snapshot we have defined a conditionedActivitygroup with two conditions. The two boxes inside the group define two conditions.
- You can select one of the condition box and define the condition using the When Conditions property. If this condition is true you need to specify in the execute code which method to execute. For instance in the current snapshot we have said that old1 method should execute if age > 21. The same procedure we need to follow for the second condition box. In the second condition box we have specified to execute young1 method if age < 21. Currently the second condition is not visible in the below snapshot.
- Workflow editor also provides a cool interface called as Rule Condition Editor, which can be used to specify conditions. Age is a public property in the behind code. You can also get the Age in the intelligence of rule condition editor.
- Both the condition will execute inside the condition activity group. We need to also specify when this conditionactivitygroup should exit. Therefore, we have made a function called as exit. If the user inputs age as -1 it will exit from the loop or else it will take inputs from user and continue evaluating depending on the two conditions.

Figure 5:- Sequential workflow with conditions
Exception handling in Workflow is somewhat different than how we do in normal .NET application. Below is the numbered snapshot of how we can handle exceptions in Workflow.
- We have small tab, which says view exceptions. If you click on view exception, you will be redirected to a workflow design only for exception as shown in numbered snapshot 2.
- This is the workflow which will execute incase we have exceptions. We have put a code activity, which points to a method called as raise Exception. Incase of exception in the workflow this path will be followed.
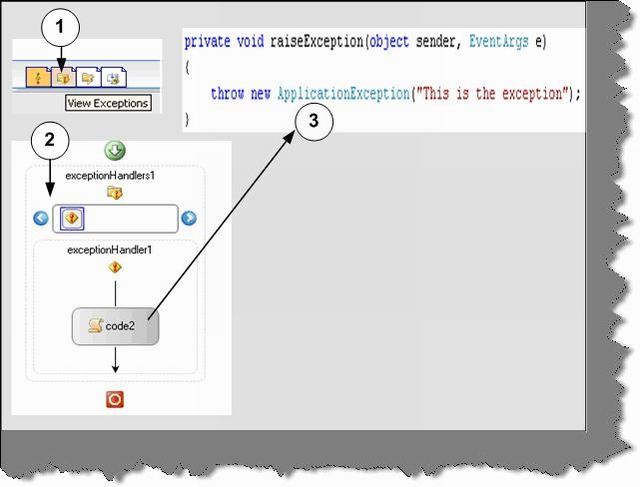
Figure 6:- Workflow with exception handling
Twist: - How can we serialize workflows?
Windows Workflow Foundation gives developers a declarative way to create workflows by using XAML. See WPF chapter for more details about XAML. These markup files are Stored with XOML (Extensible Object Markup Language) extension. In the below snapshot you can see Workflow1.xoml file created by designer. Markup file can also have code behind. The whole concept of having code behind for XOML file is to separate the presentation from logic files.
In the below code snapshot we have made a simple XOML sample. Below is the explanation number wise:
- In order to create a XOML file you need to add sequential workflow with separation. Which means that XOML file will be created with a behind code.
- Currently we have two activity code3 and code1. Below is the XOML file contents:
<?Mapping XmlNamespace="ComponentModel"
	ClrNamespace="System.Workflow.ComponentModel"
	Assembly="System.Workflow.ComponentModel" ?>
<?Mapping XmlNamespace="Compiler"
	ClrNamespace="System.Workflow.ComponentModel.Compiler"
	Assembly="System.Workflow.ComponentModel" ?>
<?Mapping XmlNamespace="Activities"
	ClrNamespace="System.Workflow.Activities"
	Assembly="System.Workflow.Activities" ?>
<?Mapping XmlNamespace="RuleConditions"
	ClrNamespace="System.Workflow.Activities.Rules"
	Assembly="System.Workflow.Activities" ?>
<SequentialWorkflow x:Class="WorkflowSeq.Workflow1"
	x:CompileWith="Workflow1.xoml.cs" ID="Workflow1"
	xmlns:x="Definition" xmlns="Activities">
<Code ExecuteCode="Mycode3" ID="code3" />
<Code ExecuteCode="Mycode1" ID="code1" />
</SequentialWorkflow>
See the above snippet of the XOML file. You can see how the behind code is linked using the Compile With attribute. Code forms the element of the Sequential Workflow tag. One of the best thing with Markup is we can change the sequence just by changing the XOML file we do not need to compile the whole application again.
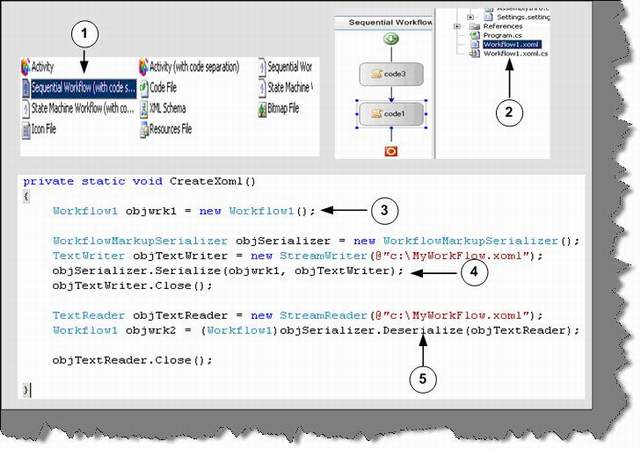
Figure 7:- XOML in action
In the above snapshot, one of the things to now is 3, 4, and 5 numbered sections. These sections are not linked with the sample. But just to make you aware you can create serialize any workflow and deserialize them again using the text writer object.
When you call the start workflow function, you can pass as name / value pairs using the dictionary object.
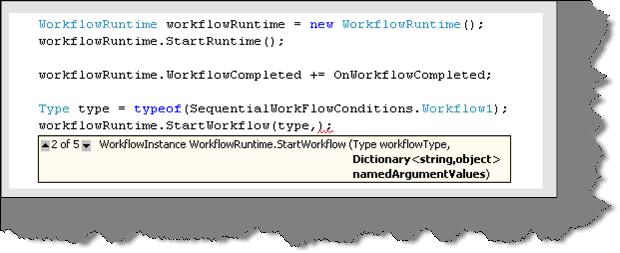
Figure 8:- Passing value to workflow