
Introduction
In this article you will get a basic introduction to Unit Test and will learn how to write Unit Test in C#. Writing a test case is always an important part of software testing. Testing software is always a real challenges for developers and testers, because many types of test cases exists and also come in so many different shapes and sizes. In order to learn how to write good test cases, we must first understand what is a test case and why do we need it. Later we will learn how to write Unit Test using C# language. So let's learn that first
What do you mean by a Unit test?
In the software development process Unit Tests basically test individual parts ( also called as Unit ) of code (mostly methods) and make it work as expected by programmer. A Unit Test is a code written by any programmer which test small pieces of functionality of big programs. Performing unit tests is always designed to be simple, A "UNIT" in this sense is the smallest component of the large code part that makes sense to test, mainly a method out of many methods of some class. Generally the tests cases are written in the form of functions that will evaluate and determine whether a returned value after performing Unit Test is equals to the value you were expecting when you wrote the function. The main objective in unit testing is to isolate a unit part of code and validate its to correctness and reliable.
Read more about Unit Test - https://en.wikipedia.org/wiki/Unit_testing
Why do we need Unit test?
One of the most valuable benefits of using Unit Tests for your development is that it may give you positive confidence that your code will work as you have expected it to work in your development process. Unit Tests always give you the certainty that it will lead to a long term development phase because with the help of unit tests you can easily know that your foundation code block is totally dependable on it.
There are few reasons that can give you a basic understanding of why a developer needs to design and write out test cases to make sure major requirements of a module are being validated during testing,
- Unit testing can increase confidence and certainty in changing and maintaining code in the development process.
- Unit testing always has the ability to find problems in early stages in the development cycle.
- Codes are more reusable, reliable and clean.
- Development becomes faster.
- Easy to automate.
Read more at - http://agiledata.org/essays/tdd.html
Lets start the show – create your first Unit test (step by Ssep)
In this article, I would like to let you know that unit tests are quite easy to use. Unit testing is a way or you can say that process with the help of this a programmer can make themselves sure that their code that is written is fully functional, clean, reliable and will definitely work the same way as it is supposed to work.
One of the fundamental principles of adopting unit testing is to follow a TDD (Test Driven Development) aproach where we have to write tests case first, and then write the simple code that will make the test pass. Here I am going to follow just the opposite approach to make you learn how to write and Test code first with a simple example. Later we will discuss about TDD(Test Driven Development) concept. In this article we are going to follow different approach where we will write simple code first, and then create the Unit Tests based on the possible situations. As discussed earlier, we can also write Tests first, and then write the code that will make the test pass. It depends upon individuals what and which one of the ways they love to follow to test code.
Here I’ve written a basic program which can be easily understandable by any novice who has just started to learn C# and wants to learn how to write unit tests.
public class BasicMaths {
    public double Add(double num1, double num2) {
        return num1 + num2;
    }
    public double Substract(double num1, double num2) {
        return num1 - num2;
    }
    public double divide(double num1, double num2) {
        return num1 / num2;
    }
    public double Multiply(double num1, double num2) {
        // To trace error while testing, writing + operator instead of * operator.
        return num1 + num2;
    }
}
In this program, you can see that there are four basic math functions: Add, Subtract, Divide and Multiply. All the functions have two double datatype parameters.
MS Unit tests
To test the above four methods, we are going to use Microsoft Testing tools, which is MS Unit Test. To add MS Unit Test, follow the steps given below.
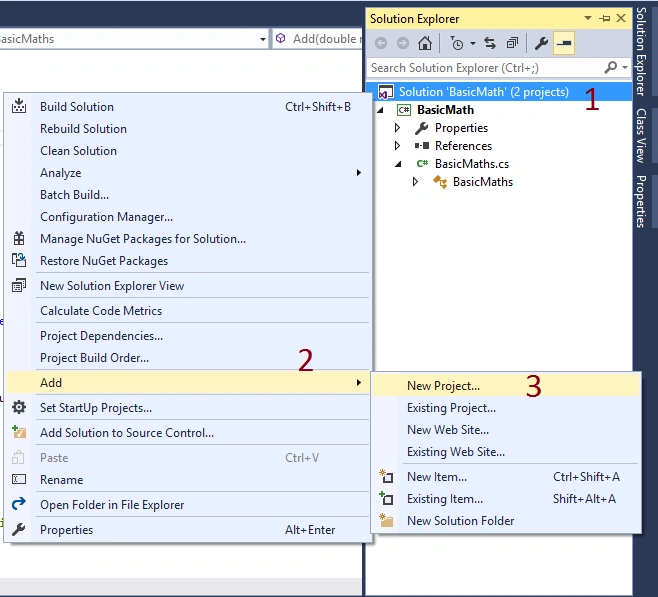
First move to Solution Explorer ( shortcut Ctrl + Alt + L to open Solution Explorer).
- Right click on Solution Project Name.
- Click Add.
- Click New Project.
It will open Add New Project Window. Follow the given steps to create and add Unit Test Project.
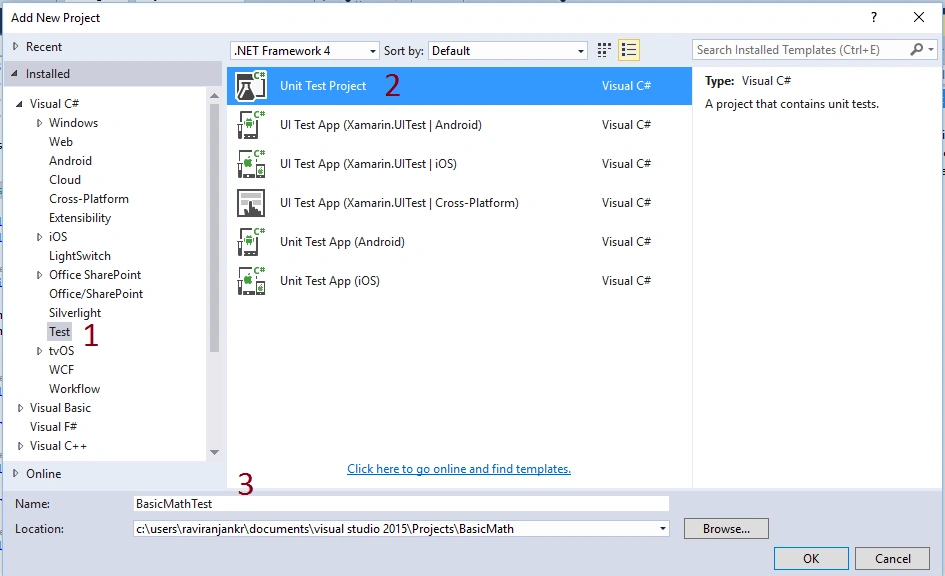
- Click Test.
- Select Unit Test Project from the list of the available templates.
- Write the name of the project. Here, we are using BasicMathTest followed by clicking OK button.
It created BasicMathTest project along with BasicMath Project whose functions need to be tested. To access all the four methods of BasicMath in test project, we need to add the reference in test project. Take a look at the image given below to know how to add.
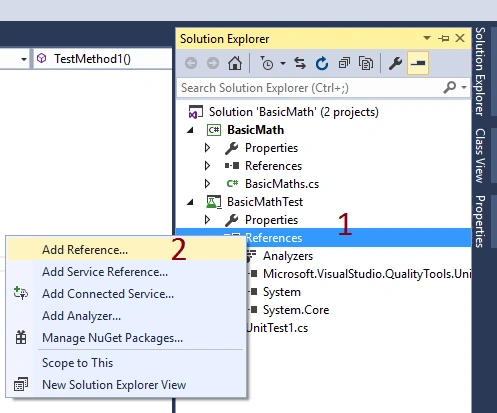
- Right click on Reference of MS Unit Test Project.
- Click Add Reference.
It will open a Reference Manager Window. To add reference, click Projects – Solutions – BasicMaths and click OK button.
You can see in the image given below that the reference has been added .
- BasicMath – Having all the functions, which needs to be tested
- Microsoft.VisualStudio.QualityTools.UnitTestFramework – It contains all classes and methods, which provides Unit testing support.
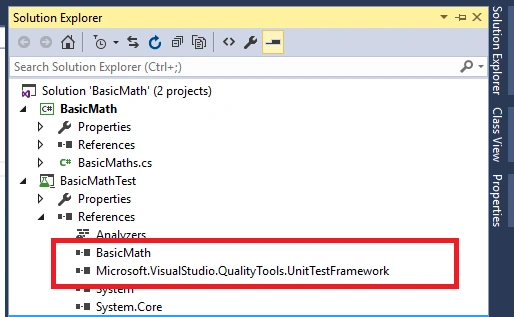
Great, you will get a screen, as shown above.
using System;
using Microsoft.VisualStudio.TestTools.UnitTesting;
namespace BasicMathTest {
    [TestClass]
    public class UnitTest1 {
        [TestMethod]
        public void TestMethod1() {
            // TODO : Write test code
        }
    }
}
What will we do next is add our code to test the functions of BasicMath Project.
First add namespaces.
using System;
using Microsoft.VisualStudio.TestTools.UnitTesting;
using BasicMath;
System namespace contains fundamental classes and base classes, which defines the commonly-used value and reference data types, events and event handlers, interfaces, attributes and processing exceptions.
The Microsoft.VisualStudio.TestTools.UnitTesting namespace supplies the classes, which provides Unit testing support. This namespace contains many attributes, which identifies test information to the test the engine regarding the data sources, order of method execution, program management, agent/host information and the deployment of the data. Microsoft.VisualStudio.TestTools.UnitTesting namespace also contains custom unit testing exceptions.
BasicMath namespace contains all the functions, which are required to be tested like Add, Subtract, Multiply and Divide
Some requirements that need to be followed,
Test class requirements
The minimum requirements for a test class while writing Unit Test case is given below:
- If you are using Unit Test to write test case then the [TestClass] attribute is highly required in the Microsoft unit testing framework for any class that contains unit test methods that you would like to run in Visual Studio Test Explorer.
- Each and every test method that you want to run must having the [TestMethod]attribute above it.
Test method requirements
A test method must meet the given requirements:
- The method must be defined with the [TestMethod] attribute just above method name.
- The method must having return type void.
- The method cannot have any parameters.
Reference: MSDN - Walkthrough: Creating and Running Unit Tests for Managed Code
Writing first Unit Test method
Here, we will write Unit Test methods to verify the behavior of Add method of the BasicMaths class. The code will look, as shown below.

In a similar way, write test code for all the methods like Subtract, Multiply and Divide. After adding all the required test methods, our test code will look, as shown below.
[TestClass]
public class UnitTest1 {
    [TestMethod]
    public void Test_AddMethod() {
            BasicMaths bm = new BasicMaths();
            double res = bm.Add(10, 10);
            Assert.AreEqual(res, 20);
        }
        [TestMethod]
    public void Test_SubstractMethod() {
            BasicMaths bm = new BasicMaths();
            double res = bm.Substract(10, 10);
            Assert.AreEqual(res, 0);
        }
        [TestMethod]
    public void Test_DivideMethod() {
            BasicMaths bm = new BasicMaths();
            double res = bm.divide(10, 5);
            Assert.AreEqual(res, 2);
        }
        [TestMethod]
    public void Test_MultiplyMethod() {
        BasicMaths bm = new BasicMaths();
        double res = bm.Multiply(10, 10);
        Assert.AreEqual(res, 100);
    }
}
We can see that in every test function, we use Microsoft Unit test framework for the managed code Assert.AreEqual method to verify that the ending balance is what we expect.
To build and run the test.
- Either go to Solution Explorer (Ctrl +Alt+L) and right click on Solution ‘BasicMath’ and click on Build Solution or go to Build Menu (Alt + B) and Click on Build Solution.
- Choose Test Menu -> Run -> All Test or instead of this step, you can follow the given step also.
- Go to Test Explorer and click Run All to run the tests for all the test methods .
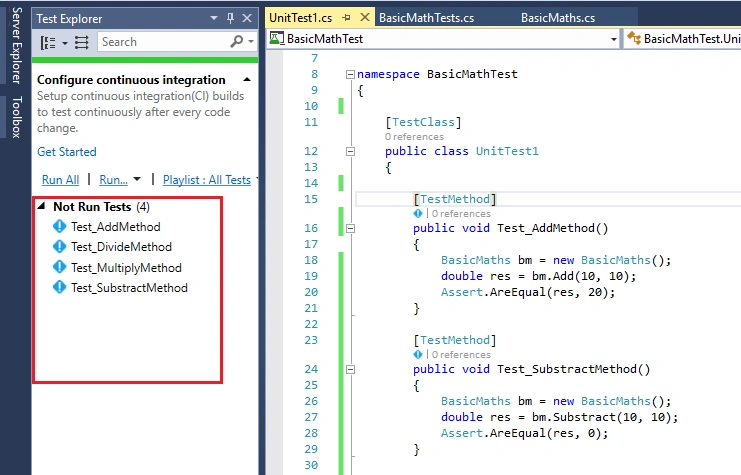
As the test is running, the status bar at the top of the Window is animated. At the end of the test run, the bar turns Green if all the test methods pass or Red, if any of the tests fail.
You should now see something, as shown below.
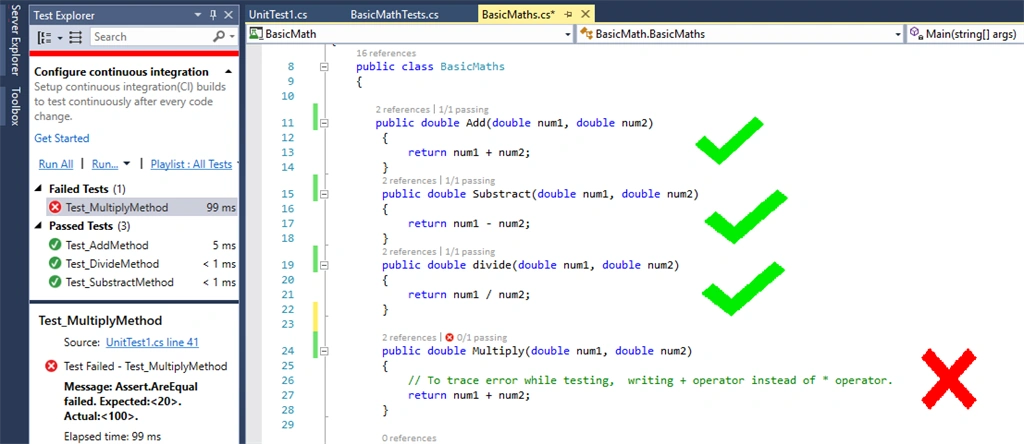
In this case, If the test fails; the test method is moved to the Failed Tests. group. Select the method in Test Explorer to view the details at the bottom of the Window.
Analyze your test results why it failed
The test result have a detailed message which describes the reason why your test failed. For the AreEquals method, you can see a message which displays you what was actuallly expected (the (Expected<XXX>parameter) and what was actually received (the Actual<YYY> parameter).
Correct the bug to make test pass
To correct the error, simply replace +(Plus) with *(Multiply).
public double Multiply(double num1, double num2) {
    return num1 * num2;
}
Rerun Test to check if it is working or not
In Test Explorer, choose Run All to rerun the test. The red/green bar turns green, and the test is moved to the Passed Tests group.
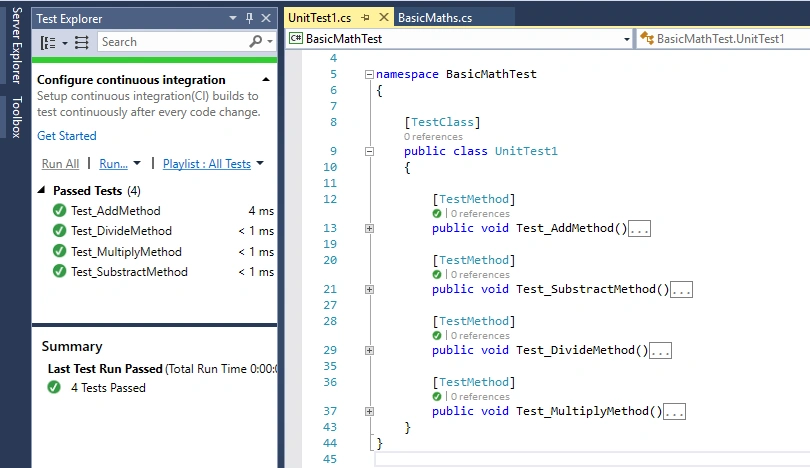
Cheers! We learned how to write a Unit test.

Source: https://blog.testlodge.com/
TDD(Test Driven Development) Implementation using Unit Testing in C#
As we discussed earlier in this article most developers follow the concept of write Test first then Code Later approach, we are going to learn TDD approach and to know how to use it.
Test-driven development (TDD) is basically a specification technique and software development process that always depends on the repetition of short development cycles. In Test-driven development(TDD) software development process, first the developer writes an automated test case which is also called as initially failing test case that defines a desired improvement or new function, then writes the minimum amount of code to pass that test, and finally use the refactors concept in the new code to make it acceptable standards.
Read more at - https://en.wikipedia.org/wiki/Test-driven_development
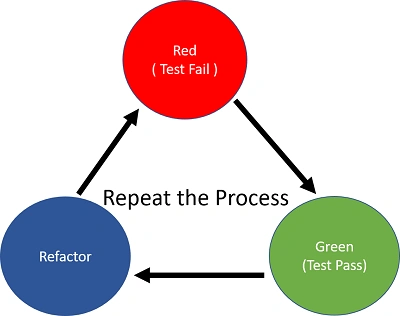
One of the advantages of using Test-driven development (TDD) is that it enables developers to take small steps while writing software programs. For example, assume you have added some new functional code in your running projects, and then compile, and then test it. There are high chances that your tests will be broken by defects that exist in the new code of your programs. With the help of TDD concept It is much easier for a developer to find and then fix those defects if you’ve written two new lines of code then two thousand lines of codes. It is generally prefered among programmers to add some few new lines of functional code before they recompile and rerun tests.
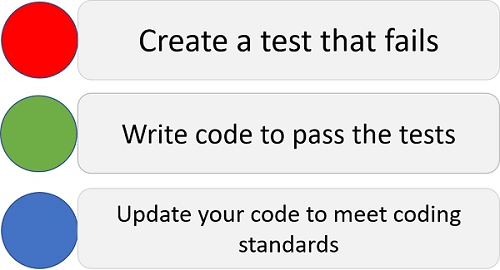
The motto of Test-Driven Development is Red, Green, Refactor.
- Red: Create a test and make it fail.
- Green: Make the test pass by any means necessary.
- Refactor: Change the code to remove duplication in your project and to improve the design while ensuring that all tests still pass.
The Red/Green/Refactor cycle is repeated very quickly for each new unit of code.
Let's Implement TDD using MS Unit Testing
Let’s take the exact same sample of code which we've used earlier in this article. We will create four basic functions like Add, Subtract, Multiply and Divide, which will need to be tested. In an earlier example, we have written the code first, then Unit Test later but as this is TDD implementation; we will write Unit Test first, then we will write the code later.
To write Unit Test, follow the steps given in the image given below.
- Create new project. Click on Test.
- Click on Unit Test Project
- Write Project name. Eg – BasicMathTDDTest followed by clicking OK button
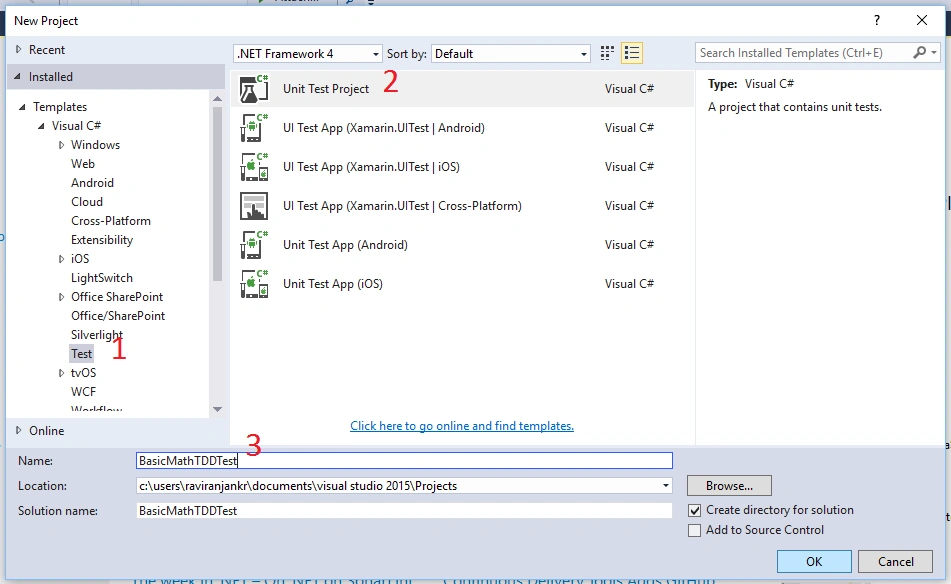
You will get the default code template, as given below to write your test code.
using System;
using Microsoft.VisualStudio.TestTools.UnitTesting;
namespace BasicMathTDDTest {
    [TestClass]
    public class UnitTest1 {
        [TestMethod]
        public void Test_Method1() {
            // TODO : Add test logic here
        }
    }
}
Here, we are going to write test code first before writing the actual code, which needs to be tested.
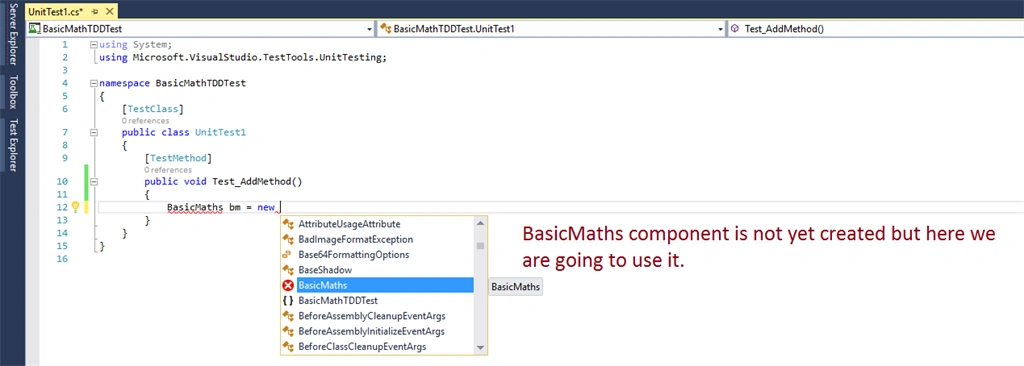
The code will look, as shown below.
public class UnitTest1 {
    [TestMethod]
    public void Test_AddMethod() {
            BasicMaths bm = new BasicMaths();
            double res = bm.Add(20.50, 20.50);
            Assert.AreEqual(41, res);
        }
        [TestMethod]
    public void Test_MultiplyMethod() {
        BasicMaths bm = new BasicMaths();
        double res = bm.Multiply(10, 10);
        Assert.AreEqual(100, res);
    }
}
As you can see that there are two test methods- Test_AddMethod and Test_MultiplyMethod and both the methods are using BasicMaths class, Add and Multiply method, which are not yet defined. When we run this Application, you will get an error, as given below.
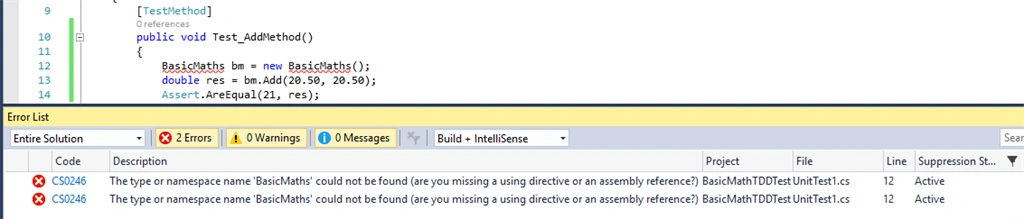
To make MS Unit Test run, we need to create BasicMaths class and add reference to Unit Test project. Follow the steps given below to know how to create BasicMaths class and add reference to MS Unit Test Project.
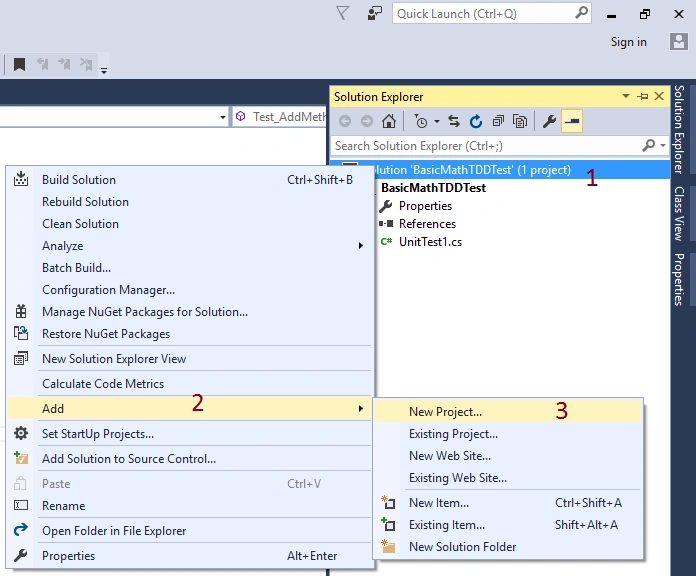
- Right click on Solution ‘BasicMathTDDTest’.
- Click ADD.
- Click New Project.
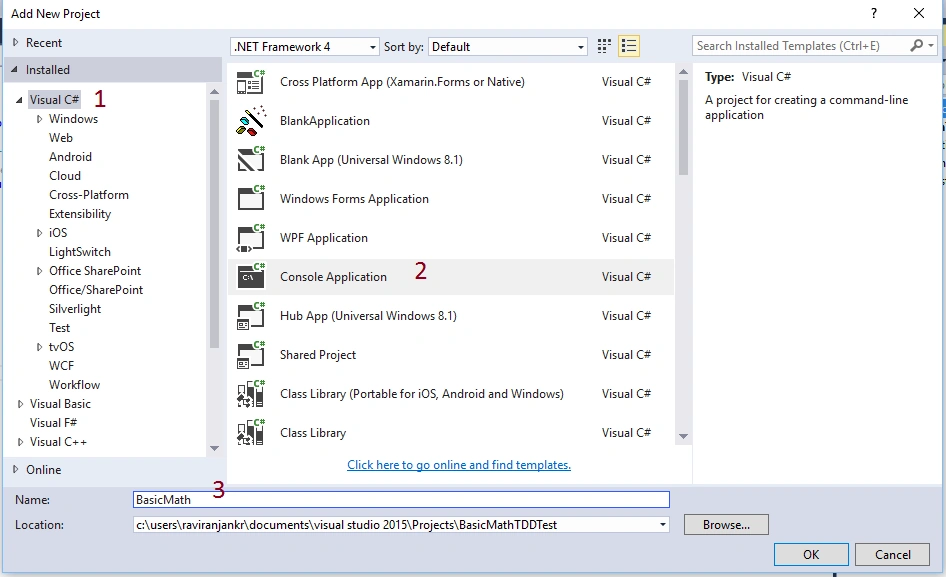
It will open a Add New Project Window, where you have to follow the steps given below.
- Click Visual C# (If you are writing code in C# language)
- Click Console Application.
- Write the name of the project. Here, the project name is BasicMath and click OK button
Now, write Add and Multiply Method under BasicMaths class for which we have already written MS Unit Test. The code will look, as shown below.
public class BasicMaths {
    public double Add(double num1, double num2) {
        return num1 + num2;
    }
    public double Multiply(double num1, double num2) {
        return num1 + num2;
    }
}
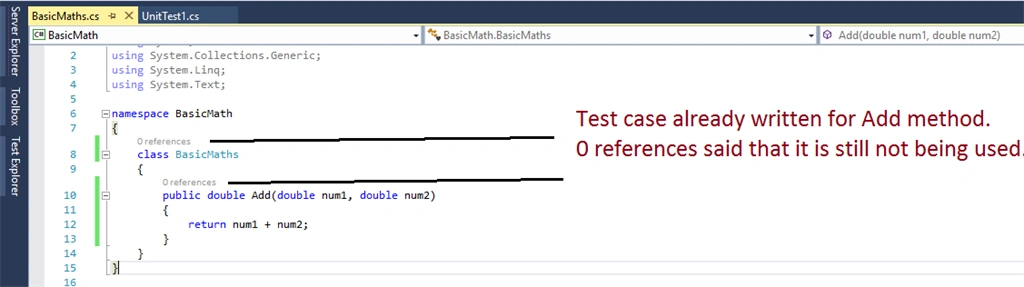
After writing the code, you can see that there are 0 references of BasicMaths class as well as Add method function but these functions are already being used in MS Unit Test project. To make it accessible, we need to add this project to MS Unit Test Project reference.
Once you add reference, its time to run the Test. To run the Test, you can either go to Test -> Run -> All Test or move to Test Explorer and click Run All. After running Tests, you will see the output, as given below.
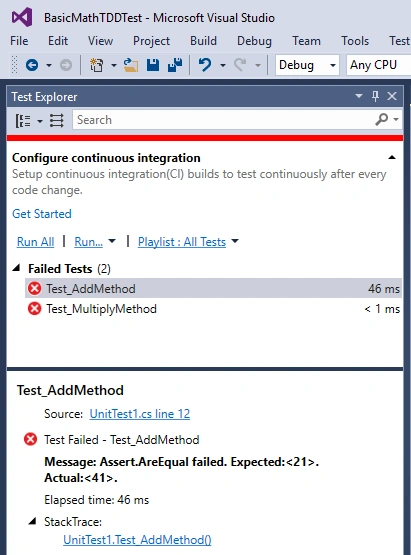
Both Test Method Test_AddMethod and Test_MultiplyMethod failed. To know why these methods failed while testing, click each method and read the reason.
In Test_AddMethod Assert.AreEqual is supposed to give 41 as an actual value but we are expecting 21. It must be 41 to get Test passed. Of course after adding 20.50 and 20.50, we will get 41. Thus, we have written the wrong expected value. Change it to 41 instead of 21.
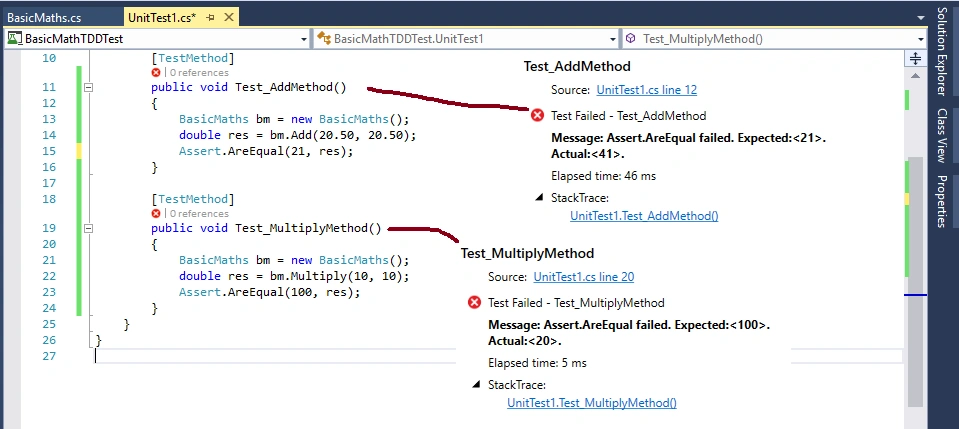
In Test_MultiplyMethod Assert.AreEqual is supposed to give 20 but we are expecting 100. It must be 20 to get the test passed but logically after multiplying 10 and 10, we should get 100, then why its actual value is returning 20. Check the code of Multiply method in BasicMaths class.

As we can see we are using +(Plus) operator between two operands- num1 and num2 which should be *(Multiply) operator. Now, the given code is a logically correct one.
public double Multiply(double num1, double num2)
{
   return num1 * num2;
}
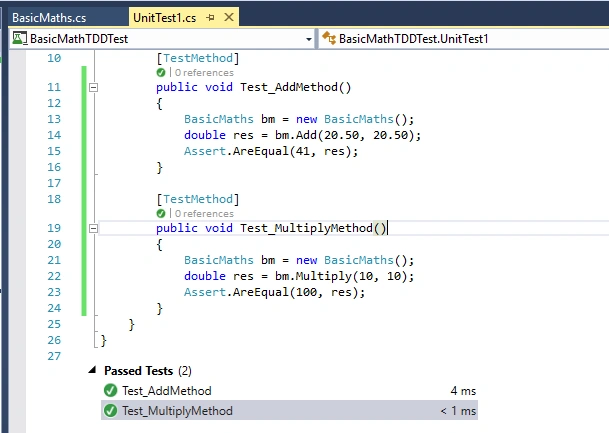
After correcting wrong values and codes, let's run the test again and see the result. Both Test methods Test_AddMethod and Test_MultiplyMethod are passed.
Last Words
I hope this article will help you to learn the basics of Unit test and how to create Unit test cases for your code in C#. Your suggestions are most welcome and highly appreciated.
Mahdi AaliPosted Dec 16, 2021, 10:31 AM
Hi , I like this article and thank you for writing this helpful article .
Steve AndrewsPosted Aug 4, 2021, 2:52 PM
Hi there, I really like the look of this article and want to follow along but I'm having a very early problem. Once I've created the BasicMathsTest UnitTest, the "using BasicMath;" statement within my Visual Studio isn't accepted. Any ideas why?
Michal BiesiadaPosted Feb 6, 2020, 8:47 AM
Really, really great article! Congrats! 5/5
Ben BeattieHoodPosted Sep 22, 2019, 11:35 PM
This is a great article, thanks for putting it together :) Unit testing like this has limitations though (non-exhaustive), and are hard work to keep up to date. Here's an alternative way to test your code, which tests the behaviour instead of the values, and gets the type system to generate the tests for you: https://www.youtube.com/watch?v=Lcppj5Wjz1E
Tarun SrivastavaPosted Jun 22, 2019, 4:52 AM
Nice Article, Please share more about testing.
Viknaraj ManogararajahPosted Jul 21, 2018, 10:59 PM
Nice Article, Thank you for sharing
Jatin AroraPosted Jul 21, 2018, 1:50 AM
Hi Ravi - I have one question related to unit testing approach. Suppose I have two methods and i want to unit test both methods. But in first method definition - second method is called. So my question is - do we need to unit test them separately or we can unit test only the first method since 2nd method is called in first method? Please provide your thoughts
Manjunath GanesanPosted Jun 25, 2018, 1:57 AM
Just want to know, in the failed test case scenario how the compiler knows that it is defined only for multiplication not for addition because we just declared method name as multiplication its just an name right !