

In this article, we are going to build a basic chat application on Node.js platform using Express and Angular 2. For saving chat history, we will use MongoDB Atlas. We will be using socket.io for communication between Server and Client.
Prerequisites
- Download and install Node.JS from https://nodejs.org/en/download/.
- Download and install Visual Studio Code from https://code.visualstudio.com/.
- You can pull the code from GitHub.
Initial Setup
Create a new folder for the application. Name it ‘chat-app’. Open ‘chat-app’ folder in Visual studio code. Open terminal and run ‘npm init’ command. Fill details as mentioned in screen shot provided. It will create ‘package.json’ under ‘chat-app’ folder.
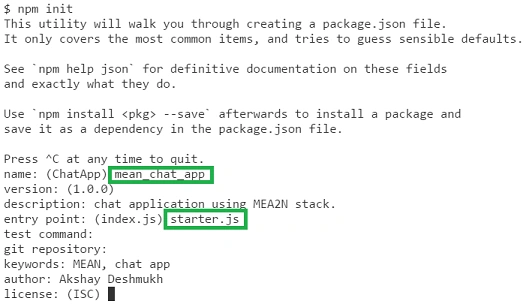
We have initialized the node application. Now we will install express, ejs and socket.io by running ‘npm install express ejs socket.io --save’ command. The --save option instructs NPM to include package under dependencies section of package.json.
To create an Angular application, we need to install angular cli. We will run ‘npm install --save-dev @angular/cli@latest’ command to install angular cli. After installing all required packages, our package.json will look like
- {
- "name": "mean_chat_app",
- "version": "1.0.0",
- "description": "chat application using MEA2N stack.",
- "main": "starter.js",
- "scripts": {
- "test": "echo \"Error: no test specified\" && exit 1"
- },
- "author": "Akshay Deshmukh",
- "license": "ISC",
- "dependencies": {
- "ejs": "^2.5.7",
- "express": "^4.15.4",
- "socket.io": "^2.0.3"
- },
- "devDependencies": {
- "@angular/cli": "^1.3.2"
- }
- }
We will create our Angular application by executing ‘ng new ng-app’ command. It will create ‘ng-app’ folder under ‘chat-app’ folder and populate all supporting files for the Angular application. Run ‘ng build’ command to build the Angular application. It will create ‘dist’ folder with build output files.
Now we are ready with initial setup. We will start with coding…
Implementation – Server side
Open ‘starter.js’ and start writing your code
- const path = require("path");
- const express = require("express");
- const ejs = require("ejs");
- const appServer = express();
- appServer.engine("html", ejs.renderFile );
Here we are loading path, express and ejs modules using require function.We have created object of express as ‘appServer’ by calling ‘express()’ method. Then we set ejs as template engine for express. Default engine of express is Jade.
- appServer.set("views", path.join(__dirname, "ng-app/dist"));
- appServer.use(express.static(path.join(__dirname, 'assets')));
- appServer.use(express.static(path.join(__dirname, 'ng-app/dist')));
We will set views path for express server as ‘ng-app/dist’, which is our output directory of the Angular app. Then we will set path for static files. This means if there is any static content mentioned on page; express server will try to fetch it from these folders.
- appServer.get("*", (request, response) => {
- response.render("index.html");
- });
- const serverPort = 9696;
- appServer.listen(serverPort, ()=>{
- console.log("Server is started and listening on port "+ serverPort);
- });
We will add route to express server as ‘*’. It means for any request it will render ‘index.html’ from views folder of express server; which is ‘ng-app/dist’. Then server will start listening on port 9696 for requests.
- const socketsPort = 9697;
- const sockets = require("socket.io").listen(socketsPort).sockets;
- sockets.on("connection", (client) => {
- console.log(socket.client.id + " is connected.");
- client.emit("connected", { clientId: socket.client.id });
- client.on("send_message", (message) => {
- console.log(socket.client.id + ":)" + message);
- sockets.emit("new_message", { from: socket.client.id, text: message });
- });
- });
After web application server, we will start listening on port 9697 for socket connection. If any client is connected, ‘connection’ event is triggered and on this event we will log ‘client id’. Then emit event ‘connected’ for that client with its client id as data. Then add listener for ‘send_message’; which will log message with client id and emit that message along with sender id to other clients.
Implementation – Client side
Now open index.html under path ‘chat-app/ng-app/src’. Add references for bootstrap, font-awesome css and socket.io js file. I have also added chat.ico icon file in assets folder under ‘chat-app’. Index.html file will look like
- <!doctype html>
- <html lang="en">
- <head>
- <meta charset="utf-8">
- <title>Chat!</title>
- <base href="/">
- <meta name="viewport" content="width=device-width, initial-scale=1">
- <link rel="icon" type="image/x-icon" href="chat.ico">
- <link rel="stylesheet" href="https://maxcdn.bootstrapcdn.com/bootstrap/3.3.7/css/bootstrap.min.css">
- <link href="https://maxcdn.bootstrapcdn.com/font-awesome/4.7.0/css/font-awesome.min.css" rel="stylesheet" integrity="sha384-wvfXpqpZZVQGK6TAh5PVlGOfQNHSoD2xbE+QkPxCAFlNEevoEH3Sl0sibVcOQVnN" crossorigin="anonymous"> </head>
- <body>
- <app-root></app-root>
- </body>
- <script src="https://cdnjs.cloudflare.com/ajax/libs/socket.io/2.0.3/socket.io.js"></script>
- </html>
Open app.component.ts from path ‘ng-app/src/app’. Add OnInit, ElementRef, ViewChild, AfterViewChecked to import from angular core. Then import all from socket.io-client.
- import {
- Component,
- OnInit,
- ElementRef,
- ViewChild,
- AfterViewChecked
- } from '@angular/core';
- import * as socket_io from 'socket.io-client';
- @Component({
- selector: 'app-root',
- templateUrl: './app.component.html',
- styleUrls: ['./app.component.css']
- })
- export class AppComponent implements OnInit, AfterViewChecked {
- title = 'Chat Application';
- message = "";
- messages = [];
- socket;
- socketId;
- @ViewChild("chatwindow") private chat_window: ElementRef;
- ngOnInit() {
- this.socket = socket_io("http://localhost:9697");
- // this.socket = socket_io("http://10.21.15.68:9697");
- this.socketId = this.socket.socketId;
- this.socket.on("new_message", (message) => {
- this.messages.push(message);
- });
- this.socket.on("connected", (data) => {
- this.socketId = data.clientId;
- });
- }
- ngAfterViewChecked() {
- this.chat_window.nativeElement.scrollTop = this.chat_window.nativeElement.scrollHeight;
- }
sendSmily() function will also emit ‘send_message’ event but with specific smiley message content.
- sendMessage = () => {
- this.socket.emit("send_message", this.message);
- this.message = "";
- };
- sendSmily = () => {
- this.socket.emit("send_message", ":)");
- };
- }
- import {
- BrowserModule
- } from '@angular/platform-browser';
- import {
- NgModule
- } from '@angular/core';
- import {
- FormsModule
- } from '@angular/forms';
- import {
- AppComponent
- } from './app.component';
- @NgModule({
- declarations: [
- AppComponent
- ],
- imports: [
- BrowserModule, FormsModule
- ],
- providers: [],
- bootstrap: [AppComponent]
- })
- export class AppModule {}
- <div style="width:33%;margin-left:auto;margin-right:auto" class="alert alert-info">
- <div> Welcome to chat application created by <img width="150" src="AkshayLetters.png"> your network id: {{socketId}} </div>
- <div class="alert alert-success" style="height:300px;overflow-y:auto" #chatwindow>
- <div *ngFor="let message of messages" class="alert" [ngClass]="(socketId==message.from)? 'sent-chat alert-info':'received-chat alert-warning'">
- <div *ngIf="message.text==':)'"><span class="badge" *ngIf="socketId!=message.from">{{message.from}}</span> <i class="fa fa-smile-o" aria-hidden="true"></i></div>
- <div *ngIf="message.text!=':)'"><span class="badge" *ngIf="socketId!=message.from">{{message.from}}</span> {{message.text}}</div>
- </div>
- </div>
- <div class="alert alert-success "> <textarea rows="4 " [(ngModel)]="message " (keydown.enter)="sendMessage();false;" style="width:100% "></textarea> <button (click)="sendSmily() " class="btn btn-default" style="margin-left:auto; "><i class="fa fa-smile-o" aria-hidden="true"></i></button> </div>
- </div>
Open two browsers and hit ‘http://localhost:9696’ from both the browsers. And start chatting…

In the next article Build Chat Application On MEA2N Stack – Part Two, we will integrate MongoDB Atlas with our chat application for chat history. Until then, keep chatting.
Join the conversation! Your thoughts help the community grow.