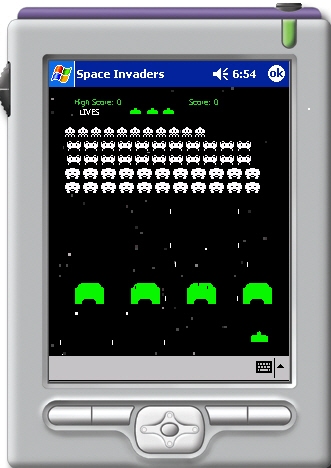
Figure 1 - PocketPC game running on the Windows Mobile Emulator
Introduction
The next big frontier is around the corner. That's right, it's the Pocket PC. Mobile phones, PDA's, they are all merging into one small powerhouse called the Pocket PC. And these little babies ARE powerful. A single Pocket PC has the power that the desktop had only a few years ago. And now with storage cards as high as 4 GB and increasing every day, the Pocket PC will only be limited by the dexterity of your fingers and the life of the battery. Also with the Pocket PC you can be connected and mobile, a huge advantage over the bulky and heavy laptop.
Although there are currently just two main flavors of pocket mobile operating systems out there (Palm OS and Microsoft), it has never been easier to develop mobile applications because windows mobile applications can be programmed in .NET. Not only does a stepped down form of the Windows.NET framework run on most Pocket PC's, but the .netcf (.NET compact framework) runtime is actually built into the ROM (Read Only Memory) of most new Pocket PC's. All Pocket PC running Windows Mobile 5 and some of the later Pocket PC 2003 OS's already have a runtime on board. All you need is Visual Studio and away you go, programming in .NET.
The only drawback is that the .NET compact framework excludes a lot of the .NET functionality you are currently used to in order to keep the necessary files small. Also problematic is that Microsoft's new ..NET framework 2.0 must currently be installed in RAM on most devices since only the 1.0 version is built into ROM. But fear not. There is an open source movement for the .NET compact framework called OpenNETCF. This organization of generous developers has created a library to address the functionality gaps in both the 1.0 and 2.0 .NET framework.
Getting Started
If you want to develop .NET applications for Windows Mobile 5.0, it is not enough to just have the Visual Studio 2005 environment installed on your development computer. You need to download the Windows Mobile 5.0 SDK Extension for Visual Studio. This extension will allow you to develop both .NET 1.1 and .NET 2.0 Compact Framework applications under the Visual Studio 2005 environment. You can also extend Visual Studio to develop for Windows Mobile 5.0 SmartPhone Applications.
Conversion Whoas
I recently took on the challenge of converting my Space Invaders Window Form application to .NET for the Pocket PC. Having discussed this with other Pocket PC developers at Tech Ed, I determined that this is not recommended. I felt that the Space Invaders application was generic enough to be moved to another platform. But I quickly found quickly that many classes that compiled very well under .NET for XP, did not necessarily compile at all under the .NET compact framework. Sometimes namespaces didn't exist, sometimes classes in namespaces didn't exist, and sometimes properties in classes didn't exist. It was as if someone took the .NET framework and fired buckshot through it. What was left when the smoke cleared was the .NET compact framework. Take for example the windows timer object (or equivalent in the .NET framework). In order to start the timer, you just call the Start method, right? Wrong! You enable the timer. Your next guess is that to stop the timer you need to disable it, right? Yes...thank goodness for simple logic.
Double Buffering
When I finally managed to convert the whole app, I noticed that the screen was flashing a lot. Clearly double buffering was not working, so how could I double buffer my Pocket PC application? Simple. You perform all your drawing to an in-memory bitmap and then blast the bitmap to the screen.
Listing 1 - Double Buffering an Image on the Pocket PC
|
private void Form1_Paint(object sender, System.Windows.Forms.PaintEventArgs e)
{
CreateMemoryBitmap();
//
Graphics g = Graphics.FromImage(m_bmp);
g.DrawImage(BackgroundImage, ClientRectangle, _backgroundBounds, GraphicsUnit.Pixel);
for (int i = 0; i < kNumberOfShields; i++)
{
Shields[i].Draw(g);
}
...
// now blast the whole bitmap to the screen
e.Graphics.DrawImage(m_bmp, 0, 0);
}
private void CreateMemoryBitmap()
{
// Only create if don't have one and the size hasn't changed
if (m_bmp == null || m_bmp.Width != this.Width || m_bmp.Height != this.Height)
{
m_bmp = new Bitmap(this.Width, this.Height);
}
} |
Closing the Application
Normally, to close or exit the application, you simply call Application.Exit. In the Pocket PC it is recommended that you remove the minimize box so a little OK button shows up in the corner. The problem with not turning off the minimize box is that the program will still sit in memory after you hit the x. To close a form, just call Close. If the form is a dialog, the Close method will close the dialog (modal or not). If the form is the main form, the Close method will close the application. Listing 2 shows you how to turn off the minimize box on the form.
Listing 2 - Removing the Minimize Box so an OK Button shows up in your Form
|
public Form1()
{
MinimizeBox = false; // causes the little ok button to show up in the right hand corner instead of the minimize button
} |
Debugging the Application
Visual Studio allows you to debug an application like you would any other .NET application using the built in debugger. An application can either be debugged directly on the Mobile Device through ActiveSync or through an emulator on your PC. The emulator completely simulates the device on your pc with an image of the device but gives you the convenience of not having to work with the Pocket PC device itself. In other words, you don't even need to own a Pocket PC to develop applications for it. In both cases, you may notice that running the debugger for the Pocket PC takes a bit longer to load than it would for a regular .NET windows application, but it's still the best environment you could use to develop and debug a Pocket PC application. Also you can use a trick to speed up your debugging sessions (as someone at Tech-Ed kindly pointed out to me). In Visual Studio 2005 you can save the last state of the emulator so you don't have to keep reloading the entire emulator each time you debug
Deploying your Application
Pocket PC Applications for .NET are deployed through a CAB file. A cab file is a compressed file similar to a zip file. Visual Studio 2005 gives you the ability to create a CAB file for smart devices. Simply go to New -> Projects in the file menu and choose the Smart Device CAB Project under Setup and Deployment as shown in figure 2. This will create a new project whose sole purpose is to create a deployment CAB package for your .NET application.

Figure 2 - Creating a Deployment project for the Pocket PC.
Once you've created the deployment project, you can use the File System View in Visual Studio to add files and short cuts for your deployment to the Pocket PC. To bring up the File System View, right click on your project and choose View --> File System as shown in figure 3. Note that you can also add Registry entries for deployment through the View menu if your application requires it.
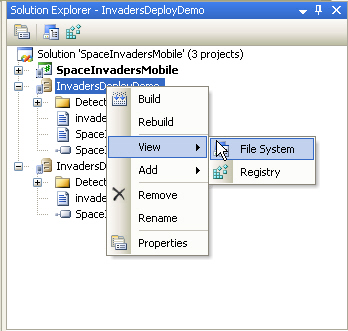
Figure 3 - Viewing the File System for deploying applications
Once in the File System View you can add the files you want to deploy for your application. Simply go to the Application Folder, right click on the right pane, and choose Add-->File.
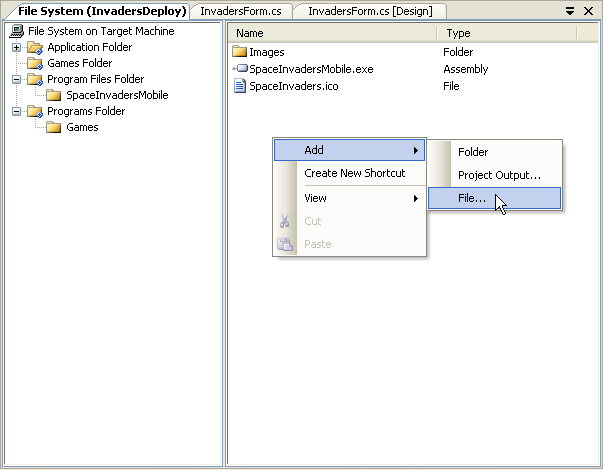
Figure 4 - Adding files for deployment
Like XP, the Pocket PC has special folders into which you can deploy your application. We found that the iPAQ keeps all its games inside the Programs Folder under a Games Subfolder. To add a special folder to your deployment, simply right click on the File System Icon in the left pane and choose the folder you want to deploy your application to as shown in figure 5. Then right click inside the programs folder and create a new folder called Games. You may notice that in figure 5 there is a Games files folder, but installing the shortcut into this folder doesn't seem to work for the iPAQ we tested.
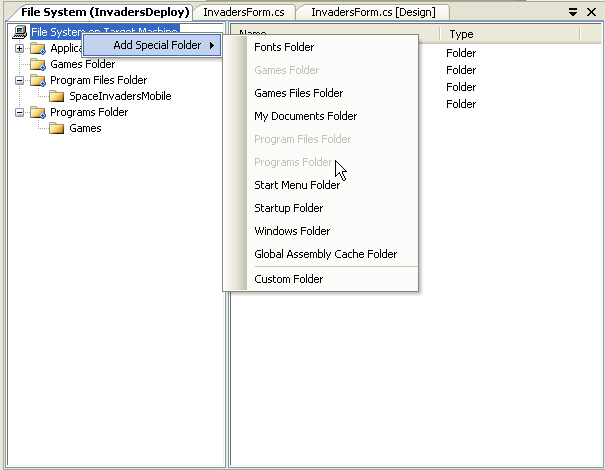
Figure 5 - Adding the Program Folder for the Space Invader Game Shortcut
Click inside the Games folder inside the left pane of the File View. Then create a shortcut inside the File System view by right clicking on the right pane and choosing Create New Shortcut menu item as shown in Figure 6. When you deploy your application, this shortcut will show up inside your Games folder.
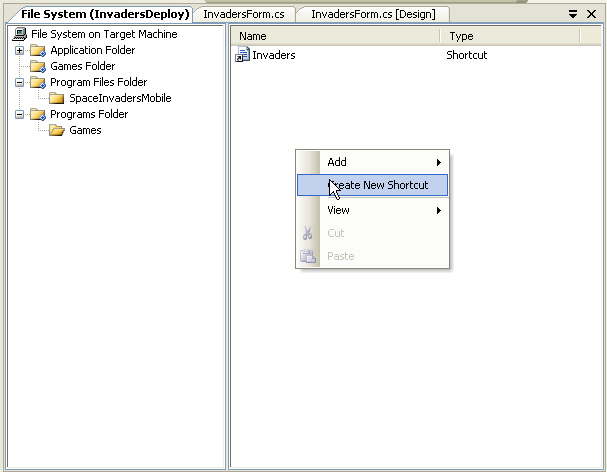
Figure 6 - Creating a Shortcut for the Invaders Game in the Games Folder
Signing your Application with a Certificate
An unfortunate feature of the new Pocket PC apps that you develop is that you will be prompted for a certificate. The certificate needs to come from a trusted certificate company. This means you need to shell out money for a certificate in order to ensure that your application is safe to run on other applications. You can deploy your application without a certificate, but when you try to install it on the Pocket PC, you get a nasty message that says:
The program is from an unknown publisher. You should install it only if you trust its publisher. Do you want to continue?
Name: ...rsDeployDEMO.cab
Publisher: Unknown
Location: \My Documents\test
So if you want to start publishing for the Pocket PC industry, you may want to consider ponying out the $300 or so it takes to get a certification for your application. You can use companies such as Verisign, GeoTrust, or Thawte. Once you have a real certificate, you can sign your application with it using Visual Studio. Simply right click on the project and choose Properties. Then go to the Devices tab as shown in Figure 7.

Figure 7 - Choosing a Certificate for Authentication Signing
Click on the Select Certificate button and the Certificate Chooser dialog will appear. Click Manage Certificates as shown in figure 8 if you don't already have a certificate available:
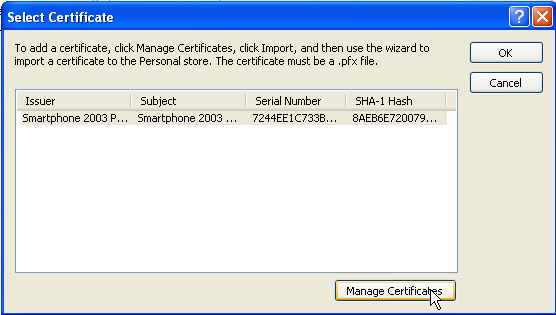
Figure 8 - Selecting a Certificate
Clicking Manage Certificates brings up the Manage Certificates dialog shown in Figure 9. Here you can choose the type of certificate you want to import. You must first purchase a certificate from one of the licensed certificate companies listed in order to import the certificate with extension .cer or .crt. Microsoft Visual Studio will convert this to a pfx file.
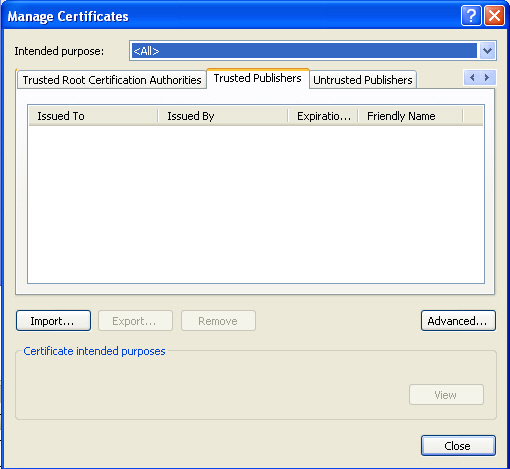
Figure 9 - Importing a Trusted Publisher Certificate
Note: Some companies, such as GEOTrust, will allow you to upload your CAB file to a portal and sign your application for you. This way they can track the number of signings.
Conclusion
If you are a .NET programmer on the Windows platform, you may find some initial challenges in suddenly developing for the Pocket PC. There will be missing functionality and you'll need to come up with some work-arounds to make your application function. Nonetheless, you should find Pocket PC application development rewarding. As memory limitations and storage space become less of an issue on Pocket PCs, the development environment in .NET will become richer.
Pocket PC's are really a new world and developing for them is a new challenge. There is no better time to start creating Pocket PC applications and probably no better tool for developing these applications than the .NET environment. We encourage you to try developing a few simple Compact .NET applications and playing with them on your compact device or on the emulator. You may think of some portable applications that help you and others in your day-to-day activities. Everyone is going mobile, so hop on the ride for the next big programming opportunity using .NET!