One guy asked a question on discussion forums about how to draw transparent images? A transparent image is an image, which you can see through. To test this, you draw some graphics shapes on a surface and draw image on top of those shapes and you should be able to see the shapes.
Any way, the answer of the question was Alpha Blending. Alpha blending is a process of mixing colors and generating a transparent affect. Figure 1 and Figure 2 are very common examples of alpha blending. In Figure 1, few transparent graphics shapes are are drawn on top of a photo and in Figure 2, photo is on top of shapes.
In GDI+, a color (ARGB) is represented by four components - Alpha, red, green and blue. The Alpha component of a color represents the transparency of a color. The value of each of these components is varies from 0 to 255. For alpha component, value 0 means full transparency and 255 means opaque. So basically you create a color with transparency affect and use that color to draw graphics shapes and images.
The code listed in Listing 1 creates few Color objects using alpha transparency and uses the Color objects to create Pen or Brush object, which later are used to draw shapes. Make sure you change the jpg file name.
Note: You can write this code on a form load, on paint event handler, a button click event handler or a menu item click event handler.
Graphics g =
this.CreateGraphics();
g.Clear(this.BackColor);
// Draw an image
Image curImage = Image.FromFile(@"f:\myphoto.jpg");
g.DrawImage(curImage, 0, 0, curImage.Width, curImage.Height);
// Create pens and a rectangle
Rectangle rect = new Rectangle(220, 30, 100, 50);
Pen opqPen = new Pen(Color.FromArgb(255, 0, 255, 0), 10);
Pen transPen = new Pen(Color.FromArgb(128, 255, 255, 255), 10);
Pen totTransPen = new Pen(Color.FromArgb(40, 0, 255, 0), 10);
// Draw lines, rectangle, ellipse and string
g.DrawLine(opqPen, 10, 10, 200, 10);
g.DrawLine(transPen, 10, 30, 200, 30);
g.DrawLine(totTransPen, 10, 50, 200, 50);
g.FillRectangle(new SolidBrush(Color.FromArgb(40, 0, 0, 255)), rect);
rect.Y += 60;
g.FillEllipse(new SolidBrush(Color.FromArgb(50, 255, 255, 255)), rect);
SolidBrush semiTransBrush = new SolidBrush(Color.FromArgb(90, 255, 255, 50));
g.DrawString("Some Photo \nDate: 04/09/2001",
new Font("Verdana", 14), semiTransBrush,
new RectangleF(20, 100, 300, 100) );
// Dispose
g.Dispose();
The output of Listing 1 looks like Figure 1. As you can see from this figure, the transparent graphics shapes (lines, rectangle, ellipse and text) are drawn on top of an image.
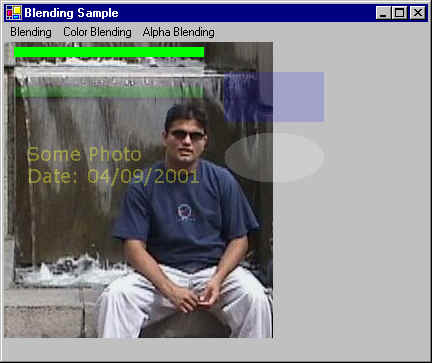
Figure 1.
The code listed in Listing 2 creates and draws few graphics shapes and on top of that, it draws a transparent image. In this listing, you see few new classes including ColorMatrix and ImageAttributes. The ImageAttribute class is used to set attributes of an image, which is passed as a parameter of the DrawImage method of the Graphics class. The SetColorMatrix method of the ImageAttributes classes uses a ColorMatrix to set the color of Image. The blue line in the ColorMatrix affects the transparency of an image. To test this, change the value of 0.5f. The value must vary between 0 to 1. You can see more affects when you change value of ptsArray.
private void AlphaBMatrix_Click(object sender, System.EventArgs e)
{
Graphics g = this.CreateGraphics();
g.Clear(this.BackColor);
Rectangle rect = new Rectangle(20, 20, 200, 100);
Bitmap bitmap = new Bitmap(@"F:\MyPhoto.jpg");
float[][] ptsArray ={
new float[] {1, 0, 0, 0, 0},
new float[] {0, 1, 0, 0, 0},
new float[] {0, 0, 1, 0, 0},
new float[] {0, 0, 0, 0.5f, 0},
new float[] {0, 0, 0, 0, 1}};
ColorMatrix clrMatrix = new ColorMatrix(ptsArray);
ImageAttributes imgAttributes = new ImageAttributes();
imgAttributes.SetColorMatrix(clrMatrix,
ColorMatrixFlag.Default,
ColorAdjustType.Bitmap);
g.FillRectangle(Brushes.Red, rect);
rect.Y += 120;
g.FillEllipse(Brushes.Black, rect);
g.DrawImage(bitmap,
new Rectangle(0, 0, bitmap.Width, bitmap.Height),
0, 0, bitmap.Width, bitmap.Height,
GraphicsUnit.Pixel, imgAttributes);
// Dispose
g.Dispose();
}
The output of Listing 2 looks like Figure 2.
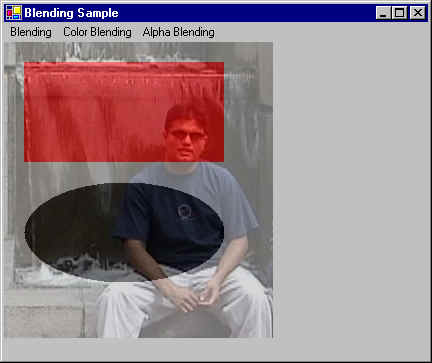
Figure 2.
Related articles: If you don't know basics of GDI+ and how to draw basic graphics objects, please refer the following links:
- GDI+ Tutorial for Beginners
GDI+ is next evolution of GDI. In Visual Studio .NET, Microsoft has taken care of most of the GDI problems and have made it easy to use.
- Working with GDI+ Brushes
This tutorial explains how to work with texture, solid, gradient, and hatch brushes.
- Graphics and Games Programming using GDI+