

Introduction
The Bot Framework enables you to build bots that support different types of interactions with users. You can design conversations in your bot to be freeform. Your bot can also have more guided interactions where it provides the user choices or actions. The conversation can use simple text strings or more complex rich cards that contain text, images, and action buttons. And you can add natural language interactions, which let your users interact with your bots in a natural and expressive way.
Bot Builder SDK introduced prompt Dialogs that allow the users to model conversations and manage conversation flow. The prompt is used whenever a bot needs input from the user. You can use prompts to ask a user for a series of inputs by chaining the prompts.
In this article, we will understand how to use prompts and how you can use them to collect information from the users. We are creating a sample Demo Bot for our C# Corner Annual Conference 2018 registration process automation.
 Prerequisite
I have explained about Bot framework installation, deployment, and implementation in the below articles.
- Getting Started with Chatbot Using Azure Bot Service
- Getting Started with Bots Using Visual Studio 2017
- Deploying A Bot to Azure Using Visual Studio 2017
- How to Create ChatBot In Xamarin
- Getting Started with Dialog Using Microsoft Bot Framework
Create New Bot Service
Let’s create a new bot service application using Visual Studio 2017. Open Visual Studio > Select File > Create New Project (Ctrl + Shift +N) > Select Bot application.
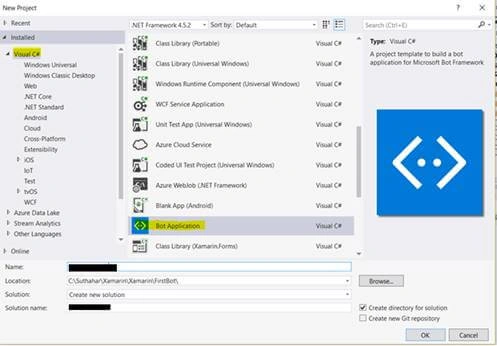 The Bot application template was created with all the components and all required NuGet references installed in the solution. Add anew AnnualPlanDialog class to the project.
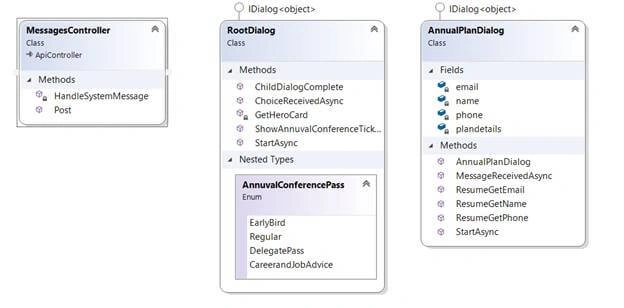
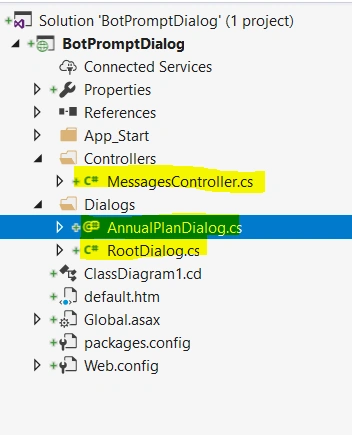 In this solution, we have three main classes - MessagesController.cs, RootDialog.cs, and AnnualPlanDialog class. Let us start discussing here.
RootDialog Class
Step 1
You can create/edit the RootDialog class. Create a class that is marked with the [Serializable] attribute (so the dialog can be serialized to state) and implement the IDialog interface.
- using System;
- using System.Threading.Tasks;
- using Microsoft.Bot.Builder.Dialogs;
- using Microsoft.Bot.Connector;
- [Serializable]
- public class RootDialog : IDialog<object>
- {
- }
Step 2
IDialog interface has only StartAsync() method. StartAsync() is called when the dialog becomes active. The method is passed to the IDialogContext object that's used to manage the conversation.
- public async Task StartAsync(IDialogContext context)
- {
- }
Step 3 Design Title and Image for Welcome
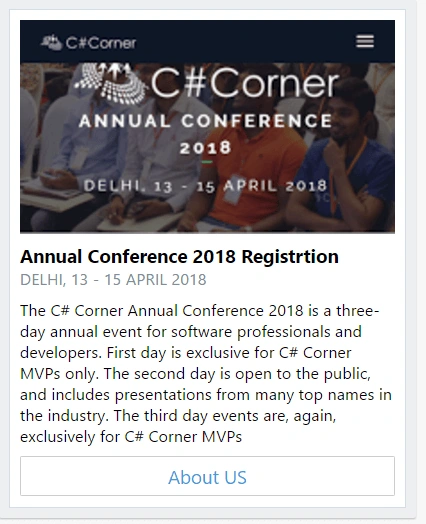
Create a method with a Hero card and return the attachment. The Hero card is a multi-purpose card having a single title, subtitle, large image, button, and a "tap action “. The following code is added to the C# Corner Annual Conference 2018 registration welcome message using the Bot Hero card.
- /// <summary>
- /// Design Title with Image and About US link
- /// </summary>
- /// <returns></returns>
- private static Attachment GetHeroCard()
- {
- var heroCard = new HeroCard
- {
- Title = "Annual Conference 2018 Registrtion ",
- Subtitle = "DELHI, 13 - 15 APRIL 2018",
- Text = "The C# Corner Annual Conference 2018 is a three-day annual event for software professionals and developers. First day is exclusive for C# Corner MVPs only. The second day is open to the public, and includes presentations from many top names in the industry. The third day events are, again, exclusively for C# Corner MVPs",
- Images = new List<CardImage> { new CardImage("https://lh3.googleusercontent.com/-fnwLMmJTmdk/WaVt5LR2OZI/AAAAAAAAG90/qlltsHiSdZwVdOENv1yB25kuIvDWCMvWACLcBGAs/h120/annuvalevent.PNG") },
- Buttons = new List<CardAction> { new CardAction(ActionTypes.OpenUrl, "About US", value: "https://conference.c-sharpcorner.com/") }
- };
- return heroCard.ToAttachment();
- }
The "Welcome" banner looks like below.
The system prompts a custom dialog for asking the user to select a registration plan, which he/she is interested in.
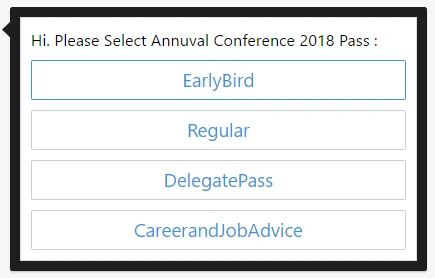 Define the enum for different types of entry pass. It’s a prompt list item
- public enum AnnuvalConferencePass
- {
- EarlyBird,
- Regular,
- DelegatePass,
- CareerandJobAdvice,
- }
Create a method ShowAnnuvalConferenceTicket with Prompt Dialog choice like below,
- public virtual async Task ShowAnnuvalConferenceTicket(IDialogContext context, IAwaitable<IMessageActivity> activity)
- {
- var message = await activity;
- PromptDialog.Choice(
- context: context,
- resume: ChoiceReceivedAsync,
- options: (IEnumerable<AnnuvalConferencePass>)Enum.GetValues(typeof(AnnuvalConferencePass)),
- prompt: "Hi. Please Select Annuval Conference 2018 Pass :",
- retry: "Selected plan not avilabel . Please try again.",
- promptStyle: PromptStyle.Auto
- );
- }
The PropmptDialog choice method has different parameters. You can refer below for parameters and their usage.
- Context - user context message
- Resume - its Resume handler, what next process
- Options - list of prompt item
- Retry - What to show on retry.
- Attempts -The number of times to retry.
- PromptStyle - Style of the prompt Prompt Style
- Descriptions - Descriptions to display for choices.
When the user selects an option, the ChoiceReceivedAsync method will be called.
- public virtual async Task ChoiceReceivedAsync(IDialogContext context, IAwaitable<AnnuvalConferencePass> activity)
- {
- AnnuvalConferencePass response = await activity;
- context.Call<object>(new AnnualPlanDialog(response.ToString()), ChildDialogComplete);
- }
If its bot conversation is completed, the ChildDialogComplete method will execute for showing the "Thanks" message.
- public virtual async Task ChildDialogComplete(IDialogContext context, IAwaitable<object> response)
- {
- await context.PostAsync("Thanks for select C# Corner bot for Annual Conference 2018 Registrion .");
- context.Done(this);
- }
Step 5
You can wait for a message from the conversation, call context.Wait(<method name>) and pass it the method you called when the message is received. When ShowAnnuvalConferenceTicket () is called, it's passed the dialog context and an IAwaitable of type IMessageActivity. To get the message, await the result.
- public async Task StartAsync(IDialogContext context)
- {
- //Show the title with background image and Details
- var message = context.MakeMessage();
- var attachment = GetHeroCard();
- message.Attachments.Add(attachment);
- await context.PostAsync(message);
- // Show the list of plan
- context.Wait(this.ShowAnnuvalConferenceTicket);
- }
AnnualPlanDialog
Create a new class file for the registration prompt dialog and implement IDialog interface. In the resume parameter, we can specify which dialog method to be called next after the user has responded. The response from the user is passed to the subsequent dialog methods and called to the following class.
In this class, Bot will collect all the user information one by one using prompt dialog like below
- namespace BotPromptDialog.Dialogs
- {
- [Serializable]
- public class AnnualPlanDialog : IDialog<object>
- {
- string name;
- string email;
- string phone;
- string plandetails;
- public AnnualPlanDialog(string plan)
- {
- plandetails = plan;
- }
- public async Task StartAsync(IDialogContext context)
- {
- await context.PostAsync("Thanks for Select "+ plandetails + " Plan , Can I Help for Registrtion ? ");
- context.Wait(MessageReceivedAsync);
- }
- public virtual async Task MessageReceivedAsync(IDialogContext context, IAwaitable<IMessageActivity> activity)
- {
- var response = await activity;
- if (response.Text.ToLower().Contains("yes"))
- {
- PromptDialog.Text(
- context: context,
- resume: ResumeGetName,
- prompt: "Please share your good name",
- retry: "Sorry, I didn't understand that. Please try again."
- );
- }
- else
- {
- context.Done(this);
- }
- }
- public virtual async Task ResumeGetName(IDialogContext context, IAwaitable<string> Username)
- {
- string response = await Username;
- name = response; ;
- PromptDialog.Text(
- context: context,
- resume: ResumeGetEmail,
- prompt: "Please share your Email ID",
- retry: "Sorry, I didn't understand that. Please try again."
- );
- }
- public virtual async Task ResumeGetEmail(IDialogContext context, IAwaitable<string> UserEmail)
- {
- string response = await UserEmail;
- email = response; ;
- PromptDialog.Text(
- context: context,
- resume: ResumeGetPhone,
- prompt: "Please share your Mobile Number",
- retry: "Sorry, I didn't understand that. Please try again."
- );
- }
- public virtual async Task ResumeGetPhone(IDialogContext context, IAwaitable<string> mobile)
- {
- string response = await mobile;
- phone = response;
- await context.PostAsync(String.Format("Hello {0} ,Congratulation :) Your C# Corner Annual Conference 2018 Registrion Successfullly completed with Name = {0} Email = {1} Mobile Number {2} . You will get Confirmation email and SMS", name, email, phone));
- context.Done(this);
- }
- }
- }
After executing the above code, the output looks like below:
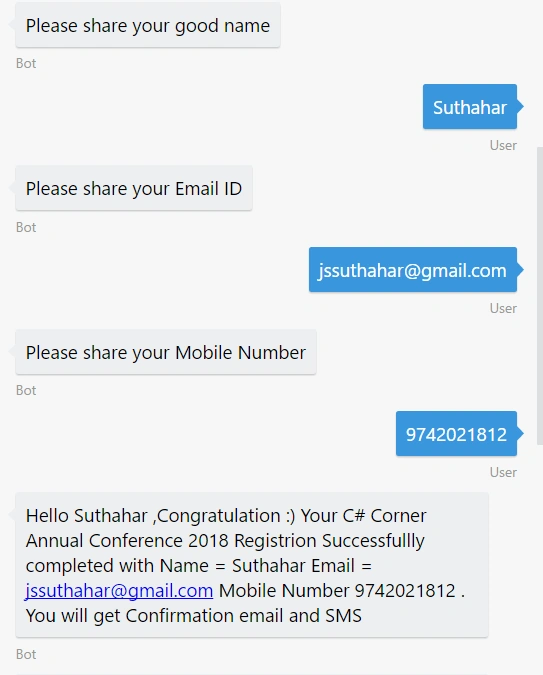
MessagesController Class
The RootDialog class is added to the conversation in the MessageController class via the Post() method. In the Post() method, the call to Conversation.SendAsync() creates an instance of the RootDialog, adds it to the dialog stack to make it the active dialog, calling the RootDialog.StartAsync() from Post method.
- [BotAuthentication]
- public class MessagesController : ApiController
- {
- /// <summary>
- /// POST: api/Messages
- /// Receive a message from a user and reply to it
- /// </summary>
- public async Task<HttpResponseMessage> Post([FromBody]Activity activity)
- {
- if (activity.Type == ActivityTypes.Message)
- {
- await Conversation.SendAsync(activity, () => new Dialogs.RootDialog());
- }
- else
- {
- HandleSystemMessage(activity);
- }
- var response = Request.CreateResponse(HttpStatusCode.OK);
- return response;
- }
- private Activity HandleSystemMessage(Activity message)
- {
- if (message.Type == ActivityTypes.DeleteUserData)
- {
- // Implement user deletion here
- // If we handle user deletion, return a real message
- }
- else if (message.Type == ActivityTypes.ConversationUpdate)
- {
- // Handle conversation state changes, like members being added and removed
- // Use Activity.MembersAdded and Activity.MembersRemoved and Activity.Action for info
- // Not available in all channels
- }
- else if (message.Type == ActivityTypes.ContactRelationUpdate)
- {
- // Handle add/remove from contact lists
- // Activity.From + Activity.Action represent what happened
- }
- else if (message.Type == ActivityTypes.Typing)
- {
- // Handle knowing that the user is typing
- }
- else if (message.Type == ActivityTypes.Ping)
- {
- }
- return null;
- }
- }
Run Bot Application
The emulator is a desktop application that lets us test and debug our bot on the localhost. Now, you can click on "Run the application" in Visual studio and execute in the browser.
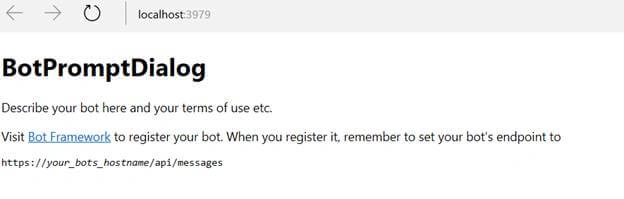
You can follow the below steps for testing your bot application.
- Open Bot Emulator.
- Copy the above localhost URL and paste it in emulator e.g. - https://localHost:3979
- You can append the /api/messages in the above URL; e.g. - https://localHost:3979/api/messages.
- You won't need to specify Microsoft App ID and Microsoft App Password for localhost testing. So, click on "Connect".

Summary
In this article, we saw how to use prompts to collect information from the users. If you have any questions/ feedback/ issues, please write in the comment box.
Jobin JosephPosted Oct 29, 2018, 3:59 AM
Is it possible to receive attachment like images from the user along with the form data ?
Sreelaya DevaguptamPosted Aug 1, 2018, 7:16 AM
The choice prompt isn't working. It doesn't show up in the bot and there are no errors when run.
Talha KhalidPosted Jul 3, 2018, 12:48 AM
Hi i am getting re prompts can you tell me any possible reasons for that?
Dev SheoranPosted May 31, 2018, 6:59 PM
I am getting error POST500directline.postActivity when I call context.Wait(this.ShowAnnuvalConferenceTicket); from BasicLuisDialog. Bot Emulator JSON Inspector given error details - {\r\n \"message\": \"An error has occurred.\",\r\n \"exceptionMessage\": \"IDialog method execution finished with multiple resume handlers specified through IDialogStack.\",\r\n \"exceptionType\": \"Microsoft.Bot.Builder.Dialogs.MultipleResumeHandlerException\",\r\n \"stackTrace\": \" at Microsoft.Bot.Builder.Dialogs.Internals.ExceptionTranslationDialogTask.<Microsoft-Bot-Builder-Dialogs-Internals-IPostToBot-PostAsync>d__2.MoveNext() in D:\\\\a\\\\1\\\\s\\\\CSharp\\\\Library\\\\Microsoft.Bot.Builder\\\\Dialogs\\\\DialogTask.cs:line 415\\r\\n--- End of stack trace from previous location where exception was thrown ---\\r\\n
Max DystopiaPosted May 25, 2018, 8:18 AM
Hi Suthahar, when I tried running it in the bot emulator it gave 405 error. How do I fix that?
gopal joshiPosted May 15, 2018, 9:13 AM
Is their any way i can localize the Prompt dialog. There are lots of unclear documents for it but it doesn?t give any solution. I am trying to make multilingual chatbot using localization and MAT.
Emanuele LeoniPosted Mar 20, 2018, 5:19 AM
Hi Sulthahar, the "Welcome" banner and Custom Prompt Dialog will appear only when an user typed a message to the bot?
Aqeel EjazPosted Dec 19, 2017, 3:52 AM
Great Stuff Man......!
om prakashPosted Sep 27, 2017, 9:15 AM
It is possible or not.
om prakashPosted Sep 27, 2017, 9:14 AM
How remove selection background color black from bot framework