I decided to write this article after realizing how many people have trouble with letting the user upload an image to their crystal report. Say for an example if the user wants to change or upload their logo onto the crystal report. How can you do this? How the developers can provide this facility to the users?
We all know that users cannot customize crystal reports much. Once the crystal report is generated, users don't have much of a choice to change the fields as they wish. This article is going to demonstrate how can the user upload or change an image on the crystal report.
This is actually a very simple example. Even if you have a novice knowledge about Crystal reports you will be able to understand how this works. I am using Crystal reports 11 for this demonstration.
To start off from the beginning, create a new windows application and add a crystal report viewer and a browse button.
This browse button will allow the user to add an image to the report. Add a crystal report into your project.
Report Schema:
We all know that we need to provide a schema for the crystal repot. Here is an XML view of the report schema that we are going to supply for the report.
<?
xml version="1.0" standalone="yes"?>
<xs:schema id="NewDataSet" xmlns="" xmlns:xs="http://www.w3.org/2001/XMLSchema" xmlns:msdata="urn:schemas-
microsoft-com:xml-msdata">
<xs:element name="NewDataSet" msdata:IsDataSet="true" msdata:Locale="en-AU">
<xs:complexType>
<xs:choice maxOccurs="unbounded">
<xs:element name="Images">
<xs:complexType>
<xs:sequence>
<xs:element name="path" type="xs:string" minOccurs="0" />
<xs:element name="image" type="xs:base64Binary" minOccurs="0" />
</xs:sequence>
</xs:complexType>
</xs:element>
</xs:choice>
</xs:complexType>
</xs:element>
</xs:schema>
BLOB field:
In order to add an image to the crystal report (considering the image field is coming from the database) we need to have a BLOB field in the schema. When you want to store images, documents or different custom types in the database you use a BLOB field. BLOB stands for Binary Large Object.
<
xs:element name="path" type="xs:string" minOccurs="0" />
<xs:element name="image" type="xs:base64Binary" minOccurs="0" />
If you inspect this schema we can see that we have a table called "Images" and two columns "path" and "image". "image" column is type Base64 Binary. This is our BLOB field.What we are going to do in our program is when the user selects the image to upload we store that image in a BLOB field as a stream of bytes and then supply that dataset to the report.
CreateTable() method will illustrate how to generate this schema in the program.
Generating the schema for the report:
There are other ways you can create the schema but this will give you a clearer idea about the column fields.
Creating the table:
private void CreateTable()
{
//create a new data set.
this.DsImages = new DataSet();
//create a new table with two columns and add the table to the
dataset
DataTable ImageTable = new DataTable("Images");
//in here the "path" column is not really needed. Image column is
just enough.
ImageTable.Columns.Add(new DataColumn("path",typeof(string)));
//Important note
//Note the type of the image column. You want to give this column
as a blob field to the crystal report.
//therefore define the column type as System.Byte[]
ImageTable.Columns.Add(new DataColumn("image",typeof(System.Byte[])));
this.DsImages.Tables.Add(ImageTable);
}
If you notice the "image" column you can see that the type of that column is System.Byte[]. This is pretty straight forward. Just create a table with two columns. Then add it to the dataset. Now you can create the schema using this line:
this
.DsImages.WriteXmlSchema(@"c:\temp\ImagesSchema.xsd");
Once we have the schema ready we can provide it to the crystal report.
Image 1:
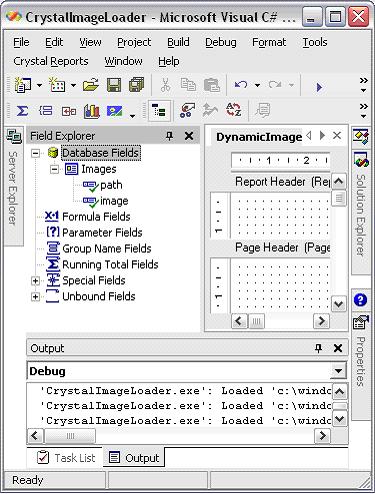
Inspect the Image 1, in the field explorer we can see Images table and the two columns path and image. When you drag the image column onto the report you can see the type of that field is IBlobFieldObject. These fields will read a stream of bytes and convert it back to an image. So our task is pretty much done. The code below shows you how it can save the image as a stream of bytes in the BLOB field.
private void openFileDialog1_FileOk(object sender, System.ComponentModel.CancelEventArgs e)
{
try
{
//get the image file into a stream reader.
FileStream FilStr = new FileStream(this.openFileDialog1.FileName, FileMode.Open);
BinaryReader BinRed = new BinaryReader(FilStr);
//Adding the values to the columns
// adding the image path to the path column
DataRow dr = this.DsImages.Tables["images"].NewRow();
dr["path"] = this.openFileDialog1.FileName;
//Important:
// Here you use ReadBytes method to add a byte array of the image stream.
//so the image column will hold a byte array.
dr["image"] = BinRed.ReadBytes((int)BinRed.BaseStream.Length);
this.DsImages.Tables["images"].Rows.Add(dr);
FilStr.Close();
BinRed.Close();
//create the report object
DynamicImageExample DyImg = new DynamicImageExample();
// feed the dataset to the report.
DyImg.SetDataSource(this.DsImages);
this.crystalReportViewer1.ReportSource = DyImg;
}
catch(Exception er)
{
MessageBox.Show(er.Message,"Error");
}
}
You write this in the FileOk method of the openFileDialog. You use the BinaryReader.ReadBytes method to read the byte array.
dr["image"] = BinRed.ReadBytes((
int)BinRed.BaseStream.Length);
If you inspect this line of code you can see that we have assigned a byte array in the "image" column of the table. This byte array is the image that the user selected. So when you supply this dataset to the crystal report the IBlobFieldObject in the report will convert this byte array back to the image.
That is all you need to understand in this program. Below I have listed all the important steps you need to understand.
- User selects an image.
- We save the image in a blob field as a stream of bytes.
- Supply the dataset to the report which contains the BLOB field.
- Report will convert the stream of bytes back to the image and show it.
Conclusion:
Using this example in we can give the user to customize the images they want to upload to the report. This would be a good implementation in situations like if the users want to change the images on the report or upload their logos by them selves. Users don't have to contact their software development team every time they want to change an image on the report. Customizing the crystal report at the user end is not possible when it comes to moving the fields across the report or adding new fields. This article only helps you to understand how you can upload an image at run time. It does not tell how you can customize a crystal report at runtime. I hope you understood the concept of this article.
Just download this program and try it. Make sure you have Crystal Reports 11. The code I have written here is basic. You shouldn't have any problems understanding this.