

It provides an easy way to Render HTML in our View.
The following is the list of Html Helper controls.
- Html.Beginform
- Html.EndForm
- Html.Label
- Html.TextBox
- Html.TextArea
- Html.Password
- Html.DropDownList
- Html.CheckBox
- Html.RedioButton
- Html.ListBox
- Html.Hidden
Below are Strongly Type Html Helper methods, this will allow us to check compile time errors. We get Model's Property intelligence at Runtime.
- Html.LabelFor
- Html.TextBoxFor
- Html.TextAreaFor
- Html.DropDownListFor
- Html.CheckBoxFor
- Html.RadioButtonFor
- Html.ListBoxFor
- Html.HiddenFor
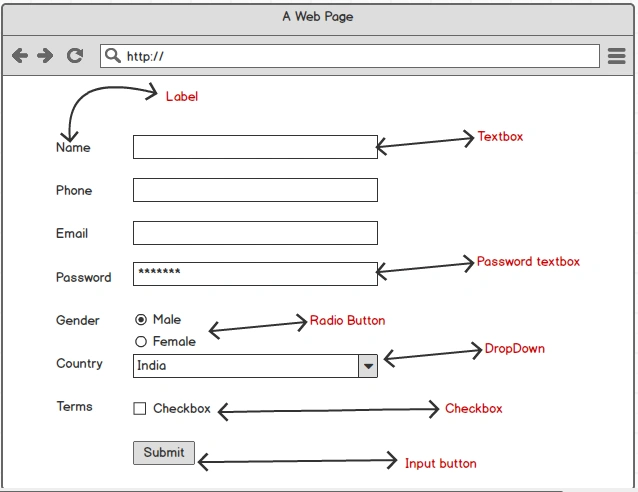
Here we have Label, Textbox, Password, Rediobutton, DropDown and Checkbox.
In ASP.NET Application we have Server Controls, so we just need to drag and drop from the Toolbox and design the page easily, but here in MVC Application we don't have Server Control so either we can use html or Html Helper Class Controls.
One more important thing here is in MVC there is no ViewState, so managing controls value here is challenging.
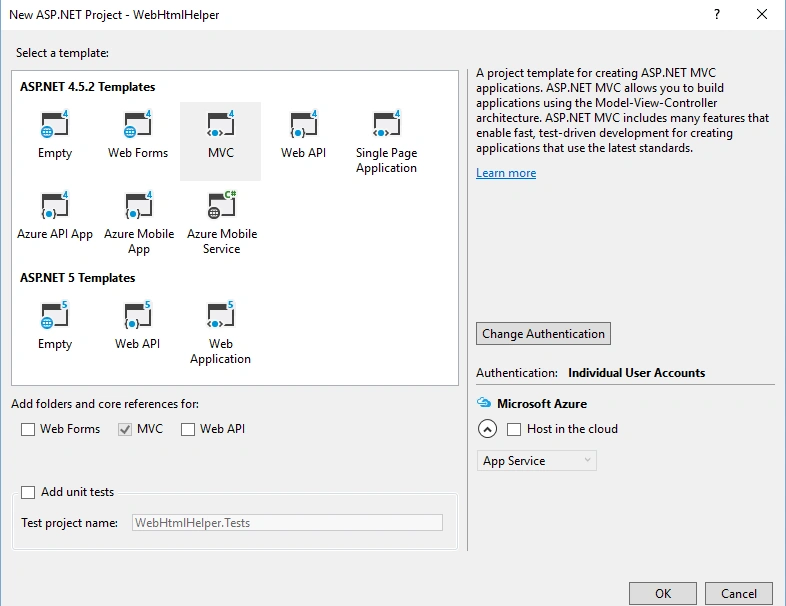
Create a new MVC Project, go to Files - > New Project -> ASP.NET Web Application and Select MVC Template. Give a name and Click on Ok.
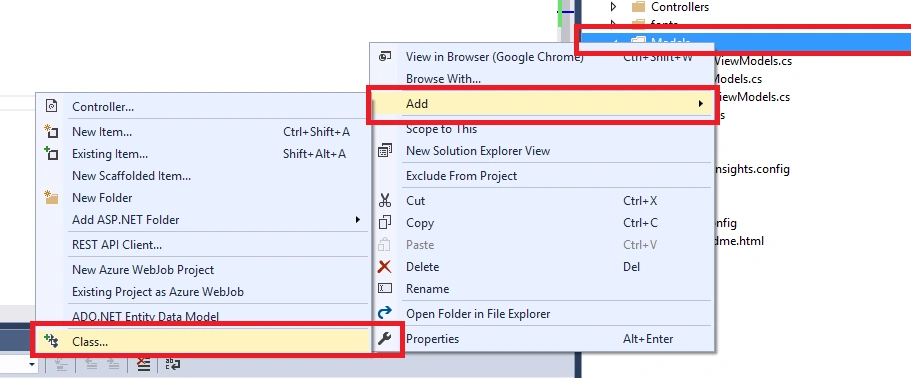
Right click on Model folder and add new Class 'Register.cs'.
Create a property for the Register class as follows.
- public class Register
- {
- public string Name { get; set; }
- public string Phone { get; set; }
- public string Email { get; set; }
- public string Gender { get; set; }
- public string Password { get; set; }
- public string Country { get; set; }
- public bool Terms { get; set; }
- }
Let's use HomeController and it's view 'Index.cshtml'
In the html part let's start the with Html.BeginForm.
That is the main container, we will place all controls inside the tag.
That is the main container, we will place all controls inside the tag.
- @using (Html.BeginForm("Index", "Home", FormMethod.Post))
- {
- }
If you are not passing any parameter like View name and Controller name then it will automatically call the current controller action method having [HttpPost] attribute.
Inside the Form Let's Start with Html.Lable : @Html.Label("UserName").
This will create a Lable Named UserName, so for Creating Label we will use @Html.Lable
This will create a Lable Named UserName, so for Creating Label we will use @Html.Lable
Next, We need Textbox for the UserName, for that we use Html.TextBox same as @Html.TextBox("UserName").
This will Create a TextBox Named UserName.
- @using (Html.BeginForm("Index", "Home", FormMethod.Post))
- {
- <br />
- @Html.Label("UserName")
- @Html.TextBox("UserName")
- <br />
- }
Same way we will design UserPhone, UserEmail etc.
- @using (Html.BeginForm("Index", "Home", FormMethod.Post))
- {
- <br />
- @Html.Label("UserName")
- @Html.TextBox("UserName")
- <br />
- @Html.Label("UserPhone")
- @Html.TextBox("UserPhone")
- <br />
- @Html.Label("UserEmail")
- @Html.TextBox("UserEmail")
- <br />
- }
- @Html.Label("UserPassword")
- @Html.Password("UserPassword")
- <br />
- @Html.Label("M")
- @Html.RadioButton("M", new { value = "Male" })
- @Html.Label("F")
- @Html.RadioButton("F", new { value = "Female" })
- <br />
For Country selection we can use dropdown and for that we have Html.DropDownList.
Here we have to create a list for the country for that I have added below code outside of BeginForm tag.
Here we have to create a list for the country for that I have added below code outside of BeginForm tag.
- @{
- var MyList = new List<SelectListItem>(){
- new SelectListItem(){Value="1",Text="India"},
- new SelectListItem(){Value="2",Text="UK"}
- };
- }
Now Use this MyList in your Html.DropDownList as follows.
- @Html.Label("UserCountry")
- @Html.DropDownList("UserCountry", MyList)
- <br />
- <br />
- @Html.Label("UserTerms")
- @Html.CheckBox("UserTerms")
- <br />
Add Submit button in the view as follows.
- <input type="submit" value="Submit" />
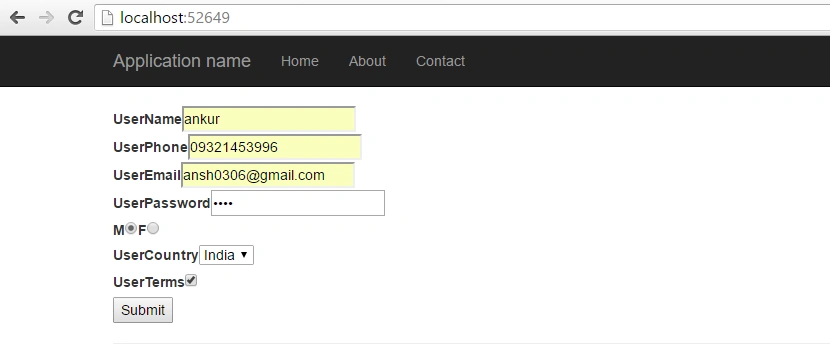
Below is the view of html which shows Render of controls. Here you can see the id and name property of control id="UserName" and Name = "UserName".
- <form action="/" method="post">
- <br />
- <label for="UserName">UserName</label>
- <input id="UserName" name="UserName" type="text" value="" />
- <br />
- <label for="UserPhone">UserPhone</label>
- <input id="UserPhone" name="UserPhone" type="text" value="" />
- <br />
- <label for="UserEmail">UserEmail</label>
- <input id="UserEmail" name="UserEmail" type="text" value="" />
- <br />
- <label for="UserPassword">UserPassword</label>
- <input id="UserPassword" name="UserPassword" type="password" />
- <br />
- <label for="M">M</label>
- <input id="M" name="M" type="radio" value="{ value = Male }" />
- <label for="F">F</label>
- <input id="F" name="F" type="radio" value="{ value = Female }" />
- <br />
- <label for="UserCountry">UserCountry</label>
- <select id="UserCountry" name="UserCountry">
- <option value="1">India</option>
- <option value="2">UK</option>
- </select>
- <br />
- <label for="UserTerms">UserTerms</label>
- <input id="UserTerms" name="UserTerms" type="checkbox" value="true" />
- <input name="UserTerms" type="hidden" value="false" />
- <br />
- <input type="submit" value="Submit" />
- </form>
Same thing but we will bind this with our model. I have already created the model class which is 'Register.cs'
Go to your HomeController and add Model reference.
- using WebHelper.Models;
and in the Index method write below code.
I have added [HrtpPost] Attributes here, and pass object r of Register class.
- [HttpPost]
- public ActionResult Index(Register r)
- {
- return View();
- }
Now, I have designed the same form by binding it through Model property using Html Helper methods.
For Label we can use Html.LabelFor and assign it with the property 'Name', 'Email', 'Phone' Etc.
By writing m => m.Name we are binding label with the model property 'Name'.
By writing m => m.Name we are binding label with the model property 'Name'.
Same way for Textbox we can use Html.TextBoxFor and assign it with the property 'Name', 'Email', 'Phone' Etc
Html.PasswordFor for Password field, Html.RadioButtonFor for Password field, Html.DropDownListFor for dropdown field, Html.CheckBoxFor for checkbox field etc.
Check below html code for the same form.
- @model WebHelper.Models.Register
- @{
- var MyList = new List
- <SelectListItem>(){
- new SelectListItem(){Value="1",Text="India"},
- new SelectListItem(){Value="2",Text="UK"}
- };
- }
- @using (Html.BeginForm("Index", "Home", FormMethod.Post))
- {
- @Html.LabelFor(m => m.Name)
- @Html.TextBoxFor(m => m.Name)
- <br />
- @Html.LabelFor(m => m.Phone)
- @Html.TextBoxFor(m => m.Phone)
- <br />
- @Html.LabelFor(m => m.Email)
- @Html.TextBoxFor(m => m.Email)
- <br />
- @Html.LabelFor(m => m.Password)
- @Html.PasswordFor(m => m.Password)
- <br />
- @Html.Label("Male")
- @Html.RadioButtonFor(m => m.Gender, "Male", new { value = "Male" })
- @Html.Label("Female")
- @Html.RadioButtonFor(m => m.Gender, "Female", new { value = "Female" })
- <br />
- @Html.LabelFor(m => m.Country)
- @Html.DropDownListFor(m => m.Country, MyList)
- <br />
- @Html.LabelFor(m => m.Terms)
- @Html.CheckBoxFor(m => m.Terms)
- <br />
- <input type="submit" value="Submit" />
- }
Now, run the application, fill the information and set breakpoint in controller, shown as per below screen.
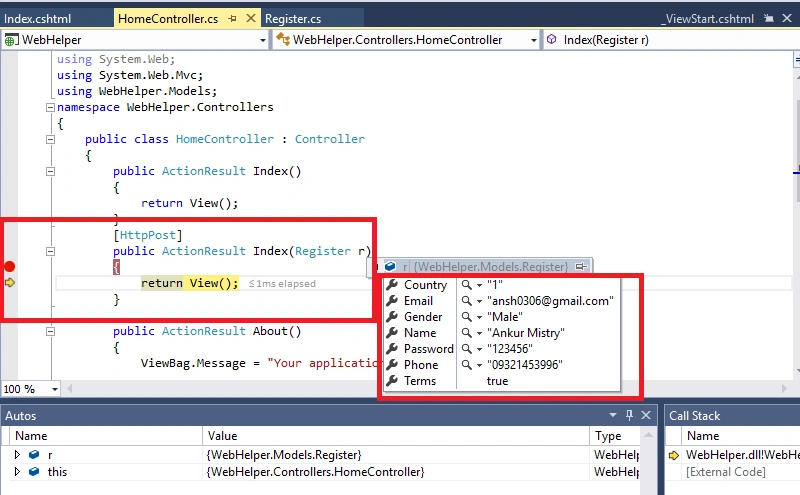
Here you can see that I got all the values of the form controls in my controller class.
Now if you want to persist the values of the controls you can pass the object in View for example return View(r) here I am passing object 'r'.
- [HttpPost]
- public ActionResult Index(Register r)
- {
- return View(r);
- }
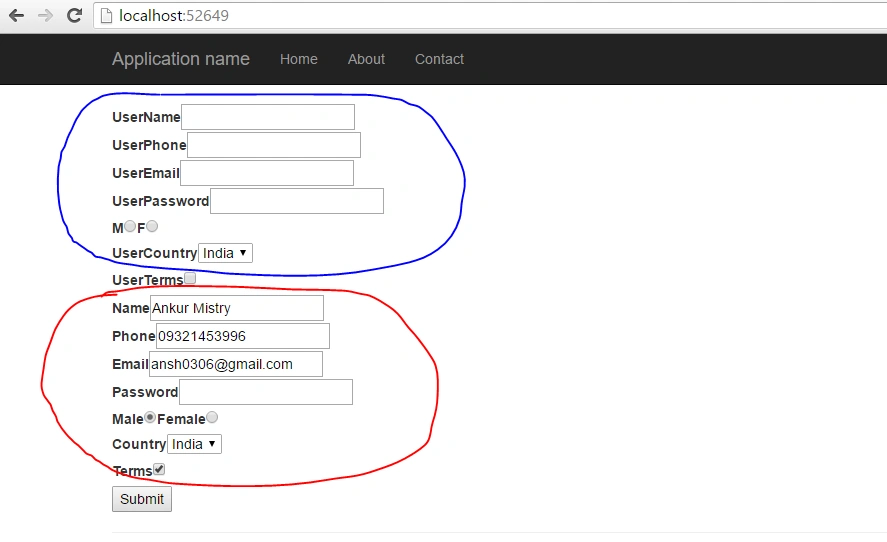
Model Binder will bind the control's values with model values.
Read more articles on ASP.NET:
Vikas RaoPosted Feb 26, 2020, 2:10 AM
Thanks Sir
Muhammad AsadPosted Sep 2, 2019, 8:01 AM
How to add left side space in dropdownlist
Humayun Kabir MamunPosted Apr 4, 2016, 5:56 AM
Nice...
kalu singh raoPosted Apr 1, 2016, 12:44 PM
Nice...
Ankur MistryPosted Apr 1, 2016, 2:40 AM
Thank you all
Rajeev PunhaniPosted Apr 1, 2016, 2:37 AM
Helpful article .
Mayank SharmaPosted Apr 1, 2016, 1:38 AM
Very very helpful for all of us Sir. Please keep sharing this type of article.
Nikhil RajputPosted Apr 1, 2016, 1:05 AM
Very Helpful article Sir.
Former memberPosted Apr 1, 2016, 1:04 AM
Good One .....
Rahul LadPosted Apr 1, 2016, 12:41 AM
very useful article
MannanPosted Apr 1, 2016, 12:22 AM
nice share
Hari ShankerPosted Mar 31, 2016, 11:33 PM
nice article