

Introduction
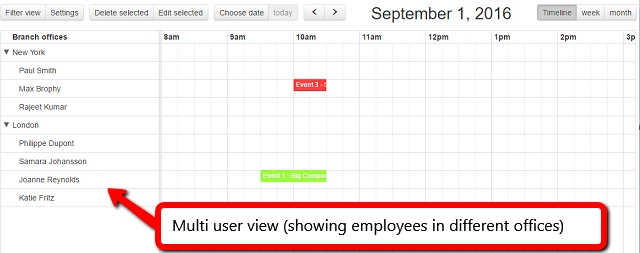
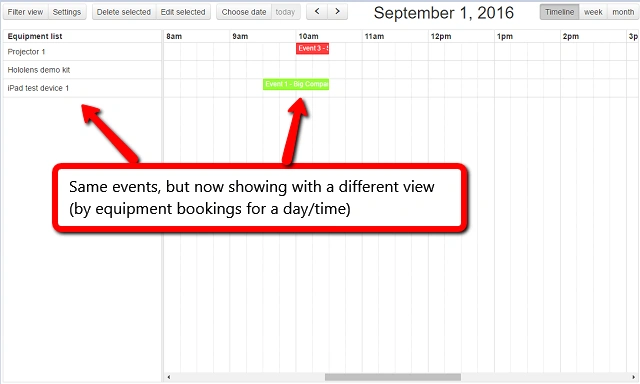
FullCalendar resources
- by office or location
- by department
- by project team
- by status
In addition to being grouped by some overall theme, we might also find that users share a set of things. We might want to view these either individually, or as a group. Here are some examples of things users might share,
- equipment
- meeting rooms
- remote support login account
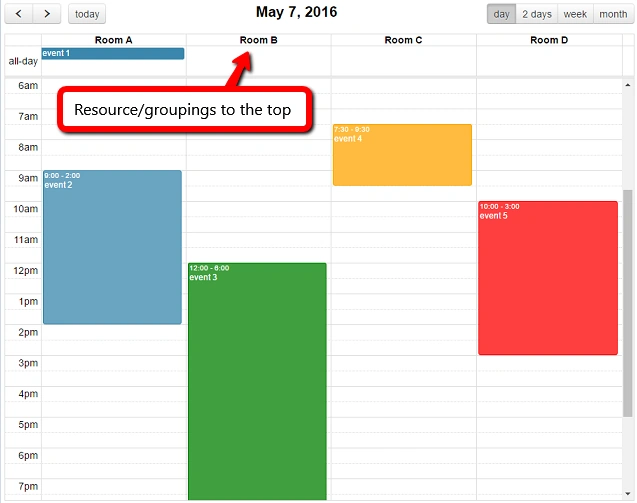
In FullCalendar, the items that appear as groupings, are called 'Resources'. The image below shows how they can appear in both horizontal and vertical view.
View 1
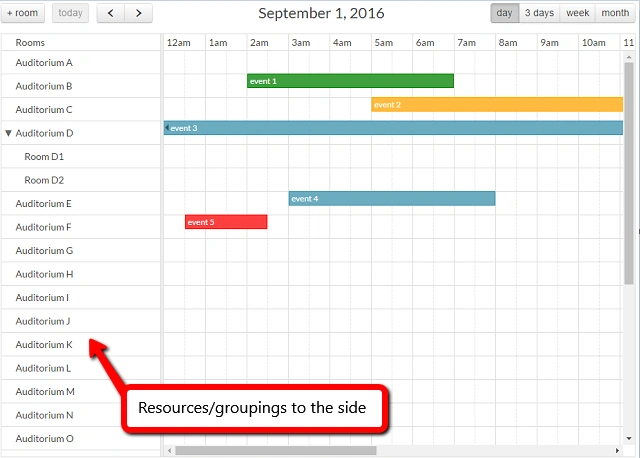 View 2
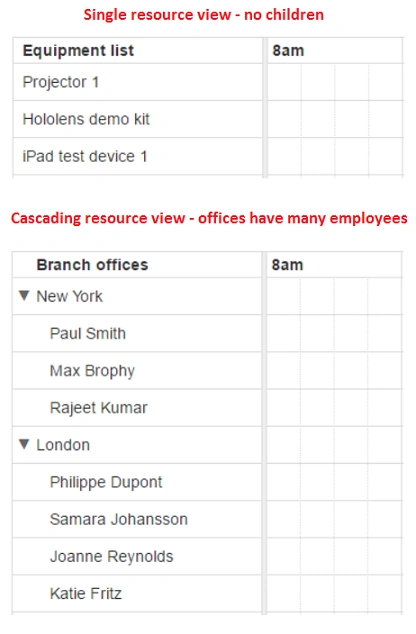
 If we take things a step further, we could consider that a user or item they share may be involved in some kind of relationship, like for example certain meeting rooms are constrained by being in certain offices, or users or their equipment may be available only in certain locations. Here are some examples of how these things might be grouped,
- Office has many meeting rooms
- Users are only available in certain locations
In order to achieve the flexibility described above, where we can have 'resources within resources', the approach FullCalendar takes is to allow the creation of a parent/child relationship between resource groupings. Note that we are not restricted to having the same items or relationships from one resource node to the next - if we want to have a top level resource node with no children, the next with three, the next with five, the next with eight, and each of these with multiple child nodes as well, its all possible.
 The key to working with FullCalendar in this way is manipulation of these resources, and how they get grouped together. Lets look now at how it can be done.
Generally, I would expect to drive a diary system from a database of some sort. In order to keep this article and its demo code database agnostic, I decided to put together a simple test harness. This relies on creating a series of classes, creating/populating them with sample data, and using this to simulate a database environment.
The harness consists of a number of classes which represent different things I want to demonstrate in the article. These are lists of users, equipment, offices, what users work out of which offices, and schedule/diary events. The harness defines the classes, and then there is an initialisation section that seeds the harness with test data. When the user (thats you!) runs the demo code, the application checks if a serialised (xml) representation of the harness exists in the user/temp folder, and if it does, it loads that, if not, it initialises itself and creates the test data. I'm only going to touch on the highlights of the setup code in this article, as the main focus is on how to use the resource functionality to enhance the Diary. If you want to go through the setup and other code in more detail, please download the code!
Setting up the TestHarness
The key to working with FullCalendar in this way is manipulation of these resources, and how they get grouped together. Lets look now at how it can be done.
Generally, I would expect to drive a diary system from a database of some sort. In order to keep this article and its demo code database agnostic, I decided to put together a simple test harness. This relies on creating a series of classes, creating/populating them with sample data, and using this to simulate a database environment.
The harness consists of a number of classes which represent different things I want to demonstrate in the article. These are lists of users, equipment, offices, what users work out of which offices, and schedule/diary events. The harness defines the classes, and then there is an initialisation section that seeds the harness with test data. When the user (thats you!) runs the demo code, the application checks if a serialised (xml) representation of the harness exists in the user/temp folder, and if it does, it loads that, if not, it initialises itself and creates the test data. I'm only going to touch on the highlights of the setup code in this article, as the main focus is on how to use the resource functionality to enhance the Diary. If you want to go through the setup and other code in more detail, please download the code!
Setting up the TestHarness
Code setup
Test Harness
- public class TestHarness
- {
- public List < BranchOfficeVM > Branches {
- get;
- set;
- }
- public List < ClientVM > Clients {
- get;
- set;
- }
- public List < EquipmentVM > Equipment {
- get;
- set;
- }
- public List < EmployeeVM > Employees {
- get;
- set;
- }
- public List < ScheduleEventVM > ScheduleEvents {
- get;
- set;
- }
- public List < ScheduleEventVM > UnassignedEvents {
- get;
- set;
- } // constructor public TestHarness() { Branches = new List<BranchOfficeVM>(); Equipment = new List
- <EquipmentVM>(); Employees = new List<EmployeeVM>(); ScheduleEvents = new List<ScheduleEventVM>();
- UnassignedEvents = new List<ScheduleEventVM>(); Clients = new List<ClientVM>(); } ... <etc>
- // initial setup if none already exists to load public void Setup()
- {
- initClients();
- initUnAssignedTasks();
- initBranches();
- initEmployees();
- linkEmployeesToBranches();
- initEquipment();
- initEvents();
- }
- public void initBranches() {
- var b1 = new BranchOfficeVM();
- b1.BranchOfficeID = Guid.NewGuid().ToString();
- b1.Name = "New York";
- Branches.Add(b1);
- var b2 = new BranchOfficeVM();
- b2.BranchOfficeID = Guid.NewGuid().ToString();
- b2.Name = "London";
- Branches.Add(b2);
- }
- public void initEmployees() {
- var v1 = new EmployeeVM();
- v1.EmployeeID = Guid.NewGuid().ToString();
- v1.FirstName = "Paul";
- v1.LastName = "Smith";
- Employees.Add(v1);
- var v2 = new EmployeeVM();
- v2.EmployeeID = Guid.NewGuid().ToString();
- v2.FirstName = "Max";
- v2.LastName = "Brophy";
- Employees.Add(v2);
- var v3 = new EmployeeVM();
- v3.EmployeeID = Guid.NewGuid().ToString();
- v3.FirstName = "Rajeet";
- v3.LastName = "Kumar";
- Employees.Add(v3);... < etc >
- public void initClients()
- {
- Clients.Add(new ClientVM("Big Company A", "New York"));
- Clients.Add(new ClientVM("Small Company X", "London"));
- Clients.Add(new ClientVM("Big Company B", "London"));
- Clients.Add(new ClientVM("Big Company C", "Mumbai"));
- Clients.Add(new ClientVM("Small Company Y", "Berlin"));
- Clients.Add(new ClientVM("Small Company Z", "Dublin"));
- }
Create relationships between the various bits of test data
- public void linkEmployeesToBranches()
- {
- var EmployeeUtil = new EmployeeVM();
- Branches[0].Employees.Add(EmployeeUtil.EmployeeByName(Employees, "Paul"));
- Branches[0].Employees.Add(EmployeeUtil.EmployeeByName(Employees, "Max"));
- Branches[0].Employees.Add(EmployeeUtil.EmployeeByName(Employees, "Rajeet"));
- Branches[1].Employees.Add(EmployeeUtil.EmployeeByName(Employees, "Philippe"));
- Branches[1].Employees.Add(EmployeeUtil.EmployeeByName(Employees, "Samara"));...
- < etc >
- public void initEvents()
- {
- var utilBranch = new BranchOfficeVM();
- var EmployeeUtil = new EmployeeVM();
- var s1 = new ScheduleEventVM();
- s1.BranchOfficeID = utilBranch.GetBranchByName(Branches, "New York").BranchOfficeID;
- var c1 = utils.GetClientByName(Clients, "Big Company A");
- s1.clientId = c1.ClientID;
- s1.clientName = c1.Name;
- s1.clientAddress = c1.Address;
- s1.title = "Event 2 - Big Company A";
- s1.statusString = Constants.statusBooked;
- var v1 = EmployeeUtil.EmployeeByName(Employees, "Paul");
- s1.EmployeeId = v1.EmployeeID;
- s1.EmployeeName = v1.FullName;
- s1.DateTimeScheduled = new DateTime(DateTime.Now.Year, DateTime.Now.Month, DateTime.Now.Day, 11, 15, 0);
- s1.durationMinutes = 120;
- s1.duration = s1.durationMinutes.ToString();
- s1.DateTimeScheduledEnd = s1.DateTimeScheduled.AddMinutes(s1.durationMinutes);
- ScheduleEvents.Add(s1);... < etc >
- public void initUnAssignedTasks()
- {
- var uaItem1 = new ScheduleEventVM();
- var cli1 = utils.GetClientByName(Clients, "Big Company A");
- uaItem1.clientId = cli1.ClientID;
- uaItem1.clientName = cli1.Name;
- uaItem1.clientAddress = cli1.Address;
- uaItem1.title = cli1.Name + " - " + cli1.Address;
- uaItem1.durationMinutes = 30;
- uaItem1.duration = uaItem1.durationMinutes.ToString();
- uaItem1.DateTimeScheduled = DateTime.Now.AddDays(14);
- uaItem1.DateTimeScheduledEnd = uaItem1.DateTimeScheduled.AddMinutes(uaItem1.durationMinutes);
- uaItem1.notes = "Test notes 1";... < etc >
First, the start of the general setup
- // Main code to initialise/setup and show the calendar itself.
- function ShowCalendar()
- {
- $('#calendar').fullCalendar
- ({
- schedulerLicenseKey: 'GPL-My-Project-Is-Open-Source',
- // change depending on license type
- theme: false,
- resourceAreaWidth: 230,
- groupByDateAndResource: false,
- editable: true,
- aspectRatio: 1.8,
- scrollTime: '08:00',
- timezone: 'local',
- droppable: true,
- drop: function
- ...<snip> ...
Then the important part for the resources
- // this is where the resource loading for laying out the page is triggered from resourceLabelText: "@Model.ResourceTitle",
- // set server-side resources:
- { url: '/Home/GetResources', data: {resourceView : "@Model.DefaultView"},
- type: 'POST', ...<snip> ...
Here is an array example
- $('#calendar').fullCalendar({
- resources: [{
- id: 'a',
- title: 'Room A'
- }, {
- id: 'b',
- title: 'Room B'
- }]
- });
Relationship between diary event objects and resources
- events: [ { id: '1', title: 'Meeting', start: '2015-02-14' }
Lets say we have the following structure of resources,
- resources: [ { id: 'a', title: 'Room A' } ]
- $('#calendar').fullCalendar({
- resources: [{
- id: 'a',
- title: 'Room A'
- }],
- events: [{
- id: '1',
- resourceId: 'a',
- title: 'Meeting',
- start: '2015-02-14'
- }]
- });
We can also associate an event with multiple different resources - in this case, we separate the IDs using a comma, and use the plural 'resourceIds' to define the relationship, versus the singular used for one link.
- $('#calendar').fullCalendar
- ({
- resources: [{
- id: 'a',
- title: 'Room A'
- }, {
- id: 'b',
- title: 'Room B'
- }],
- events: [{
- id: '1',
- resourceIds: ['a', 'b'],
- title: 'Meeting',
- start: '2015-02-14'
- }]
- });
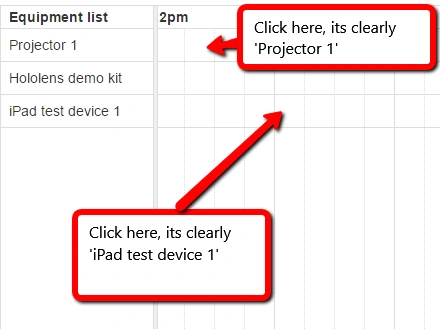
Now, here's something to get your head around ... a resourceId is a moving target. What I mean by this is that depending on what kind of view you are using, the ID of it means something different. For example, if the current view is ‘timeline: equipment’, then the ResourceID refers to the EquipmentID. If the current view is ‘timeline: Employees’, then the ResourceID refers to the EmployeeID.
The reason for this is that the diary grid for timeline view shows date/time on top (columns), and the rows are reserved for the main ‘diary event’ in question, being the resource having the focus (employee, or equipment, etc).
Switching between resource views / loading data
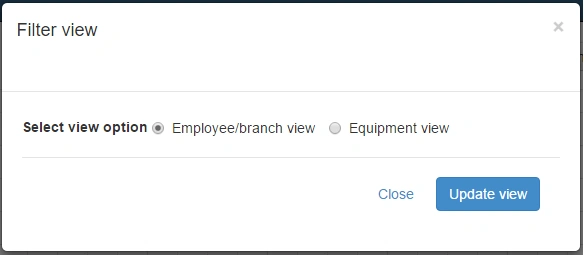
In the OnClick/close modal event of the selector form, Javascript code takes the value of the resource type the user wants to see, and posts this to the server calling 'setView'. I decided to use a post versus a get as I didn't want to make my URL ugly! The SetView controller sets the new default view in the session data, then redirects back to the index controller and the correct view is then rendered to the user.
- $('#btnUpdateView').click(function()
- {
- var selectedView = $('input[name="rdoResourceView"]:checked').val();
- post('/Home/setView',
- {
- ResourceView: selectedView
- }, 'setView');
- });
Server-side code
- Index controller
- public class HomeController: Controller
- {
- TestHarness testHarness;
- // used to store temp data repository public ActionResult
- Index(string ResourceView)
- {
- // create test harness if it does not exist
- // this harness represents interaction you may replace with database calls.
- if (Session["ResourceView"]!=null)
- // refers to whatever default view you may have,
- // for example Offices/Users/Shared Equipment/etc
- // you can create any amount and combination
- // of different view types you need.
- ResourceView = Session["ResourceView"].ToString();
- if (!System.IO.File.Exists(utils.GetTestFileLocation()))
- {
- testHarness = new TestHarness();
- testHarness.Setup();
- utils.Save(utils.GetTestFileLocation(), testHarness);
- }
- if (ResourceView == null) ResourceView = "";
- ResourceView = ResourceView.ToLower().Trim();
- var DiaryResourceView = new Resource();
- if (ResourceView == "" || ResourceView == "employees")
- // set the default
- {
- DiaryResourceView.DefaultView = "employees";
- DiaryResourceView.ResourceTitle = "Branch offices";
- }
- else if
- (
- ResourceView == "equipment")
- {
- DiaryResourceView.DefaultView = ResourceView;
- DiaryResourceView.ResourceTitle = "Equipment list";
- }
- return View(DiaryResourceView);
- }
- SetView controller
- // this method, called from the index page, sets a session variable for
- // the user that gets looped back to the index page to tell it what view
- // to display. branch/employee or Equipment.
- public ActionResult setView(string ResourceView)
- {
- Session["ResourceView"] = ResourceView; return RedirectToAction("Index");
- }
Useful functionality
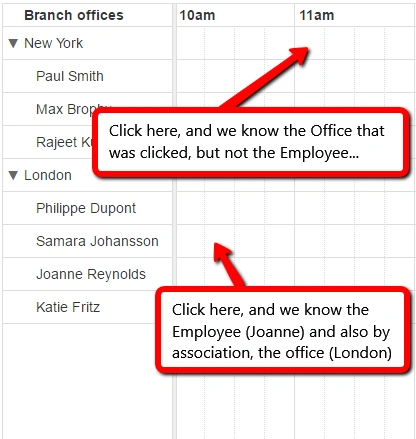
- // use this function to get a local list of employees/branches/equipment etc
- // and populate arrays as appropriate for checking business rules etc.
- function GetLocationsAndEmployees()
- {
- $.ajax
- ({
- url: '/home/GetSetupInfo',
- cache: false,
- success: function (resultData)
- {
- ClearLists(); EmployeeList = resultData.Employees.slice(0);
- BranchList = resultData.Branches.slice(0);
- EquipmentList = resultData.Equipment.slice(0);
- ClientList = resultData.Clients.slice(0);
- }
- });
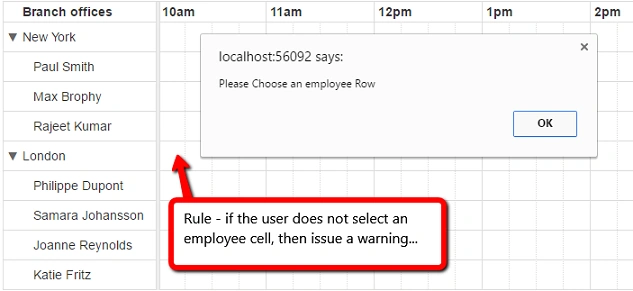
- var employeeResource = EmployeeList.find
- (
- // if the row clicked on is NOT in the known array of employeeID,
- // then drop out (and alert...)
- function (employee)
- {
- return employee.EmployeeID == resourceObj.id;
- }
- )
Drag and drop
To identify items to be dropped, we mark them with a class 'draggable'. To attach data to them, we call a function that iterates through everything marked with this class, and assign data as follows,
- // set up for drag/drop of unassigned tasks into scheduler
- // *example only - if using a large data feed from a table* function
- InitDragDrop()
- {
- $('.draggable').each(function ()
- {
- // create an Event Object
- // ref: (http://arshaw.com/fullcalendar/docs/event_data/Event_Object/)
- // it doesn't need to have a start or end
- var table = $('#UnScheduledEvents').DataTable();
- var eventObject = {
- id: $(table.row(this).data()[0]).selector,
- clientId: $(table.row(this).data()[1]).selector,
- start: $(table.row(this).data()[2]).selector,
- end: $(table.row(this).data()[3]).selector,
- title: $(table.row(this).data()[4]).selector,
- duration: $(table.row(this).data()[5]).selector,
- notes: $(table.row(this).data()[6]).selector,
- color: 'tomato'
- }
- // gotcha: MUST be named "event", for *external dropped objects* and
- // some rules: http://fullcalendar.io/docs/dropping/eventReceive/ $(this).data('event', eventObject);
- // make the event draggable using jQuery UI
- $(this).draggable
- ({
- activeClass: "ui-state-hover",
- hoverClass: "ui-state-active",
- zIndex: 999, revert: true,
- // will cause the event to go back to its revertDuration: 0
- // original position after the drag
- });
- });
- };
When the item is dropped, it is hooked by the FullCalendar 'eventReceive' method. In our example, we ask the user to confirm before proceeding,
- eventReceive: function(event)
- {
- var confirmDlg = confirm('Are you sure you wish to assign this event?');
- if (confirmDlg == true)
- {
- var eventDrag =
- {
- title: event.title,
- start: new Date(event.start),
- resourceId: event.resourceId,
- clientId: null,
- duration: 30,
- equipmentId: null,
- BranchID: null,
- statusString: "",
- notes: "",
- }
- UpdateEventMove(eventDrag, null);
- }
Now, heres a minor gotcha to note.... you will recall earlier in the article we discussed the 'resourceId' property of an event object being a 'moving target'... well here it is in action. Depending on the view the user is looking at (say employee or equipment), then the 'resourceId' value in the associated event, will *either* refer to the ID of an employee OR a piece of equipment. Due to this, here we example the view type before proceeding and sending the data to the server. Of course this is my example implementation, there are many ways to work the logic - the point of this is to point out that you need to take it into consideration.
- function UpdateEventMove(event, view)
- {
- // determine the view and from this set the correct EmployeeID or ResourceID
- // before sending down to server
- if (ResourceView == 'employees') event.employeeId = event.resourceId;
- else
- {
- event.employeeId = $('#newcboEmployees').val();
- }
- var dataRow =
- {
- 'Event': event
- }
- $.ajax
- ({
- type: 'POST', url: "/Home/PushEvent", dataType: "json", contentType: "application/json", data: JSON.stringify(dataRow)
- });
- }
Repeat / recurring calendar events
Understanding CRON format
- * (asterisk) means all values. For example, if we had '*' in the minute field, it would mean 'execute the job once per minute'. If it was in the month field, it would mean 'execute the job once per month'.
- commas in a field are used to separate values (eg: 2,4,6 .. on the 2nd, 4th and 6th minute)
- hyphens in a field are used to specify a range (eg: 4-9 .. between the 4th and 9th minute)
- after an asterisk or hyphen-range, we can use the forward slash '/' to indicate that values are repeated over and over with a particular interval between the values. (eg: 0-18/2 indicates execute the job every two hours between the time 0 hours and 18 hours)
Here are some examples showing CRON in action,
 * * * * * * Each minute 45 17 7 6 * * Every year, on June 7th at 17:45 * 0-11 * * * Each minute before midday 0 0 * * * * Daily at midnight 0 0 * * 3 * Each Wednesday at midnight
You can find out more detailed information on CRON here (where some examples came from) and here.
Whenever possible, I try not to reinvent the wheel. I came across the really useful JQuery-Cron builder from Shawn Chin a few years back and have used it in multiple projects since very successfully. Instead of forcing users to enter cryptic expressions to specify a cron expression, this JQuery plugin allows users to select recurring times from an easy to use GUI. It is designed as a series of drop-boxes that the users chooses values from. Depending on the initial selections, the interface changes to offer appropriate follow-on values. Once the user has set the repeat/recurring time they require, you can call a function that gives you back the CRON expression for the visual values the user selected.
Using the Cron builder is the usual JQuery style. We declare a div, then call the plugin against it,
* * * * * * Each minute 45 17 7 6 * * Every year, on June 7th at 17:45 * 0-11 * * * Each minute before midday 0 0 * * * * Daily at midnight 0 0 * * 3 * Each Wednesday at midnight
You can find out more detailed information on CRON here (where some examples came from) and here.
Whenever possible, I try not to reinvent the wheel. I came across the really useful JQuery-Cron builder from Shawn Chin a few years back and have used it in multiple projects since very successfully. Instead of forcing users to enter cryptic expressions to specify a cron expression, this JQuery plugin allows users to select recurring times from an easy to use GUI. It is designed as a series of drop-boxes that the users chooses values from. Depending on the initial selections, the interface changes to offer appropriate follow-on values. Once the user has set the repeat/recurring time they require, you can call a function that gives you back the CRON expression for the visual values the user selected.
Using the Cron builder is the usual JQuery style. We declare a div, then call the plugin against it,
JQueryUI Cron Builder
- <div id="repeatCRON"></div> $('#repeatCRON').cron();
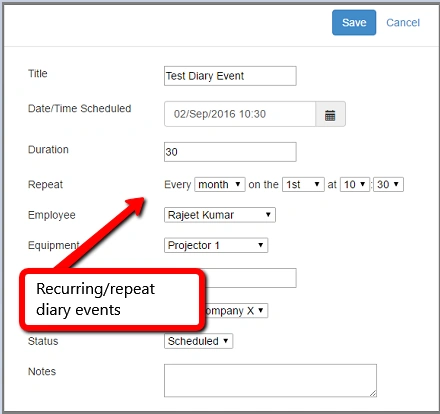
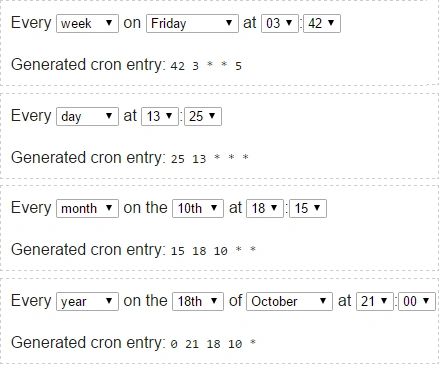
Here are some examples of it rendered in the browser,
When we save the diary event, we query the CronBuilder plugin and get the CRON expression - once we have this, we can then save it as a string into a field in our database .. in my case I named this field 'Repeat'.
- $('#submitButton').on('click', function(e)
- {
- e.preventDefault();
- SelectedEvent.title = $('#title').val();
- SelectedEvent.duration = $('#duration').val();
- SelectedEvent.equipmentId = $('#cboEquipment').val();
- SelectedEvent.branchId = $('#branch').val();
- SelectedEvent.clientId = $('#cboClient').val();
- SelectedEvent.notes = $('#notes').val();
- SelectedEvent.resourceId = $('#cboEmployees').val();
- SelectedEvent.statusString = $('#cboStatus').val();
- SelectedEvent.repeat = $('#repeatCRONEdit').cron("value") UpdateEventMove(SelectedEvent, null);
- doSubmit();
- });
We can also do the reverse - take a CRON string, and pass it into the JQuery builder, and it will display the UI that represents the CRON expression.
- if (SelectedEvent.repeat != null) $('#repeatCRONEdit').cron("value", SelectedEvent.repeat);
- else $('#repeatCRONEdit').cron("value", "* * * * *");
NCronTab
- Parsing of crontab expressions
- Formatting of crontab expressions
- Calculation of occurrences of time based on a crontab schedule
This library does not provide any scheduler or is not a scheduling facility like cron from Unix platforms. What it provides is parsing, formatting and an algorithm to produce occurrences of time based on a give schedule expressed in the crontab format. (src: NCrontab)
In this example project, I am using a NCrontab library method to examine a stored CRON expression string, against the date range that the user has selected in the FullCalendar, and determine if any of my stored repeat values occur within that date range.
Lets look at how the code works for this,
- the user decides to refresh the diary to show events in a particular date range. Note the params sent in are the start and end date plus the resourceView required.
- public JsonResult GetScheduleEvents(string start, string end, string resourceView) .. <etc>
- we query all scheduled events for any event that has a 'repeat' value stored.
- repeatEvents = testHarness.ScheduleEvents.Where(s => (s.repeat != null));
- we then examine each repeat event (ie: the CRON string expression), and PARSE it with NCronTab.CrontabSchedule, passing the result of the parse into a method that says 'between this start and end date given, give me a list of valid date/times the CRON string represents.
- if (repeatEvents != null) foreach(var rptEvnt in repeatEvents)
- {
- var schedule = CrontabSchedule.Parse(rptEvnt.repeat);
- var nextSchdule = schedule.GetNextOccurrences(Start, End);
- foreach(var startDate in nextSchdule) {
- ScheduleEvent itm = new ScheduleEvent();
- itm.id = rptEvnt.EventID;
- if (rptEvnt.title.Trim() == "") itm.title = rptEvnt.clientName;
- else itm.title = rptEvnt.title;
- itm.start = startDate.ToString("s");
- itm.end = startDate.AddMinutes(30).ToString("s");
- itm.duration = rptEvnt.duration.ToString();
- itm.notes = rptEvnt.notes;
- itm.statusId = rptEvnt.statusId;
- itm.statusString = rptEvnt.statusString;
- itm.allDay = false;
- itm.EmployeeId = rptEvnt.EmployeeId;
- itm.clientId = rptEvnt.clientId;
- itm.clientName = rptEvnt.clientName;
- itm.equipmentId = rptEvnt.equipmentID;
- itm.EmployeeName = rptEvnt.EmployeeName;
- itm.repeat = rptEvnt.repeat;
- itm.color = rptEvnt.statusString;
- if (resourceView == "employees") itm.resourceId = rptEvnt.EmployeeId;
- else itm.resourceId = rptEvnt.equipmentID;
- EventItems.Add(itm);
- }
- }
The final thing to note in the above code ar the last few lines - again, we go back to our 'moving target' issue. Depending on the view that the user has selected, we need to set the correct resourceId value so ti will render correctly once it is returned to the browser.
That pretty much wraps up the article. If you need to implement a fully loaded diary/calendar/appointment solution that incorporates multi resources in a very powerful way, you should strongly consider the combination of FullCalendar, JQueryCron, and NCronTab. I have attached a working example with the article that shows all of the functionality we have discussed working - please download and play with it.
Conclusion
Please note, this is not a standalone project - it demonstrates specific functionality. You should use it in conjunction with my other article explaining FullCalendar (and its accompanying code) to implement your own particular working solution.
David DuboisPosted Jun 25, 2021, 3:46 AM
Hi Love the example. However, I am having problems saving the repeating event. When I save a repeating event is repeats from and to infinity??????
santhosh kannanPosted Aug 9, 2019, 5:07 AM
Its mind-blowing
Lucas NgobeniPosted May 19, 2017, 9:14 AM
Thanks a lot, you're a life saver after all. this is clear and fantastic.
Upendra Pratap ShahiPosted Oct 5, 2016, 12:42 PM
Nice share sir..
Humayun Kabir MamunPosted Oct 5, 2016, 12:45 AM
Nice...
Manav PandyaPosted Oct 4, 2016, 1:07 PM
Nice share sir ..