

In part 1 of this article, we looked at how to set up SQL database in Azure, created a simple get operation in web API, and published the API to Azure. You can read part 1 here -
Agenda for this post is -
- Update our Web API to include Post, Update and Delete methods
- Creating SPFX web part
- Consume the Web API and Implement CRUD operations in Spfx web part
- Test the web part
If you have created a Web API solution as described in part 1, go ahead and copy the code below to update your solution, otherwise go back to part 1 to create a web API solution. Your final code should look like this.
- using System;
- using System.Collections.Generic;
- using System.Linq;
- using System.Net;
- using System.Net.Http;
- using System.Web.Http;
- using DemoAPI.Models;
- namespace DemoAPI.Controllers
- {
- public class EmployeeController : ApiController
- {
- public IEnumerable<Employee> GetEmployees()
- {
- using (StaffDemoDBEntities entities = new StaffDemoDBEntities())
- {
- return entities.Employees.ToList();
- }
- }
- public HttpResponseMessage GetEmployeeById(int id)
- {
- try
- {
- using (StaffDemoDBEntities entities = new StaffDemoDBEntities())
- {
- var entity= entities.Employees.FirstOrDefault(e => e.ID == id);
- //entities.Employees.Where(e => e.ID == id).FirstOrDefault();
- if (entity != null)
- {
- return Request.CreateResponse(HttpStatusCode.OK, entity);
- }
- else
- return Request.CreateErrorResponse(HttpStatusCode.NotFound, "Employee with id " + id + "was not found");
- }
- }
- catch(Exception ex)
- {
- return Request.CreateErrorResponse(HttpStatusCode.BadGateway, ex);
- }
- }
- public HttpResponseMessage Post([FromBody] Employee employee)
- {
- try {
- using (StaffDemoDBEntities entities = new StaffDemoDBEntities())
- {
- entities.Employees.Add(employee);
- entities.SaveChanges();
- var message = Request.CreateResponse(HttpStatusCode.Created, employee);
- message.Headers.Location = new Uri(Request.RequestUri + "/" + employee.ID.ToString());
- return message;
- }
- }
- catch (Exception ex)
- {
- return Request.CreateErrorResponse(HttpStatusCode.BadRequest, ex);
- }
- }
- public HttpResponseMessage Put(int id, [FromBody] Employee employee)
- { try
- {
- using (StaffDemoDBEntities entities = new StaffDemoDBEntities())
- {
- var entity = entities.Employees.FirstOrDefault(e => e.ID == id);
- if (entity != null)
- {
- entity.FirstName = employee.FirstName;
- entity.LastName = employee.LastName;
- entity.Gender = employee.Gender;
- entity.Salary = employee.Salary;
- entities.SaveChanges();
- return Request.CreateResponse(HttpStatusCode.OK, entity);
- }
- else
- return Request.CreateErrorResponse(HttpStatusCode.NotFound, "Employee with id " + id + "was not found");
- }
- }
- catch(Exception ex)
- {
- return Request.CreateErrorResponse(HttpStatusCode.BadRequest, ex);
- }
- }
- public HttpResponseMessage Delete(int id)
- {
- try
- {
- using (StaffDemoDBEntities entities = new StaffDemoDBEntities())
- {
- var entity = entities.Employees.FirstOrDefault(e => e.ID == id);
- if (entity != null)
- {
- entities.Employees.Remove(entity);
- entities.SaveChanges();
- return Request.CreateResponse(HttpStatusCode.OK, entity);
- }
- else
- return Request.CreateErrorResponse(HttpStatusCode.NotFound, "Employee object with id " + id + "was not found.");
- }
- }
- catch (Exception ex)
- {
- return Request.CreateErrorResponse(HttpStatusCode.BadRequest, ex);
- }
- }
- }
- }
Creating SPFX web part
The first step is to set up your dev environment for SharePoint framework development. If you have not already done so, follow this link to Set up your SharePoint Framework development environment.
Now, that you have finished setting up your environment, follow the steps below to create an spfx web part.
Step 1
Open command line, CMD.
Step 2
Create a folder named spfxusing the md command md (i.e. md spfx).
Step 3
Navigate to the folder you just created using "cd spfx" and type yo @microsoft/sharepoint
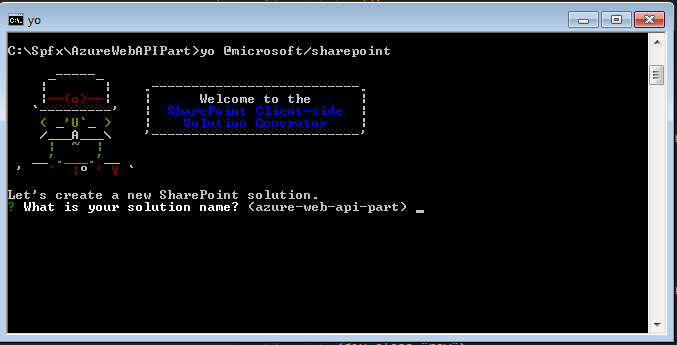
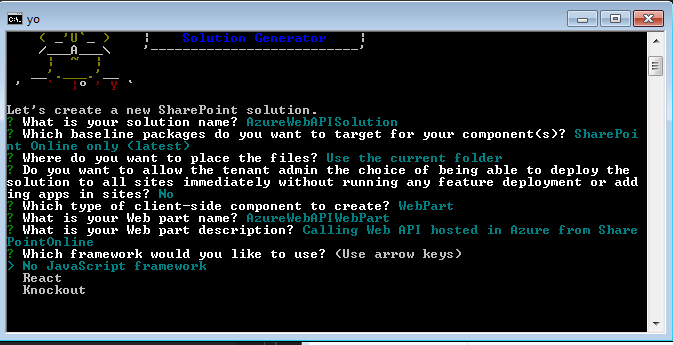
Follow the screenshot below to create a solution for your web part. Note that you can name your web part AzureWebAPIWebPart as shown below or anything you wish. Just ensure that when you are copying the code from here, you replace your web part name where necessary.
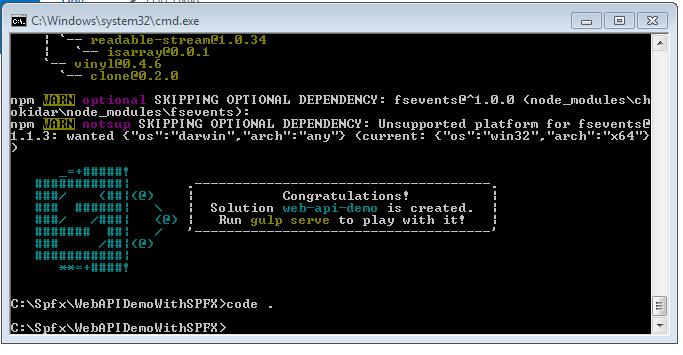
If all is well, you will seen a congratulations screen that looks like below. If there is any issue, ensure you fix it before going on to the next step.
Step 6
You can run gulp serve to ensure everything is okay. This should launch your default browser. Click the plus sign and add your web part. If all is fine, you should see your web part with default look.
Now let's install jquery and Typings for jquery as we require jquery ajax to make calls to our web API.
Step 7
To add jquery to your project, on command line type,
npm jquery --save
Step 8
Then type "code ." without the quote to open visual studio code editor.
Step 9
Click the drop down arrow next to src >Webparts>YourWebpartName
Step 10
Verify that jquery library was added successfully to your project by clicking the arrow next to nodes_modules > jquery > dist. Verify jquery.min.js is there.
Let's un-bundle the jquery library by externalizing it. This step is optional but good for page load performance.
Step 11
Open Config.json. YourWebpartName > Config > Config.json
Step 12
Modify it as shown below,
- "externals": {
- "jquery": {
- "path": "node_modules/jquery/dist/jquery.min.js",
- "globalName": "jQuery"
- }
Step 13
Go back to src and open YourWebpartName.ts. Let's import the jquery and load css file from a SharePoint library in the YourWebpartName.ts.
Note
Normally you would want to put your css classes in the .scss file (i.e. YourWebpartName.scss) and import it into the YourWebpartName.ts file (this is actually done automatically during project creation). But I decided to put it in a SharePoint list because my css selectors are grouped and I could not reference them using "styles.selector". Let me explain this a bit further,
- <div class="${ styles.webApiDemoWebPart }">
- <div class="${ styles.container }">
- <div class="${ styles.row }">
- <div class="${ styles.column }">
- <span class="${ styles.title }">Welcome to SharePoint!</span>
- <p class="${ styles.subTitle }">Customize SharePoint experiences using Web Parts.</p>
- <p class="${ styles.description }">${escape(this.properties.description)}</p>
- <a href="https://aka.ms/spfx" class="${ styles.button }">
- <span class="${ styles.label }">Learn more</span>
- </a>
- </div>
- </div>
- </div>
- </div>
"from the above code, class="${ styles.container }" means selector .container is being referenced from the stylesheet file (i.e. YourWebpartName.scss file). But when your css class selectors are grouped like,
- .container .row .column{
- width: 70%;
- }
To load our css file from a list or an external location, we have to import SPComponentLoader into our project
Step 14
Add the code line below in the import section at the top of your code inside YourWebpartName.ts file
Step 15
We also need to import jquery into the file. Copy and paste the following line of code above the SPComponentLoader. No special reason for putting it above SPComponentLoader, it's just my practice.
import * as jquery from 'jquery';
Step 16
Copy and paste the css file below in notepad and save as styles.css
- div.blueTable {
- border: 1px solid #1C6EA4;
- background-color: #EEEEEE;
- width: 100%;
- text-align: left;
- border-collapse: collapse;
- }
- .divTable.blueTable .divTableCell, .divTable.blueTable .divTableHead {
- border: 1px solid #AAAAAA;
- padding: 3px 2px;
- }
- .divTable.blueTable .divTableBody .divTableCell {
- font-size: 13px;
- }
- .divTable.blueTable .divTableRow:nth-child(even) {
- background: #D0E4F5;
- }
- .divTable.blueTable .divTableHeading {
- background: #1C6EA4;
- background: -moz-linear-gradient(top, #5592bb 0%, #327cad 66%, #1C6EA4 100%);
- background: -webkit-linear-gradient(top, #5592bb 0%, #327cad 66%, #1C6EA4 100%);
- background: linear-gradient(to bottom, #5592bb 0%, #327cad 66%, #1C6EA4 100%);
- border-bottom: 2px solid #444444;
- }
- .divTable.blueTable .divTableHeading .divTableHead {
- font-size: 15px;
- font-weight: bold;
- color: #FFFFFF;
- border-left: 2px solid #D0E4F5;
- }
- .divTable.blueTable .divTableHeading .divTableHead:first-child {
- border-left: none;
- }
- .blueTable .tableFootStyle {
- font-size: 14px;
- font-weight: bold;
- color: #FFFFFF;
- background: #D0E4F5;
- background: -moz-linear-gradient(top, #dcebf7 0%, #d4e6f6 66%, #D0E4F5 100%);
- background: -webkit-linear-gradient(top, #dcebf7 0%, #d4e6f6 66%, #D0E4F5 100%);
- background: linear-gradient(to bottom, #dcebf7 0%, #d4e6f6 66%, #D0E4F5 100%);
- border-top: 2px solid #444444;
- }
- .blueTable .tableFootStyle {
- font-size: 14px;
- }
- .blueTable .tableFootStyle .links {
- text-align: right;
- }
- .blueTable .tableFootStyle .links a{
- display: inline-block;
- background: #1C6EA4;
- color: #FFFFFF;
- padding: 2px 8px;
- border-radius: 5px;
- }
- .blueTable.outerTableFooter {
- border-top: none;
- }
- .blueTable.outerTableFooter .tableFootStyle {
- padding: 3px 5px;
- }
- /* DivTable.com */
- .divTable{ display: table; }
- .divTableRow { display: table-row; }
- .divTableHeading { display: table-header-group;}
- .divTableCell, .divTableHead { display: table-cell;}
- .divTableHeading { display: table-header-group;}
- .divTableFoot { display: table-footer-group;}
- .divTableBody { display: table-row-group;}
- /* Css styles for the form */
- * {
- box-sizing: border-box;
- }
- input[type=text], select, textarea{
- width: 100%;
- padding: 12px;
- border: 1px solid #ccc;
- border-radius: 4px;
- box-sizing: border-box;
- resize: vertical;
- }
- label {
- padding: 12px 12px 12px 0;
- display: inline-block;
- }
- input[type=submit] {
- background-color: #4CAF50;
- color: white;
- padding: 12px 20px;
- border: none;
- border-radius: 4px;
- cursor: pointer;
- float: right;
- }
- input[type=submit]:hover {
- background-color: #45a049;
- }
- .container {
- border-radius: 5px;
- background-color: #f2f2f2;
- padding: 20px;
- }
- .col-25 {
- float: left;
- width: 25%;
- margin-top: 6px;
- }
- .col-75 {
- float: left;
- width: 75%;
- margin-top: 6px;
- }
- /* Clear floats after the columns */
- .row:after {
- content: "";
- display: table;
- clear: both;
- }
- /* Responsive layout - when the screen is less than 600px wide, make the two columns stack on top of each other instead of next to each other */
- @media (max-width: 600px) {
- .col-25, .col-75, input[type=submit] {
- width: 100%;
- margin-top: 0;
- }
- }
Step 17
Upload it to Site Asset library in your SharePoint site. Note you can use any library of your choice.
Step 18
Right-click on the styles.css inside the library and click Copy link. follow the instruction to copy the link. You can get the short link to the file by pasting the link in the browser and hit enter. This will give you something like,
https://yourspsite.sharepoint.com/sites/dev/SiteAssets/styles.css?slrid=65513e9e-e0b3-4000-c649-ece51bb97dbc.
Step 19
Copy https://yourspsite.sharepoint.com/sites/dev/SiteAssets/styles.css out of the link and go back to YourWebpartName.ts
Step 20
Add the following line of code just under SPComponentLoader, but above export interface WebpartProps
SPComponentLoader.loadCss('https://yourspsite.sharepoint.com/sites/dev/SiteAssets/styles.css')
Let's create our form and a table to display data from Azure database.
Step 21
Replace the code block in public render () with the code block below
- public render(): void {
- this.domElement.innerHTML = `
- <div class="container">
- <form>
- <div class="row">
- <h2 style="text-align:left" id="statusMode">
- Add New Record
- </h4>
- <div class="col-25">
- <label for="fname">First Name</label>
- </div>
- <div class="col-75">
- <input type="text" id="fname" name="firstname" placeholder="First Name..">
- </div>
- </div>
- <div class="row">
- <div class="col-25">
- <label for="lname">Last Name</label>
- </div>
- <div class="col-75">
- <input type="text" id="lname" name="lastname" placeholder="Last Name..">
- </div>
- </div>
- <div class="row">
- <div class="col-25">
- <label for="gender">Gender</label>
- </div>
- <div class="col-75">
- <input type="text" id="gender" name="gender" placeholder="Gender..">
- </div>
- </div>
- <div class="row">
- <div class="col-25">
- <label for="salary">Salary</label>
- </div>
- <div class="col-75">
- <input type="text" id="salary" name="gender" placeholder="Salary..">
- </div>
- </div>
- <!-- hidden controls -->
- <div style="display: none">
- <input id="recordId" />
- </div>
- <div class="row">
- <input type="submit" value="Submit" id="btnSubmit">
- </div>
- </form>
- </div>
- //Creates a table to display data from Azure database
- <div class="divTable blueTable">
- <div class="divTableHeading">
- <div class="divTableRow">
- <div class="divTableHead">First Name</div>
- <div class="divTableHead">Last Name</div>
- <div class="divTableHead">Gender</div>
- <div class="divTableHead">Salary</div>
- </div>
- </div>
- <div class="divTableBody" id="fileGrid">
- </div>
- </div>
- <div class="blueTable outerTableFooter"><div class="tableFootStyle"><div class="links"><a href="#">«</a> <a class="active" href="#">1</a> <a href="#">2</a> <a href="#">3</a> <a href="#">4</a> <a href="#">»</a></div></div></div>
- `;
This code block does two things. It creates a form to carry out Create and Update operations on our table and creates a table to display data from Azure database.
Implement CRUD Operations in SPFX
Step 1
Still in YourWebpartName.ts, update the code block inside Public render() as follows,
- public render(): void {
- this.domElement.innerHTML = `
- <div class="container">
- <form>
- <div class="row">
- <h2 style="text-align:left" id="statusMode">
- Add New Record
- </h4>
- <div class="col-25">
- <label for="fname">First Name</label>
- </div>
- <div class="col-75">
- <input type="text" id="fname" name="firstname" placeholder="First Name..">
- </div>
- </div>
- <div class="row">
- <div class="col-25">
- <label for="lname">Last Name</label>
- </div>
- <div class="col-75">
- <input type="text" id="lname" name="lastname" placeholder="Last Name..">
- </div>
- </div>
- <div class="row">
- <div class="col-25">
- <label for="country">Gender</label>
- </div>
- <div class="col-75">
- <input type="text" id="gender" name="gender" placeholder="Gender..">
- </div>
- </div>
- <div class="row">
- <div class="col-25">
- <label for="subject">Salary</label>
- </div>
- <div class="col-75">
- <input type="text" id="salary" name="gender" placeholder="Salary..">
- </div>
- </div>
- <!-- hidden controls -->
- <div style="display: none">
- <input id="recordId" />
- </div>
- <div class="row">
- <input type="submit" value="Submit" id="btnSubmit">
- </div>
- </form>
- </div>
- <div class="divTable blueTable">
- <div class="divTableHeading">
- <div class="divTableRow">
- <div class="divTableHead">First Name</div>
- <div class="divTableHead">Last Name</div>
- <div class="divTableHead">Gender</div>
- <div class="divTableHead">Salary</div>
- </div>
- </div>
- <div class="divTableBody" id="fileGrid">
- </div>
- </div>
- <div class="blueTable outerTableFooter"><div class="tableFootStyle"><div class="links"><a href="#">«</a> <a class="active" href="#">1</a> <a href="#">2</a> <a href="#">3</a> <a href="#">4</a> <a href="#">»</a></div></div></div>
- `;
- $(document).ready(function(){
- PopulateData();
- $('#statusMode').html('Add New Record');
- $('#btnSubmit').click(function(e){
- if($('#statusMode').html()=="Add New Record")
- {
- alert('Add record function');
- AddNewRecord();
- }
- else{
- UpdateRecord($('#recordId').val());
- }
- });
- });
- function PopulateData()
- {
- jquery.ajax({
- url: "https://yourdemoapi.azurewebsites.net/api/employee",
- type:"GET",
- headers: {"Accept": "application/json; odata=verbose"},
- success: function(data){
- if(data){
- var len = data.length;
- var txt = "";
- if(len > 0){
- for(var i=0;i<len;i++){
- txt += '<div class="divTableRow" ><div class="divTableCell">'+data[i].FirstName+'</div><div class="divTableCell">'+data[i].LastName+'</div>' +
- '<div class="divTableCell">'+data[i].Gender+'</div><div class="divTableCell">'+data[i].Salary+'</div><div class="divTableCell">'+"<a id='" + data[i].ID + "' href='#' class='EditFileLink'>Edit</a>"+'</div><div class="divTableCell">'+"<a id='" + data[i].ID + "' href='#' class='DeleteLink'>Delete</a>"+'</div></div>';
- }
- if(txt != ""){
- $("#fileGrid").append(txt);
- }
- }
- }
- },
- error: function(jqXHR, textStatus, errorThrown){
- alert('error: ' + textStatus + ': ' + errorThrown);
- }
- });
- }
- $(document).on('click', '.EditFileLink', function (e) {
- e.preventDefault();
- var id = this.id;
- var requestUri = "https://yourdemoapi.azurewebsites.net/api/employee/"+id+"";
- $.ajax({
- url: requestUri,
- method: "GET",
- contentType: "application/json;odata=verbose",
- headers: { "accept": "application/json;odata=verbose" },
- success: function (data) {
- $('#fname').val(data.FirstName);
- $('#lname').val(data.LastName);
- $('#gender').val(data.Gender);
- $('#salary').val(data.Salary);
- $('#statusMode').html('Edit Record');
- $('#recordId').val(data.ID);
- }
- });
- });
- $(document).on('click', '.DeleteLink', function (e) {
- e.preventDefault();
- var id = this.id;
- var confirmDelete = confirm('Confirm deletion');
- if(confirmDelete){
- var requestUri = "https://yourdemoapi.azurewebsites.net/api/employee/"+id+"";
- $.ajax({
- url: requestUri,
- method: "DELETE",
- headers: { "accept": "application/json;odata=verbose" },
- success: function () {
- alert('Record deleted successfully');
- }
- });
- location.reload(true);
- }
- else{
- }
- });
- // Add new record
- function AddNewRecord() {
- var firstName = $("#fname").val();
- var lastName = $("#lname").val();
- var gender = $("#gender").val();
- var salary = $("#salary").val();
- var requestUri = "https://yourdemoapi.azurewebsites.net/api/employee";
- var requestHeaders = {
- "accept": "application/json;odata=verbose",
- }
- var requestData = {
- FirstName: firstName,
- LastName: lastName,
- Gender: gender,
- Salary: salary
- };
- var requestBody = JSON.stringify(requestData);
- jquery.ajax({
- url: requestUri,
- method: "POST",
- contentType: "application/json;odata=verbose",
- headers: requestHeaders,
- data: requestBody,
- success: function ()
- {
- alert('Record successfully updated');
- },
- error: function(jqXHR){
- alert('error: ' + jqXHR.responseText);
- }
- });
- }
- //update record
- function UpdateRecord(id) {
- var firstName = $("#fname").val();
- var lastName = $("#lname").val();
- var gender = $("#gender").val();
- var salary = $("#salary").val();
- var requestUri = "https://yourdemoapi.azurewebsites.net/api/employee/"+id+"";
- var requestHeaders = {
- "accept": "application/json;odata=verbose",
- }
- var requestData = {
- FirstName: firstName,
- LastName: lastName,
- Gender: gender,
- Salary: salary
- };
- var requestBody = JSON.stringify(requestData);
- jquery.ajax({
- url: requestUri,
- method: "PUT",
- contentType: "application/json;odata=verbose",
- headers: requestHeaders,
- data: requestBody,
- success: function ()
- {
- alert('Record successfully updated');
- },
- error: function(jqXHR){
- alert('error: ' + jqXHR.responseText);
- }
- });
- }
- }
Your complete code should look like this,
- import { Version } from '@microsoft/sp-core-library';
- import {
- BaseClientSideWebPart,
- IPropertyPaneConfiguration,
- PropertyPaneTextField
- } from '@microsoft/sp-webpart-base';
- import { escape } from '@microsoft/sp-lodash-subset';
- import * as jquery from 'jquery';
- //import styles from './WebApiDemoWebPartWebPart.module.scss';
- import * as strings from 'WebApiDemoWebPartWebPartStrings';
- import { SPComponentLoader } from '@microsoft/sp-loader';
- SPComponentLoader.loadCss('https://yourspsite.sharepoint.com/sites/dev/SiteAssets/styles.css');
- export interface IWebApiDemoWebPartWebPartProps {
- description: string;
- }
- export default class WebApiDemoWebPartWebPart extends BaseClientSideWebPart<IWebApiDemoWebPartWebPartProps> {
- public render(): void {
- this.domElement.innerHTML = `
- <div class="container">
- <form>
- <div class="row">
- <h2 style="text-align:left" id="statusMode">
- Add New Record
- </h4>
- <div class="col-25">
- <label for="fname">First Name</label>
- </div>
- <div class="col-75">
- <input type="text" id="fname" name="firstname" placeholder="First Name..">
- </div>
- </div>
- <div class="row">
- <div class="col-25">
- <label for="lname">Last Name</label>
- </div>
- <div class="col-75">
- <input type="text" id="lname" name="lastname" placeholder="Last Name..">
- </div>
- </div>
- <div class="row">
- <div class="col-25">
- <label for="country">Gender</label>
- </div>
- <div class="col-75">
- <input type="text" id="gender" name="gender" placeholder="Gender..">
- </div>
- </div>
- <div class="row">
- <div class="col-25">
- <label for="subject">Salary</label>
- </div>
- <div class="col-75">
- <input type="text" id="salary" name="gender" placeholder="Salary..">
- </div>
- </div>
- <!-- hidden controls -->
- <div style="display: none">
- <input id="recordId" />
- </div>
- <div class="row">
- <input type="submit" value="Submit" id="btnSubmit">
- </div>
- </form>
- </div>
- <div class="divTable blueTable">
- <div class="divTableHeading">
- <div class="divTableRow">
- <div class="divTableHead">First Name</div>
- <div class="divTableHead">Last Name</div>
- <div class="divTableHead">Gender</div>
- <div class="divTableHead">Salary</div>
- </div>
- </div>
- <div class="divTableBody" id="fileGrid">
- </div>
- </div>
- <div class="blueTable outerTableFooter"><div class="tableFootStyle"><div class="links"><a href="#">«</a> <a class="active" href="#">1</a> <a href="#">2</a> <a href="#">3</a> <a href="#">4</a> <a href="#">»</a></div></div></div>
- `;
- $(document).ready(function(){
- PopulateData();
- $('#statusMode').html('Add New Record');
- $('#btnSubmit').click(function(e){
- if($('#statusMode').html()=="Add New Record")
- {
- alert('Add record function');
- AddNewRecord();
- }
- else{
- UpdateRecord($('#recordId').val());
- }
- });
- });
- //bind data to the table
- function PopulateData()
- {
- jquery.ajax({
- url: "https://yourdemoapi.azurewebsites.net/api/employee",
- type:"GET",
- headers: {"Accept": "application/json; odata=verbose"},
- success: function(data){
- if(data){
- var len = data.length;
- var txt = "";
- if(len > 0){
- for(var i=0;i<len;i++){
- txt += '<div class="divTableRow" ><div class="divTableCell">'+data[i].FirstName+'</div><div class="divTableCell">'+data[i].LastName+'</div>' +
- '<div class="divTableCell">'+data[i].Gender+'</div><div class="divTableCell">'+data[i].Salary+'</div><div class="divTableCell">'+"<a id='" + data[i].ID + "' href='#' class='EditFileLink'>Edit</a>"+'</div><div class="divTableCell">'+"<a id='" + data[i].ID + "' href='#' class='DeleteLink'>Delete</a>"+'</div></div>';
- }
- if(txt != ""){
- $("#fileGrid").append(txt);
- }
- }
- }
- },
- error: function(jqXHR, textStatus, errorThrown){
- alert('error: ' + textStatus + ': ' + errorThrown);
- }
- });
- }
- //load and bind data to form in edit mode
- $(document).on('click', '.EditFileLink', function (e) {
- e.preventDefault();
- var id = this.id;
- var requestUri = "https://yourdemoapi.azurewebsites.net/api/employee/"+id+"";
- $.ajax({
- url: requestUri,
- method: "GET",
- contentType: "application/json;odata=verbose",
- headers: { "accept": "application/json;odata=verbose" },
- success: function (data) {
- $('#fname').val(data.FirstName);
- $('#lname').val(data.LastName);
- $('#gender').val(data.Gender);
- $('#salary').val(data.Salary);
- $('#statusMode').html('Edit Record');
- $('#recordId').val(data.ID);
- }
- });
- });
- //delete record
- $(document).on('click', '.DeleteLink', function (e) {
- e.preventDefault();
- var id = this.id;
- var confirmDelete = confirm('Confirm deletion');
- if(confirmDelete){
- var requestUri = "https://yourdemoapi.azurewebsites.net/api/employee/"+id+"";
- $.ajax({
- url: requestUri,
- method: "DELETE",
- headers: { "accept": "application/json;odata=verbose" },
- success: function () {
- alert('Record deleted successfully');
- }
- });
- location.reload(true);
- }
- else{
- }
- });
- // Add new record
- function AddNewRecord() {
- var firstName = $("#fname").val();
- var lastName = $("#lname").val();
- var gender = $("#gender").val();
- var salary = $("#salary").val();
- var requestUri = "https://yourdemoapi.azurewebsites.net/api/employee";
- var requestHeaders = {
- "accept": "application/json;odata=verbose",
- }
- var requestData = {
- FirstName: firstName,
- LastName: lastName,
- Gender: gender,
- Salary: salary
- };
- var requestBody = JSON.stringify(requestData);
- jquery.ajax({
- url: requestUri,
- method: "POST",
- contentType: "application/json;odata=verbose",
- headers: requestHeaders,
- data: requestBody,
- success: function ()
- {
- alert('Record successfully updated');
- },
- error: function(jqXHR){
- alert('error: ' + jqXHR.responseText);
- }
- });
- }
- //update record
- function UpdateRecord(id) {
- var firstName = $("#fname").val();
- var lastName = $("#lname").val();
- var gender = $("#gender").val();
- var salary = $("#salary").val();
- var requestUri = "https://yourdemoapi.azurewebsites.net/api/employee/"+id+"";
- var requestHeaders = {
- "accept": "application/json;odata=verbose",
- }
- var requestData = {
- FirstName: firstName,
- LastName: lastName,
- Gender: gender,
- Salary: salary
- };
- var requestBody = JSON.stringify(requestData);
- jquery.ajax({
- url: requestUri,
- method: "PUT",
- contentType: "application/json;odata=verbose",
- headers: requestHeaders,
- data: requestBody,
- success: function ()
- {
- alert('Record successfully updated');
- },
- error: function(jqXHR){
- alert('error: ' + jqXHR.responseText);
- }
- });
- }
- }
- protected get dataVersion(): Version {
- return Version.parse('1.0');
- }
- protected getPropertyPaneConfiguration(): IPropertyPaneConfiguration {
- return {
- pages: [
- {
- header: {
- description: strings.PropertyPaneDescription
- },
- groups: [
- {
- groupName: strings.BasicGroupName,
- groupFields: [
- PropertyPaneTextField('description', {
- label: strings.DescriptionFieldLabel
- })
- ]
- }
- ]
- }
- ]
- };
- }
- }
Ensure you replace the URLs in the code with the URL of your API. Now it is time to test our web part. In the command prompt, go to the directory for your web part and type one after the other -
gulp build
gulp serve
gulp serve launches your browser and opens local workbench. Click the plus sign and add your web part. If everything works fine, the web part will display your data.
Now, go to your dev SharePointOnline, append _layouts/15/workbench.aspx to your URL. Something like https://yourspsite.sharepoint.com/sites/dev/_layouts/15/workbench.aspx.
Click the plus sign and look for your web part. If everything works fine, your web part should display the data from your Azure database. Your web part should look like the image below if everything is fine,
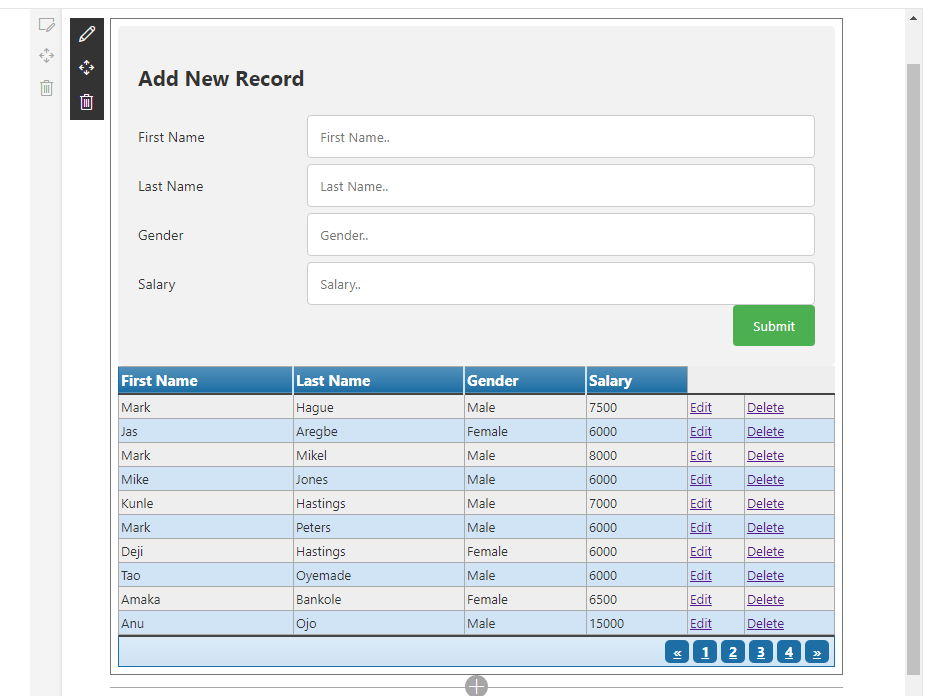
Congratulations!! You have succeeded in displaying your existing data on SQL Server in SharePoint Online.
Note
This loads the script directly from your local dev machine. If you try to access this web part outside your local dev environment, it will throw an error. You will need to package it and deploy before it can be accessible to your users.
If you have any questions or suggestion, please leave them in the comment section. Happy coding!
<<Click here for previous part
jaymit shahPosted Jul 13, 2020, 5:55 AM
We can use Filter in RequestUri of Populate Method like standard RestAPi ???