

Introduction
The Kendo UI supports working with its widget using AngularJS.
This article flows as follows.
- Creating an ASP.NET WEB API application.
- Creating a Controller.
- Testing the REST API
- Implementing the Kendo Grid using AngularJS with the REST API.
Creating an ASP.NET WEB API application
Create a WEB API application using an installed web template in Visual Studio as in the following figures.

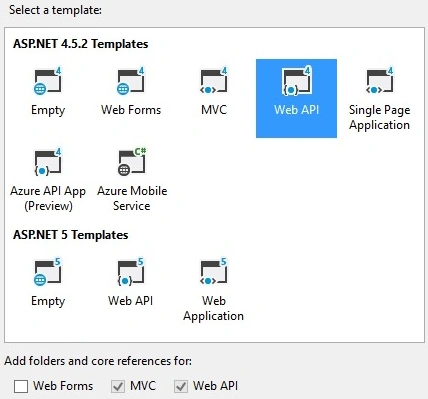
- Creating model classes: In the Solution Explorer, right-click the model folder, select Add, then Class, and name it Employee. cs
- Code in Employee. cs
public class Employee
{
    public Employee(int EmployeeID, string FirstName, string LastName)
    {
        this.EmployeeID = EmployeeID;
        this.FirstName = FirstName;
        this.LastName = LastName;
    }
    public int EmployeeID { get; set; }
    public string FirstName { get; set; }
    public string LastName { get; set; }
}
Creating a Controller
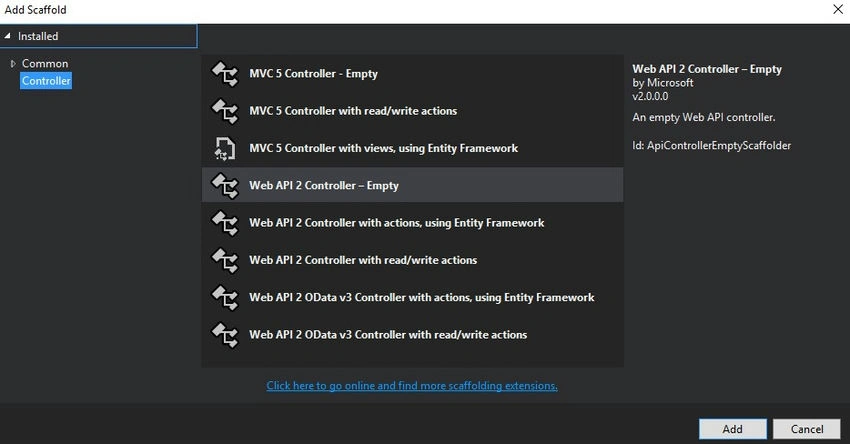
Right-click on the Controller folder and add a new WEB API 2- Empty controller as in the following figure 3. In my case, I named it EmployeeDetailsController.cs.
Code in EmployeeDetailsController.cs
[RoutePrefix("api/EmployeeList")]
public class EmployeeDetailsController : ApiController
{
    [HttpGet]
    [Route("List")]
    public HttpResponseMessage EmployeeList()
    {
        try
        {
            List<Employee> _emp = new List<Employee>();
            _emp.Add(new Employee(1, "Bobb", "Ross"));
            _emp.Add(new Employee(2, "Pradeep", "Raj"));
            _emp.Add(new Employee(3, "Arun", "Kumar"));
            return Request.CreateResponse(HttpStatusCode.OK, _emp, Configuration.Formatters.JsonFormatter);
        }
        catch (Exception ex)
        {
            return Request.CreateResponse(HttpStatusCode.OK, ex.Message, Configuration.Formatters.JsonFormatter);
        }
    }
}
The above employee controller action EmployeeList will return a list of Employees.
Testing the REST API
Test the API using the POSTMAN/Fiddler as in the following figure 4.
- API End Point: /api/EmployeeList/List
- Type: GET
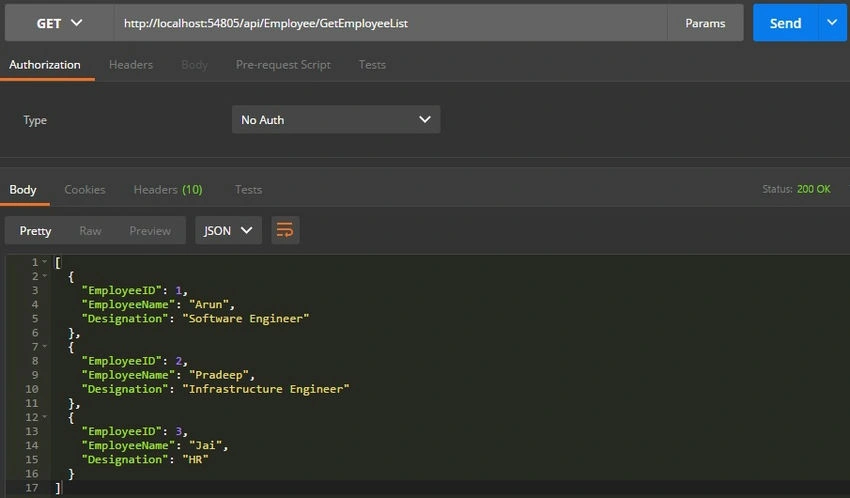
- The API is working fine. Now, it's ready to consume.
Implementing the Kendo Grid using AngularJS and the REST API
- Creating an HTML page: Create a new HTML page in the project.
- Design
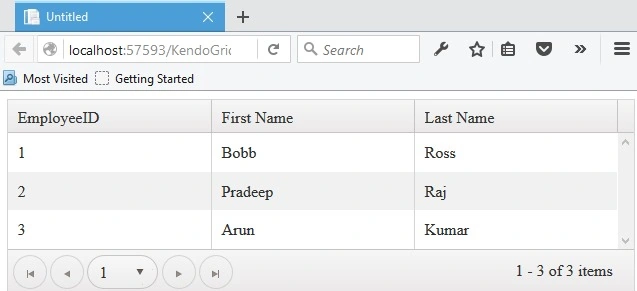
<!DOCTYPE html> <html> <head> <meta charset="utf-8"> <title>Untitled</title> <link rel="stylesheet" href="http://kendo.cdn.telerik.com/2016.1.412/styles/kendo.common.min.css"> <link rel="stylesheet" href="http://kendo.cdn.telerik.com/2016.1.412/styles/kendo.rtl.min.css"> <link rel="stylesheet" href="http://kendo.cdn.telerik.com/2016.1.412/styles/kendo.default.min.css"> <link rel="stylesheet" href="http://kendo.cdn.telerik.com/2016.1.412/styles/kendo.mobile.all.min.css"> <script src="http://code.jquery.com/jquery-1.9.1.min.js"></script> <script src="http://kendo.cdn.telerik.com/2016.1.412/js/angular.min.js"></script> <script src="http://kendo.cdn.telerik.com/2016.1.412/js/jszip.min.js"></script> <script src="http://kendo.cdn.telerik.com/2016.1.412/js/kendo.all.min.js"></script> </head> <body> <div id="example" ng-app="KendoDemos"> <div ng-controller="MyCtrl"> <kendo-grid options="mainGridOptions"></kendo-grid> </div> </div> <script> angular.module("KendoDemos", ["kendo.directives"]) .controller("MyCtrl", function($scope) { $scope.mainGridOptions = { dataSource: { type: "json", transport: { read: "/api/EmployeeList/List" }, pageSize: 5, serverPaging: true, serverSorting: true }, sortable: true, pageable: true, columns: [ { field: "EmployeeID", title: "EmployeeID", width: "120px" }, { field: "FirstName", title: "First Name", width: "120px" }, { field: "LastName", title: "Last Name", width: "120px" } ] }; }); </script> </body> </html> - Result in Browser
Conclusion
We have seen how to work with Kendo Grid using AngularJS, which is really useful to build an application with ease.
I hope you have enjoyed this article. Your valuable feedback, questions, or comments about this article are always welcome.
Read more articles on AngularJS.
Rupali ShindePosted Apr 22, 2016, 2:26 AM
nice share, more helpful for me
Debasis SahaPosted Apr 16, 2016, 2:39 AM
Nice One..
Vignesh ManiPosted Apr 15, 2016, 4:21 PM
Nice one
Kuppurasu NagarajPosted Apr 15, 2016, 1:22 PM
Nice Sharing..
Rahul Kumar SaxenaPosted Apr 15, 2016, 7:15 AM
Good Show
Chandradev PrasadPosted Apr 15, 2016, 5:45 AM
Nice post.