

Step 1: Before going through this article, please go through my previous articles:
- Installing Visual Studio With Xamarin
- Xamarin.Forms: Create Your First Xamarin App For iOS, Android, And Windows
- Xamarin.Forms: Create A Simple Login UI
- Xamarin.Forms: Data Binding (Android, iOS and Windows)
Step 2: First, create a Xamarin.Forms project with the Portable Class Library (PCL) as discussed in my previous article,
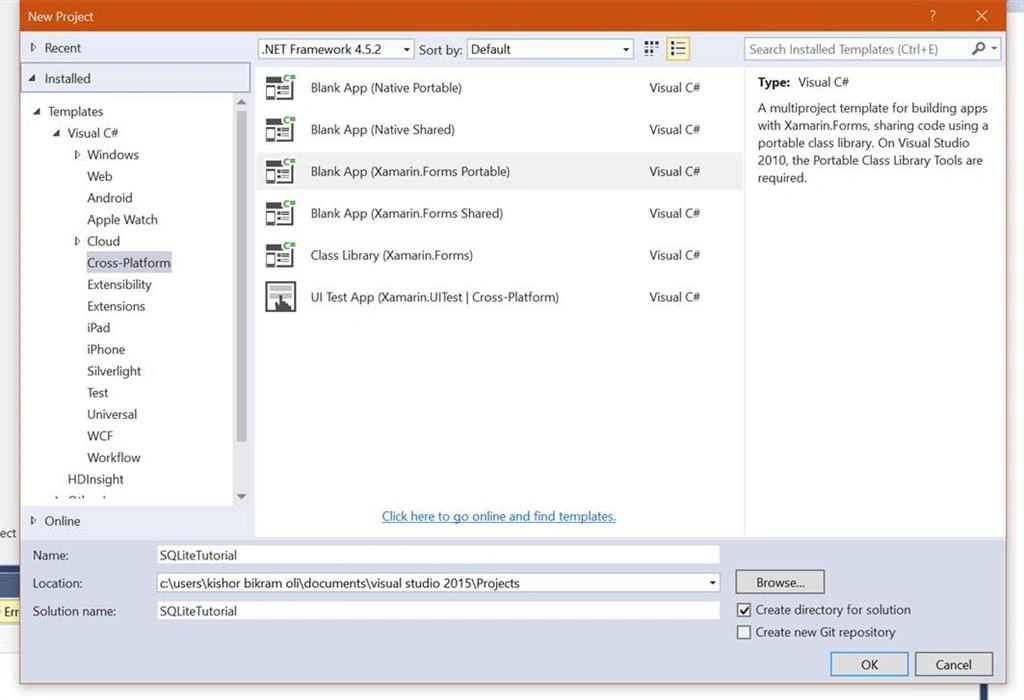
Step 3: Now, we will install sqlite-net-pcl from Nuget Package Manager.
Under PCL project, right click on References and from the Nuget Package Manager, search sqlite-net-pcl and install that within Portable Class Library (PCL) project.
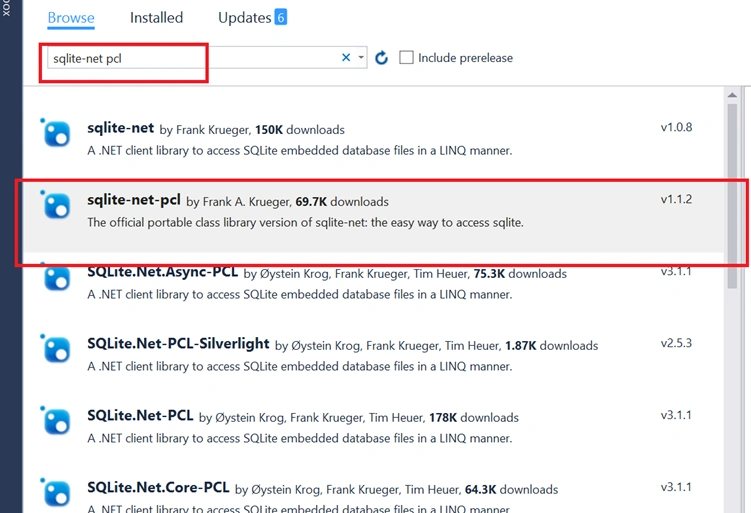
Step 4: Install the same SQLite library for each platform (Android, iOS and Windows) under each project. So, let’s add sqlite-net-pcl for Android first.
Right click on References under Android project and install sqlite-net-pcl in a similar way as above.
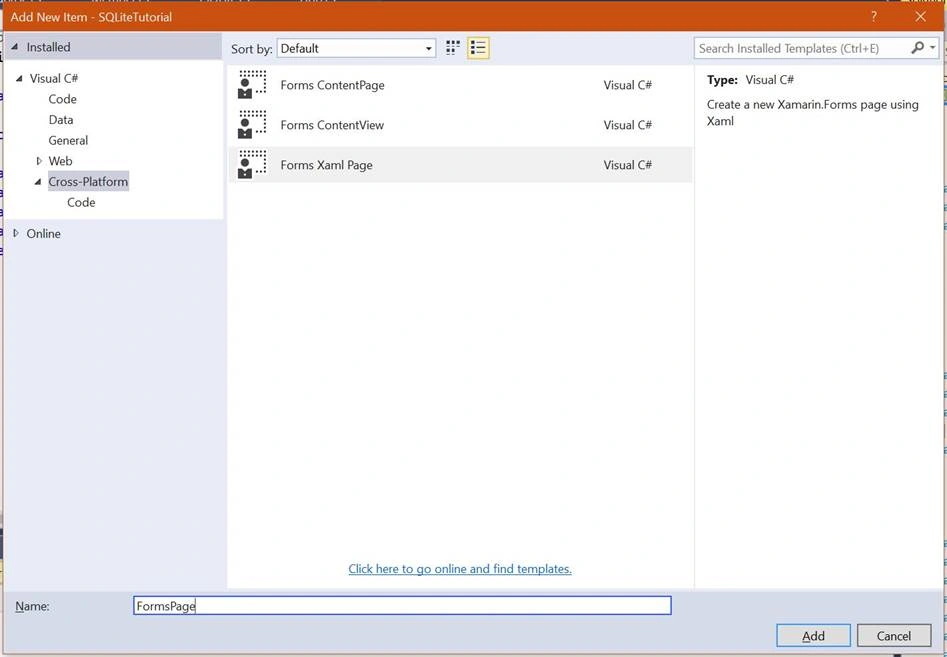
Step 5: Add an XAML Page with the name FormsPage.xaml. For this, right click on PCL project and add Forms Xaml Page.
Step 6: In the FormsPage.xaml, we add two labels, two input fields and two buttons like this:
- <?xml version="1.0" encoding="utf-8" ?>
- <ContentPage xmlns="http://xamarin.com/schemas/2014/forms"
- xmlns:x="http://schemas.microsoft.com/winfx/2009/xaml"
- x:Class="SQLiteTutorial.FormsPage">
- <ContentPage.Content>
- <StackLayout Padding="20">
- <Label Text="Name" FontSize="25"/>
- <Entry x:Name="memberName" Placeholder="Enter Name"></Entry>
- <Label Text="Age" FontSize="25"/>
- <Entry x:Name="memberAge" Placeholder="Enter Age"></Entry>
- <StackLayout Orientation="Horizontal">
- <Button Text="Insert Members" BackgroundColor="Gray" TextColor="White" Clicked="InsertMember"/>
- <Button Text="Show Memebrs" BackgroundColor="Maroon" TextColor="White" Clicked="ShowMembers"/>
- </StackLayout>
- </StackLayout>
- </ContentPage.Content>
- </ContentPage>

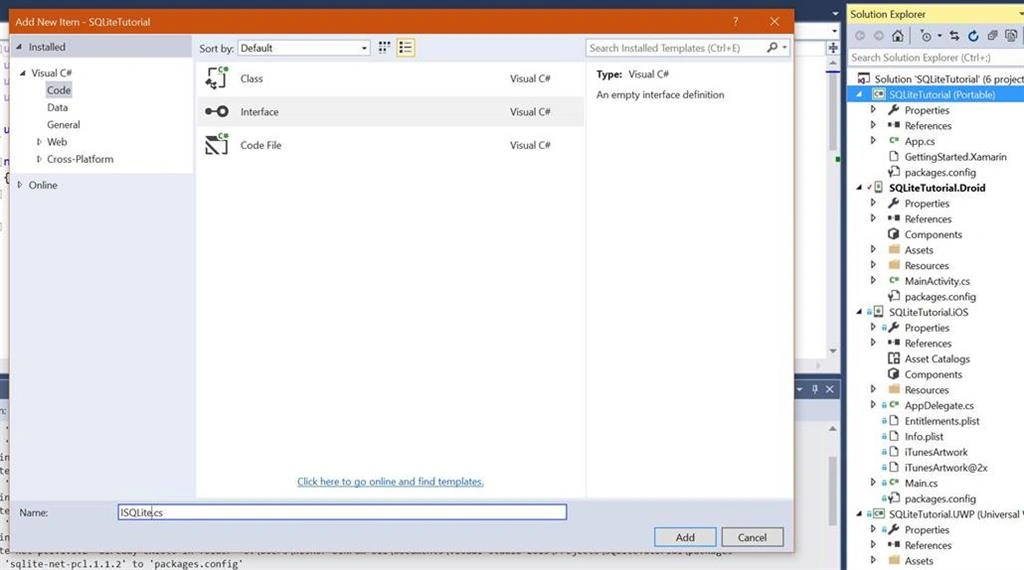
Step 7: We need to create an interface class to define platform specific database file, save, and create a database connection.
So, in your PCL project, add an Interface class with the name ISQLite.
Complete code for ISQLite.cs
- using System;
- using System.Collections.Generic;
- using System.Linq;
- using System.Text;
- using System.Threading.Tasks;
- namespace SQLiteTutorial
- {
- public interface ISQLite
- {
- SQLite.SQLiteConnection GetConnection();
- }
- }
Right Click on PCL Project > Add > Class > Name it Member and Click Add.
Here, Name and Age are used to set and get the values with the ID which has PrimaryKey and AutoIncrement properties derived from SQLite.
Complete Code snippet for Member class is,
- using System;
- using System.Collections.Generic;
- using System.Linq;
- using System.Text;
- using System.Threading.Tasks;
- using SQLite;
- namespace SQLiteTutorial
- {
- public class Member
- {
- [PrimaryKey, AutoIncrement]
- public int ID { get; set; }
- public string Name { get; set; }
- public string Age { get; set; }
- public Member()
- {
- }
- }
- }
Let’s add another class with name MemberDatabase for DB logics.
- using System;
- using System.Collections.Generic;
- using System.Linq;
- using System.Text;
- using System.Threading.Tasks;
- using SQLite;
- using Xamarin.Forms;
- using System.Collections;
- namespace SQLiteTutorial
- {
- public class MemberDatabase
- {
- private SQLiteConnection conn;
- //CREATE
- public MemberDatabase()
- {
- conn = DependencyService.Get<ISQLite>().GetConnection();
- conn.CreateTable<Member>();
- }
- //READ
- public IEnumerable<Member> GetMembers()
- {
- var members = (from mem in conn.Table<Member>() select mem);
- return members.ToList();
- }
- //INSERT
- public string AddMember(Member member)
- {
- conn.Insert(member);
- return "success";
- }
- //DELETE
- public string DeleteMember(int id)
- {
- conn.Delete<Member>(id);
- return "success";
- }
- }
- }
FOR ANDROID
Add a class with name Andorid_SQLite and implement ISQLite interface. Under Android Project > Right Click > Add > New Class.
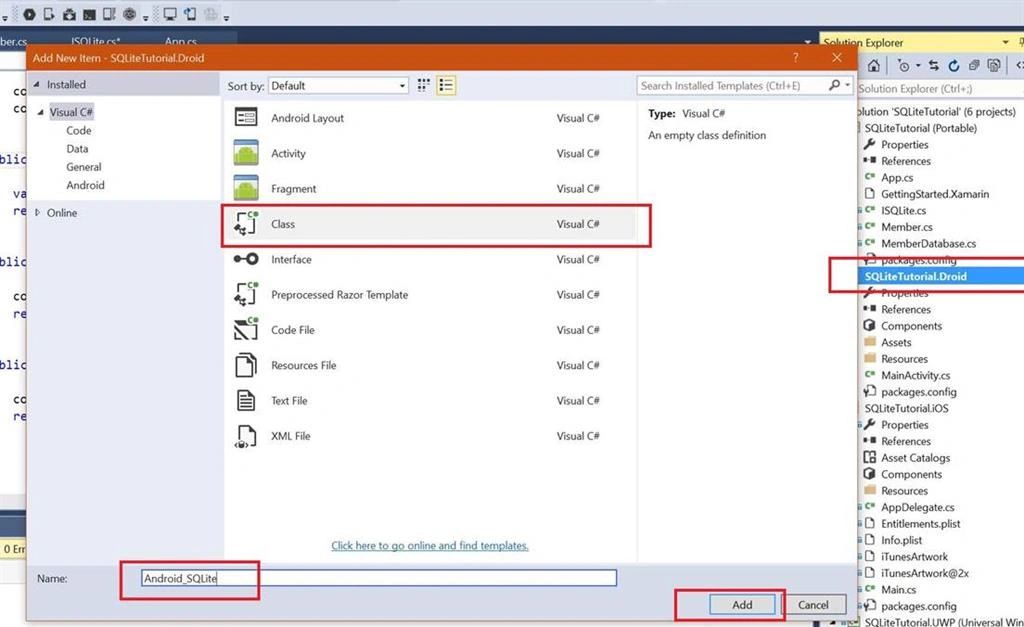
In Andorid_SQLite class, update your code with the following code snippet,
- using System;
- using System.Collections.Generic;
- using System.Linq;
- using System.Text;
- using Android.App;
- using Android.Content;
- using Android.OS;
- using Android.Runtime;
- using Android.Views;
- using Android.Widget;
- using SQLiteTutorial.Droid;
- using Xamarin.Forms;
- [assembly: Dependency(typeof(Android_SQLite))]
- namespace SQLiteTutorial.Droid
- {
- public class Android_SQLite : ISQLite
- {
- public SQLite.SQLiteConnection GetConnection()
- {
- var dbName = "Members.sqlite";
- var dbPath = System.Environment.GetFolderPath(System.Environment.SpecialFolder.ApplicationData);
- var path = System.IO.Path.Combine(dbPath, dbName);
- var conn = new SQLite.SQLiteConnection(path);
- return conn;
- }
- }
- }
Add a similar class like above inside Windows Phone/Windows Project. Name it Windows_SQLite.
In Windows_SQLite class, update your code with the following code snippet,
- using System;
- using System.Collections.Generic;
- using System.Linq;
- using System.Text;
- using System.Threading.Tasks;
- using Windows.Storage;
- using SQLite;
- using System.IO;
- using Xamarin.Forms;
- using SQLiteTutorial.WinPhone;
- [assembly: Dependency(typeof(Windows_SQLite))]
- namespace SQLiteTutorial.WinPhone
- {
- public class Windows_SQLite : ISQLite
- {
- public SQLiteConnection GetConnection()
- {
- var sqliteFilename = "Member.sqlite";
- string path = Path.Combine(ApplicationData.Current.LocalFolder.Path, sqliteFilename);
- var conn = new SQLite.SQLiteConnection(path);
- return conn;
- }
- }
- }
Add a similar class like above inside iOS Project. Name it IOS_SQLite.
In IOS_SQLite class, update your code with the following code snippet,
- using System;
- using System.Collections.Generic;
- using System.IO;
- using System.Text;
- using Xamarin.Forms;
- using SQLite;
- using SQLiteTutorial.iOS;
- [assembly: Dependency(typeof(IOS_SQLite))]
- namespace SQLiteTutorial.iOS
- {
- public class IOS_SQLite : ISQLite
- {
- public SQLiteConnection GetConnection()
- {
- var dbName = "Member.sqlite";
- string dbPath = Environment.GetFolderPath(Environment.SpecialFolder.Personal); // Documents folder
- string libraryPath = Path.Combine(dbPath, "..", "Library"); // Library folder
- var path = Path.Combine(libraryPath, dbName);
- var conn = new SQLite.SQLiteConnection(path);
- return conn;
- }
- }
- }
Click events. InsertMember and ShowMembers are defined here. And we navigate to MemberList page inside the ShowMember function.
Complete code snippet for FormsPage.xaml.cs
- using System;
- using System.Collections.Generic;
- using System.Linq;
- using System.Text;
- using System.Threading.Tasks;
- using Xamarin.Forms;
- namespace SQLiteTutorial
- {
- public partial class FormsPage : ContentPage
- {
- public MemberDatabase memberDatabase;
- public Member member;
- public FormsPage()
- {
- InitializeComponent();
- }
- public void InsertMember(object o, EventArgs e)
- {
- member = new Member();
- memberDatabase = new MemberDatabase();
- member.Name = memberName.Text;
- member.Age = memberAge.Text;
- memberDatabase.AddMember(member);
- }
- public async void ShowMembers(object o, EventArgs e)
- {
- await Navigation.PushModalAsync(new MemberList());
- }
- }
- }
- public App()
- {
- // The root page of your application
- MainPage = new FormsPage();
- }
Inside PCL, Add a Forms Xaml Page with name MembersList.xaml,
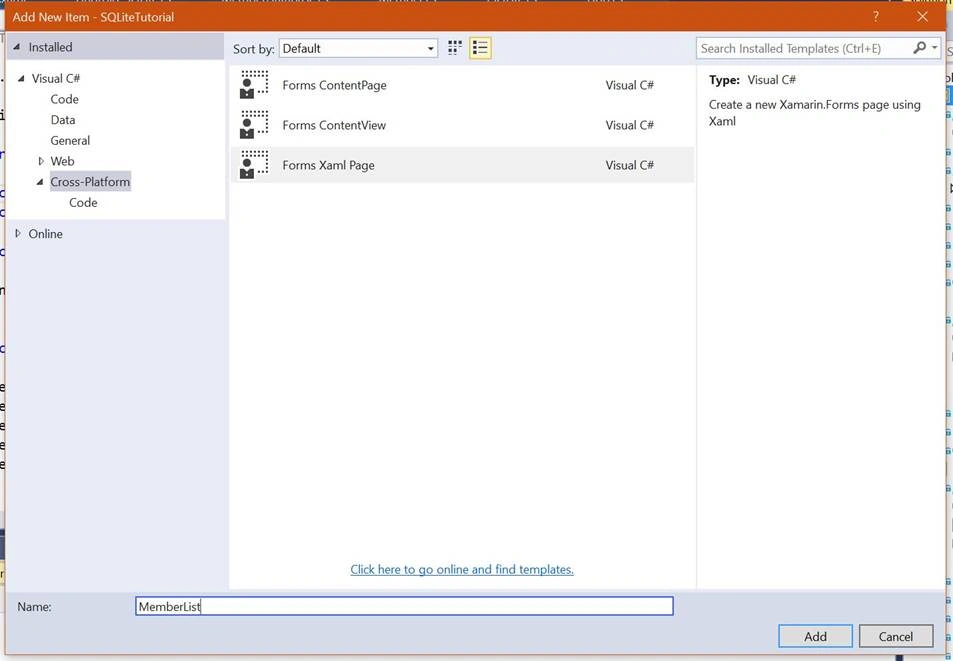
In the MemberList.xaml, add a ListView inside ContentPage.Content. Inside the ListView, we have ItemTemplate and DataTemplate. We use ViewCell to display our content.
Complete XAML code will be
- <?xml version="1.0" encoding="utf-8" ?>
- <ContentPage xmlns="http://xamarin.com/schemas/2014/forms"
- xmlns:x="http://schemas.microsoft.com/winfx/2009/xaml"
- x:Class="SQLiteTutorial.MemberList">
- <ContentPage.Content>
- <ListView x:Name="listMembers" ItemTapped="OnSelected">
- <ListView.ItemTemplate>
- <DataTemplate>
- <ViewCell>
- <StackLayout Spacing="2" HorizontalOptions="Center">
- <StackLayout Orientation="Horizontal">
- <Label Text="Name: " FontSize="16"/>
- <Label x:Name="firstName"
- Text="{Binding Name}"
- FontSize="16"
- TextColor="Red"/>
- </StackLayout>
- <StackLayout Orientation="Horizontal">
- <Label Text="Age: " FontSize="16"/>
- <Label x:Name="middleName"
- Text="{Binding Age}"
- FontSize="16"
- TextColor="Red"/>
- </StackLayout>
- </StackLayout>
- </ViewCell>
- </DataTemplate>
- </ListView.ItemTemplate>
- </ListView>
- </ContentPage.Content>
- </ContentPage>
- using System;
- using System.Collections.Generic;
- using System.Linq;
- using System.Text;
- using System.Threading.Tasks;
- using Xamarin.Forms;
- namespace SQLiteTutorial
- {
- public partial class MemberList : ContentPage
- {
- public MemberDatabase memberDatabase;
- public MemberList()
- {
- InitializeComponent();
- memberDatabase = new MemberDatabase();
- var members = memberDatabase.GetMembers();
- listMembers.ItemsSource = members;
- // BindingContext = this;
- }
- public async void OnSelected(object obj, ItemTappedEventArgs args)
- {
- var member = args.Item as Member;
- await DisplayAlert("You selected", member.Name + " " + member.Age, "OK");
- }
- }
- }
Android Screenshots


Windows Screenshots


Note: Since the whole project has very large size, download the Portable Class Library (PCL) only from GitHub.
JosephsPosted Oct 14, 2019, 1:19 AM
Embeded issue can you resolve it
Vijay PalvePosted Mar 19, 2019, 11:41 PM
Hi, I am having problems with copy exist abc.sqlite database file to a local folder. I am trying to use following lines - var originalDbFileUri = new Uri("ms-appx:///Assets/abc.sqlite").AbsolutePath; var originalDbFile = await StorageFile.GetFileFromPathAsync(originalDbFileUri); when using this code application not responding.
ADEYEMO SUNDAYPosted Oct 6, 2018, 6:20 PM
Hi, thanks for the post. I am having problems with the database connection, do I need to install SQLite on my system to be able to use it in visual studio?
Evan MoorePosted Aug 30, 2018, 3:20 PM
Have tried many different complicated tutorials without success. This is Perfect, easy to follow and works well. THANKYOU!!!!!
Chandan HSPosted Aug 10, 2018, 4:10 AM
Hi, I've included WPF project to my Xamarin forms cross-platform solution. Is this Sqlite nuget package supported in WPF?
Vikash KumarPosted Apr 25, 2018, 3:06 PM
I am beginner and tried to consider many article on Sqlite ,didn't works.Now I follow ur article It works.
Madhan KumarPosted Jul 7, 2016, 8:30 AM
Which is best DB to use with Xamari?
Jayant TripathyPosted Jul 7, 2016, 7:37 AM
Nice post. Is it possible in vs 2010
Vignesh ManiPosted Jul 6, 2016, 4:21 PM
Nice
kalu singh raoPosted Jul 5, 2016, 4:39 AM
Nice...