In my previous article we discussed Data Binding, Validation, Exception Handling, Handling Multiple tables and many more. But the first step in a business application deals with Authentication. Surely nobody wants data to be meshed up by an anonymous user so in this article we are going to implement Authentication to the SOI (States of India) application. This post is restricted to the FormsAuthentication model only. Also I am going to skip Authorization and due for next article.
Well authentication in Silverlight 4 using RIA service in a business application can be implemented in one of two ways.
- Using Default authentication provided by Silverlight Business Template (Using ASP.Net Role and Membership)
- Using Custom Authentication (Using your own database and model)
You can find a number of posts/articles available in blogs that deals with default authentication with ASP.Net membership provider. If you want to find know more about this, this MSDN article is worth a look.
SO lets start with Authentication using your own custom table for applications.
Source Code and Live Link
Source Code - StatesOfIndia_Authentication.zip
Scenario
This article is going to demonstrate the steps involved for integrating authentication for the States of India (SOI App) using a custom table which will store basic information such as UserName, Password and Email. Before proceeding with this SOI app let's have a look into the app with my previous articles.
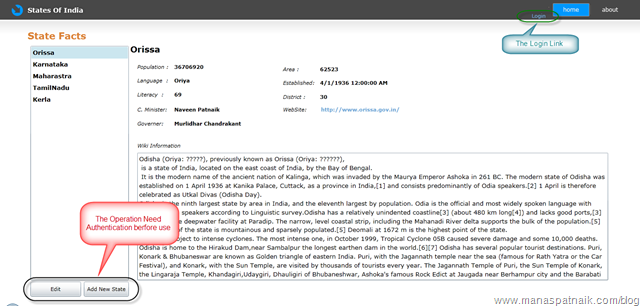
So the application aims to have the following functionality:
- The User has access to the Home page, where they can view the State and its information
- But Adding a new state or Editing state requires the user to be authenticated
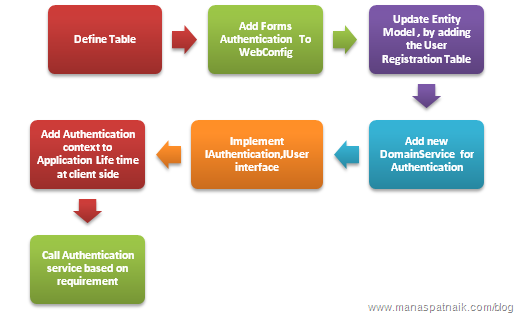
Steps Involved For Implementing Authentication
Before going into detail of each step, the image bellow shows an overall picture/steps. Just follow the arrows, since there is a human tendency to read Left to Right  .
.
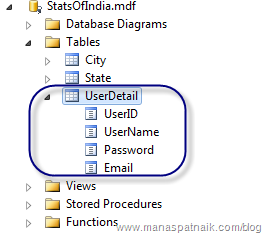
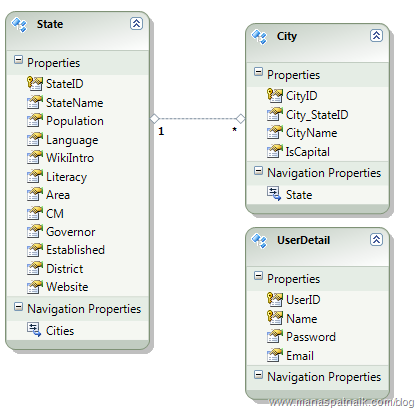
Adding a new Table to a Database and Updating the Data model
The first step is to add a table to the application database; here I have added a new table called UserDetail with the following fields.
Then go to your Model at server side project and update the Model. In case you need the details of setting up an Entity Data Model then refer to my earlier post Here.
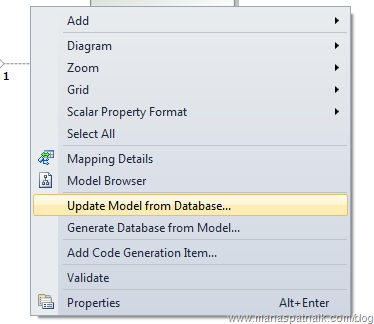
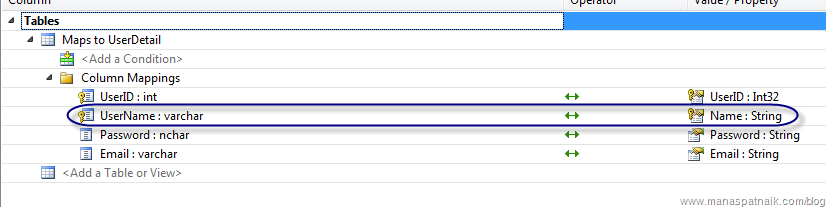
Select the newly added UserDetail table and proceed. Along with the newly added entity to data model it will be as below. If you notice than you can mark that the UserName column in the table is mapped as Name to UserDetail entity; we will discuss about it later in this article.
The Basic Server Side Setup for Custom Authentication
Changes to WebConfig File
As we opted for Forms Authentication, the very first change we need to do is to add the authentication in webconfig file. So add the following section to the webconfig file at server side project.
- <authentication mode="Forms">
- </authentication>
The Concept
Before I proceed with rest of the article let's look into some concepts and how it will work. When you use a business template in Silverlight, Visual Studio adds an Authentication service derived from AuthenticationBase<T> and User Derived form UserBase. The user information and roles are stored with the default ASP.Net membership provider table ASPNETDB.
But we are going to use UserDetail table instead of default ASPNETDB and our own Domainservice to handle authentication. Here comes the IAuthentication and Iuser interfaces.
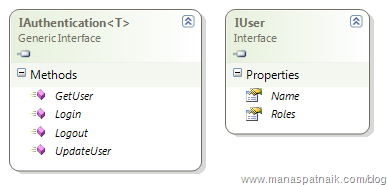
So our Custom DomainService is going to implement IAuthentication <T>, where T is the type of UserDetail, in turn the interface will make available the UserDetail to both client and server side.
As the UserDetail entity is going to be propagated to the client side using IAuthentication it must implement the IUser interface. The update of Entity Data Model add UserDetail entity to model and generates the following piece of code alongside the State and City entities.
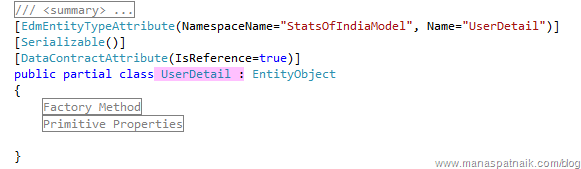
Our Database Table does not hold a Name property as is required by the IUser interface, so we need to map UserName to Name in the UserDetail entity. You can avoid this step If your table has a Name column. For the time being here I am going to skip Role as implemented by IUser.
Then let's add a class named UserDetail to implement the IUSer interface: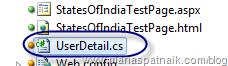
- public partial class UserDetail : IUser
- {
- #region IUser Members
- [DataMember]
- public IEnumerable<string> Roles
- {
- get
- {
- return null;
- }
- set
- {
- throw new NotImplementedException();
- }
- }
- #endregion
- }
- }
So partial classes for UserDetail at EntityModel and above UserDetail sets the valid User which is going to be used in the Custom Authentication domain service, which we are going to add in the next Step.
Adding a DomainService for Authentication
Lets add a new DomainService named SOIAuthDomainService, with out selecting any entity. In the Domain service implement the IAuthentication interface.

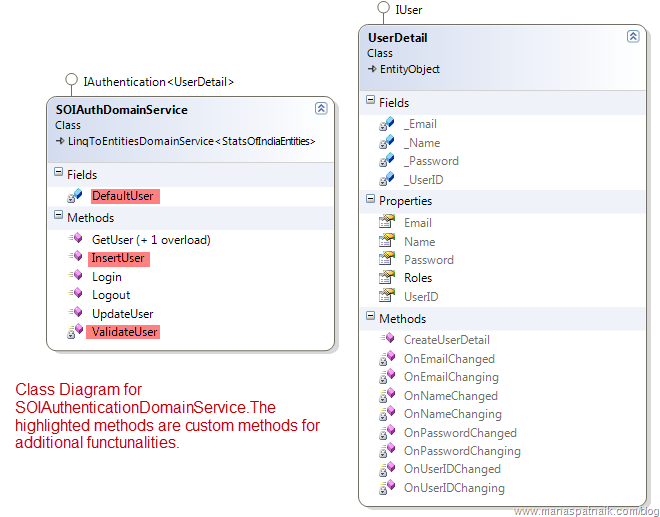
Here in SOIAuthDomainService along with the default methods we will add more methods for Validation and insertion of a user. And also implement logic for Login, Logout. The DefaultUser is the user we are going to return in case the login failed. So overall the class structure will be as bellow.
The Login Logic in the domain service is as follows.
- public UserDetail Login(string userName, string password, bool isPersistent, string customData)
- {
- if (this.ValidateUser(userName, password))
- {
- FormsAuthentication.SetAuthCookie(userName, isPersistent);
- return this.GetUser(userName);
- }
- return null;
- }
while the ValidateUser logic follow as below:
- private bool ValidateUser(string username, string password)
- {
- return this.ObjectContext.UserDetails.Any(u => u.Name == username && u.Password == password);
- }
Since we are allowing User Registration, we need to add the InsertUser Method; later in this article we will check with implementation.
- public void InsertUser(UserDetail user)
- {
- if ((user.EntityState != EntityState.Detached))
- {
- this.ObjectContext.ObjectStateManager.ChangeObjectState(user, EntityState.Added);
- }
- else
- {
- this.ObjectContext.UserDetails.AddObject(user);
- }
- }
Client Side Setup
The next step is to add the Registration Service to the ApplicationLifeTime so that it can be accessed using WebContext.Current. When you build a RIA project it automatically creates a WebContext Class at client side which holds the information Authentication and Current User. Here is the client side generated code:

So in the App.Xaml.cs add the following:
- // Create a WebContext and add it to the ApplicationLifetimeObjects
- // collection. This will then be available as WebContext.Current.
- WebContext webContext = new WebContext();
- webContext.Authentication =
- new System.ServiceModel.DomainServices.Client.ApplicationServices.FormsAuthentication();
- //webContext.Authentication = new WindowsAuthentication();
- this.ApplicationLifetimeObjects.Add(webContext);
Implementing Authentication Logic at UI
Let's add Login And UserRegistration Screens to client side Silverlight project.

Since my intent is to give a clear picture of authentication, I have not added any validation logic what so ever. For more information on adding validation logic refer to my earlier post here.
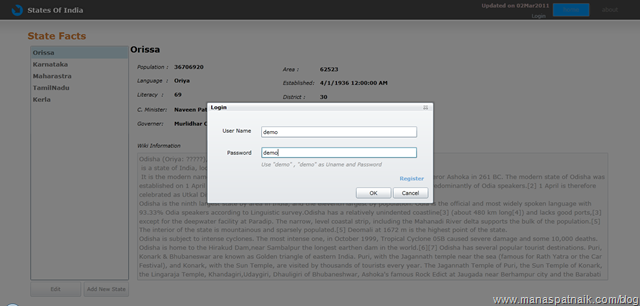
Returning to this article, let's check with the Login screen.
Login Screen
With the user input details and on Ok Button click the user credentials are validated against the database using the service. The commented code is self explanatory for each line of code and its intentions.
- private void OKButton_Click(object sender, RoutedEventArgs e)
- {
- biCreateUser.IsBusy = true;
- //Attach The Authentication_LoggedIn For Displaying the User Status
- //On MainPage once the user Logged In
- WebContext.Current.Authentication.LoggedIn +=
- new EventHandler<AuthenticationEventArgs>(Authentication_LoggedIn);
- //Call WebContext.Current.Login
- LoginOperation lop= WebContext.Current.Authentication.Login
- ((new LoginParameters(txtUserName.Text, txtPassword.Text, true, null)));
- //Callback to Login Operation
- lop.Completed += (Authsender, args) =>
- {
- if (!lop.HasError)
- {
- if (lop.LoginSuccess)
- {
- this.DialogResult = true;
- }
- else
- {
- lblAuthStatus.Content = "Login Failed";
- }
- }
- else
- {
- MessageBox.Show(lop.Error.Message);
- lop.MarkErrorAsHandled();
- }
- biCreateUser.IsBusy = false;
- };
- }
Once the Login operation has completed successfully and the login screen closes, we will display the UserName on the main page header.

So I am going to add a method called UpdateStatus in the Mainpage.Xaml.cs and will call it on the login window close.
- private void ChildWindow_Closed(object sender, EventArgs e)
- {
- MainPage mpage = (MainPage)App.Current.RootVisual;
- mpage.UpdateStatus();
- }
Using Webcontext.Current we can check whether the client using the app is authenticated or not.
- WebContext.Current.Authentication.User.Identity.IsAuthenticated
So the Update Status code is as below:
- public void UpdateStatus()
- {
- //Check if Client is Authenticated
- if (WebContext.Current.Authentication.User.Identity.IsAuthenticated)
- {
- lblUser.Visibility = System.Windows.Visibility.Visible;
- //Assign The Username to screen
- lblUser.Content = WebContext.Current.Authentication.User.Identity.Name;
- hbLogin.Content = "Logout";
- }
- else
- {
- lblUser.Visibility = System.Windows.Visibility.Collapsed;
- hbLogin.Content = "Login";
- }
- }
User Registration
As shown in the picture, the user has an option to Register in the Login screen and on demand the UserRegistration screen popa up for adding a new user.The InsertUserDetail method in the SOIAuthentication DomainService class will be called for creating a new user.
- private void OKButton_Click(object sender, RoutedEventArgs e)
- {
- //New Domain Context Objext
- SOIAuthDomainContext domContext = new SOIAuthDomainContext();
- //New UserDetail Object from User Input
- UserDetail uDetail=new UserDetail();
- uDetail.Name=txtUserName.Text;
- uDetail.Password=txtPassword.Text;
- uDetail.Email=txtEmail.Text;
- biWait.IsBusy = true;
- //Add to DomainContext UserDetail collection
- domContext.UserDetails.Add(uDetail);
- //Call InsertUserDetail with SubmitChanges
- SubmitOperation authSO= domContext.SubmitChanges();
- authSO.Completed += (authsender, args) =>
- {
- if (!authSO.HasError)
- {
- MessageBox.Show("User Created");
- this.DialogResult = true;
- }
- else
- {
- MessageBox.Show(authSO.Error.Message);
- authSO.MarkErrorAsHandled();
- }
- biWait.IsBusy = false ;
- };
- }
The Final Punch
The step above lays the foundation for authentication and the Webcontext. Current can be used throughout the project for additional constraints for each functionality. For e.g in SOI app, the AddNewState and EditState is now onwards open for authenticated User only.
Conclusion
Microsoft suggests to follow the ASP membership provided model for Authentication as it provides more reusability and more security. But authentication some times uses a custom table and that is unavoidable. I hope this article will help you in many ways either using multiple Domain Services, knowing application classes and of course authentication. Keep posting suggestions.
Source Code and Live Link
Live Link - SOI App
Source Code - StatesOfIndia_Authentication.zip