
Part 1
We will continue to design our Business application . Lets continue with the
Payroll view .
Creating remaining Views and adding Transition effects .
Lets add another user control in the Views folder as Payroll.
I follow the same steps as I did for the Author.xaml .
The Final xaml code for Payroll.xaml would look like :
<Grid
x:Name="LayoutRoot"
Background="White">
<riaControls:DomainDataSource
AutoLoad="True"
d:DesignData="{d:DesignInstance
my:Payroll,
CreateList=true}"
Height="0"
LoadedData="payrollDomainDataSource_LoadedData"
Name="payrollDomainDataSource"
QueryName="GetPayrollsQuery"
Width="0">
<riaControls:DomainDataSource.DomainContext>
<my:DataDomainContext
/>
</riaControls:DomainDataSource.DomainContext>
</riaControls:DomainDataSource>
<sdk:DataGrid
AutoGenerateColumns="False"
Height="200"
HorizontalAlignment="Left"
ItemsSource="{Binding
ElementName=payrollDomainDataSource,
Path=Data}"
Margin="0,50,0,0"
Name="payrollDataGrid"
RowDetailsVisibilityMode="VisibleWhenSelected"
VerticalAlignment="Top"
Width="400"
>
<sdk:DataGrid.Columns>
<sdk:DataGridTextColumn
Binding="{Binding
Path=AuthorID}"></sdk:DataGridTextColumn>
<sdk:DataGridTextColumn
Binding="{Binding
Path=PayrollID}"></sdk:DataGridTextColumn>
<sdk:DataGridTextColumn
Binding="{Binding
Path=Salary}"></sdk:DataGridTextColumn>
</sdk:DataGrid.Columns>
</sdk:DataGrid>
</Grid>
Comment the Author View placed in the Mainpage.xaml.cs and drag and drop payroll
view now.
Build and Run.
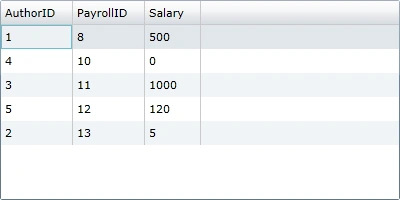
Lets also add the Article View .
I would be using Slide In Transition effects in our example to add the effects .
For reference
http://www.c-sharpcorner.com/UploadFile/Mahadesh/8886/
Add references to the Blend Dlls as shown in the Diagram below :
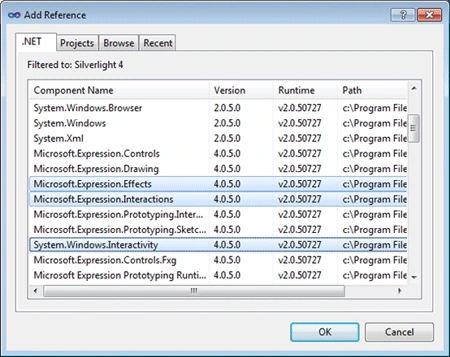
Added the following code to MainPage.xaml.cs .
Do add the namespaces as well .
xmlns:ei="http://schemas.microsoft.com/expression/2010/interactions"
xmlns:ee="http://schemas.microsoft.com/expression/2010/effects"
<!-- Visual State Created -->
<VisualStateManager.VisualStateGroups>
<VisualStateGroup x:Name="PageTrans">
<VisualStateGroup.Transitions>
<VisualTransition
GeneratedDuration="0:0:1">
<ei:ExtendedVisualStateManager.TransitionEffect>
<ee:SlideInTransitionEffect/>
</ei:ExtendedVisualStateManager.TransitionEffect>
<VisualTransition.GeneratedEasingFunction>
<CubicEase
EasingMode="EaseInOut"/>
</VisualTransition.GeneratedEasingFunction>
</VisualTransition>
</VisualStateGroup.Transitions>
<VisualState x:Name="Start"/>
<VisualState
x:Name="New"/>
</VisualStateGroup>
</VisualStateManager.VisualStateGroups>
<VisualStateManager.CustomVisualStateManager>
<ei:ExtendedVisualStateManager/>
</VisualStateManager.CustomVisualStateManager>
<!-- Visual State End-->
In order to swap between the states add the following code to MainPage
constructor . This would create a nice sliding animation when the page loads .
// Swapping Between the states - This code creates a nice Slide
In Transition
if (state = state ^
true)
{
VisualStateManager.GoToState(this,
"Start", true);
}
else
{
VisualStateManager.GoToState(this,
"New", true);
}
Lets run the code the Page opens with a nice animation .
Now lets try some different transition effects .
Lets open our solution in Blend and see what we can do .
The project opens up as shown below :
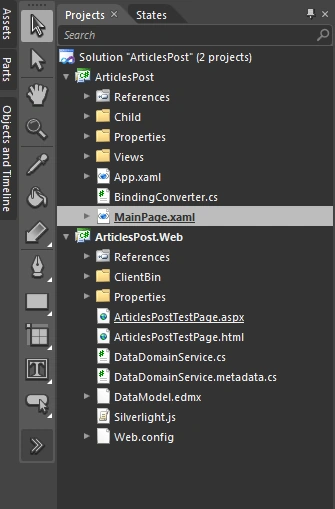
Check out the States Panel - It would look like below :
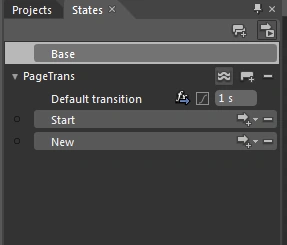
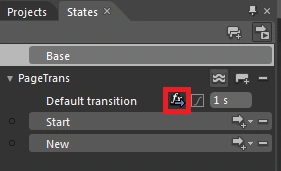
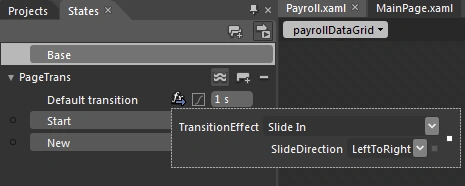
The default would be Slide In . Lets go and modify it .
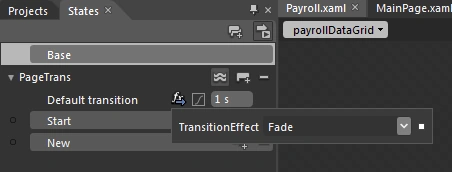
Lets change it to say Fade .
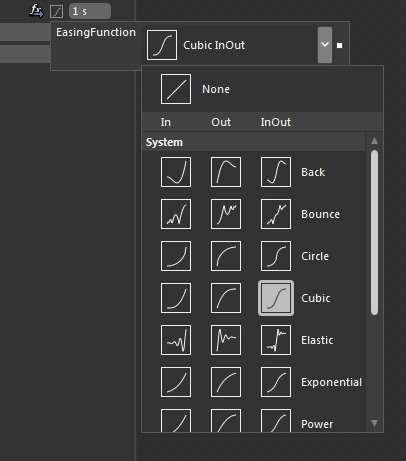
You could also play around with the Easing Function as shown below :
Run and check out the animation .
In this post we have covered the Payroll View and we checked out few animations
. Thanks . Happy Coding
Gowtham RajamanickamPosted Apr 11, 2016, 3:05 AM
good one...