

Introduction:
In this article we will be seeing how to create a custom tab, group and button
to the server ribbon in Sharepoint 2010. Tabs are the root of the Server ribbon
and they contain one or more groups. Every tab in the ribbon contains a series
of one or more groups. Groups are used to associate controls with similar
functionality. Controls are the items that live inside the ribbon that users can
interact with. In this we will be creating a tab, group and control as shown in
the following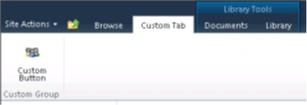
Prerequisites
- SharePoint Server 2010
- SharePoint development tools in Microsoft Visual Studio 2010
Create a SharePoint project:
- Open Visual Studio 2010.
- On the File menu, go to New, and then click Project.
- In Project Types, under Visual C#, select
Empty SharePoint Project.
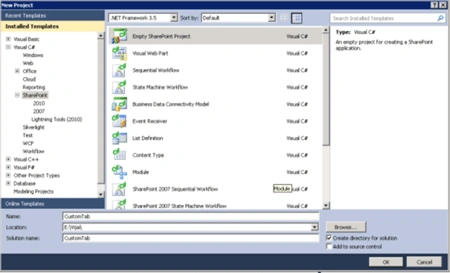
- Enter CustomTab as the project name, and then click OK.
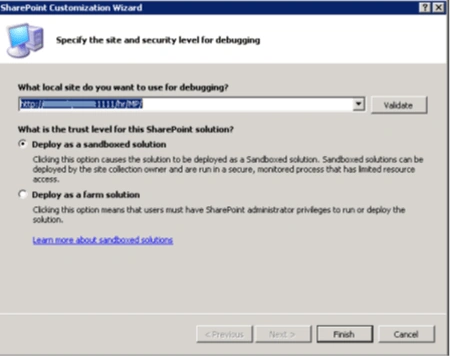
- In the SharePoint Customization Wizard,
select Deploy as a sandboxed solution, and then click Finish.
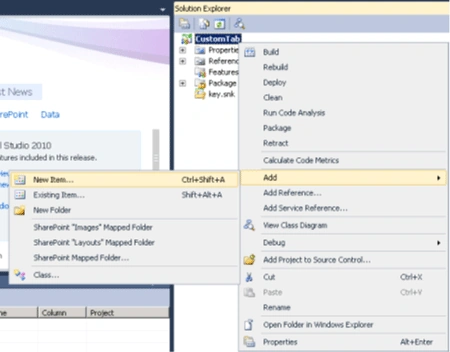
- Right click on the solution, click on Add
=> New item.
- Select Empty Element template and enter
the name as CustomTab.
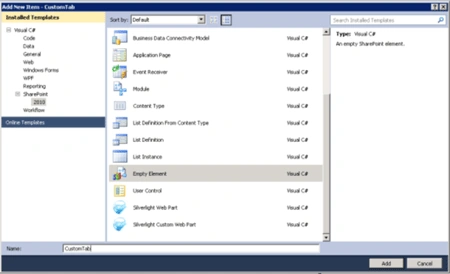
- Click on Ok.
- Open Elements.xml and replace the xml with
the following
<?xml version="1.0" encoding="utf-8"?>
<Elements xmlns="http://schemas.microsoft.com/sharepoint/">
<CustomAction
Id="CustomRibbonTab"
Location="CommandUI.Ribbon"
RegistrationId="101"
RegistrationType="List">
<CommandUIExtension>
<CommandUIDefinitions>
<CommandUIDefinition
Location="Ribbon.Tabs._children">
<Tab
Id="Ribbon.CustomTab"
Title="Custom Tab"
Description="Custom Tab !!!"
Sequence="501">
<Scaling
Id="Ribbon.CustomTab.Scaling">
<MaxSize
Id="Ribbon.CustomTab.MaxSize"
GroupId="Ribbon.CustomTab.CustomGroup"
Size="OneLargeTwoMedium"/>
<Scale
Id="Ribbon.CustomTab.Scaling.CustomTabScaling"
GroupId="Ribbon.CustomTab.CustomGroup"
Size="OneLargeTwoMedium" />
</Scaling>
<Groups Id="Ribbon.CustomTab.Groups">
<Group
Id="Ribbon.CustomTab.CustomGroup"
Description="Custom Group!"
Title="Custom Group"
Sequence="52"
Template="Ribbon.Templates.CustomTemplate">
<Controls Id="Ribbon.CustomTab.CustomGroup.Controls">
<Button
Id="Ribbon.CustomTab.CustomGroup.CustomButton"
Command="CustomTab.CustomButtonCommand"
Sequence="15"
Description=""
LabelText="Custom Button"
Image32by32="/_layouts/images/PPEOPLE.GIF"
TemplateAlias="cust1"/>
</Controls>
</Group>
</Groups>
</Tab>
</CommandUIDefinition>
<CommandUIDefinition Location="Ribbon.Templates._children">
<GroupTemplate Id="Ribbon.Templates.CustomTemplate">
<Layout
Title="OneLargeTwoMedium"
LayoutTitle="OneLargeTwoMedium">
<Section Alignment="Top" Type="OneRow">
<Row>
<ControlRef DisplayMode="Large" TemplateAlias="cust1" />
</Row>
</Section>
</Layout>
</GroupTemplate>
</CommandUIDefinition>
</CommandUIDefinitions>
<CommandUIHandlers>
<CommandUIHandler
Command="CustomTab.CustomButtonCommand"
CommandAction="javascript:alert('Hello, world!');" />
</CommandUIHandlers>
</CommandUIExtension>
</CustomAction>
</Elements>
Deploy the solution:
- Right click on the solution, then click on Build.
- Right click on the solution, then click on Deploy.
- Go to the SharePoint site => Document Library (In the Elements.xml file we have mentioned RegistrationId="101" the custom tab that we have created will be available only in the document library ).
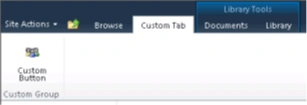
- You could be able to see Custom Tab ,
Custom Group and the Custom Button as shown in the following
Carlos PinheiroPosted Mar 4, 2012, 6:31 PM
Simple, short and it works
Megan WagnerPosted Oct 5, 2011, 6:04 AM
Very nice article, thank you! Is there a way I can make my custom tab display on all the pages, esp the home page? My tab contains three link buttons. Any help will be greatly appeciated!
shashiPosted Aug 3, 2011, 7:15 AM
This is good artical. can you please give me more detail . how to apply a custom css in button control.
Rohatash KumarPosted Jul 27, 2011, 7:11 AM
Nice article. thanks