In this article we will be seeing how to open the xaml files in the Silverlight tab controls. For Silverlight tab controls refer to Silverlight- TabControl Example Part 1 and Silverlight- TabControl Example Part 2.
Here we will be creating the three xaml files StackPanel.xaml, Canvas.xaml and Grid.xaml.
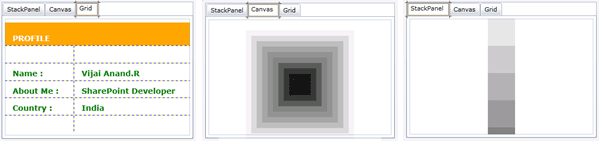
On click of each tab item xaml files will be opened ( On click of StackPanel => StackPanel.xaml will be opened, Canvas => Canvas.xaml will be opened, Grid => Grid.xaml will be opened).
To create a Silverlight Application:
- Open Visual Studio 2010.
- Go to File => New => Project.
- Select Silverlight from the Installed templates and choose the Silverlight Application template.
- Enter the Name and choose the location.
- Click OK.
- In the New Silverlight Application wizard check the "Host the Silverlight Application in a new Web site".
- Click OK.
StackPanel.xaml:
- Right click on the solution, Add => New Item.
- Select Silverlight User Control and enter the Name as StackPanel.xaml.
- Click Ok.
- Open the StackPanel.xaml and replace the code with the following.
<StackPanel Orientation="Vertical">
<Rectangle Height="50" Width="50" Fill="Gray" Opacity="0.2"></Rectangle>
<Rectangle Height="50" Width="50" Fill="Gray" Opacity="0.4"></Rectangle>
<Rectangle Height="50" Width="50" Fill="Gray" Opacity="0.6"></Rectangle>
<Rectangle Height="50" Width="50" Fill="Gray" Opacity="0.8"></Rectangle>
<Rectangle Height="50" Width="50" Fill="Gray" Opacity="1"></Rectangle>
</StackPanel>
Canvas.xaml:
- Right click on the solution, Add => New Item.
- Select Silverlight User Control and enter the Name as Canvas.xaml.
- Click Ok.
- Open the Canvas.xaml and replace the code with the following.
<Canvas Height="250" Width="300" Background="White">
<Rectangle Height="200" Width="200" Canvas.Left="50" Canvas.Top="50" Fill="Gray" Opacity="0.1" />
<Rectangle Height="180" Width="180" Canvas.Left="60" Canvas.Top="60" Fill="Gray" Opacity="0.2" />
<Rectangle Height="160" Width="160" Canvas.Left="70" Canvas.Top="70" Fill="Gray" Opacity="0.3" />
<Rectangle Height="140" Width="140" Canvas.Left="80" Canvas.Top="80" Fill="Gray" Opacity="0.4" />
<Rectangle Height="120" Width="120" Canvas.Left="90" Canvas.Top="90" Fill="Gray" Opacity="0.5" />
<Rectangle Height="100" Width="100" Canvas.Left="100" Canvas.Top="100" Fill="Gray" Opacity="0.6" />
<Rectangle Height="80" Width="80" Canvas.Left="110" Canvas.Top="110" Fill="Black" Opacity="0.3" />
<Rectangle Height="60" Width="60" Canvas.Left="120" Canvas.Top="120" Fill="Black" Opacity="0.4" />
<Rectangle Height="40" Width="40" Canvas.Left="130" Canvas.Top="130" Fill="Black" Opacity="0.5" />
<Rectangle Height="20" Width="20" Canvas.Left="140" Canvas.Top="140" Fill="Black" Opacity="0.6" />
</Canvas>
Grid.xaml:
- Right click on the solution, Add => New Item.
- Select Silverlight User Control and enter the Name as Grid.xaml.
- Click Ok.
- Open the Grid.xaml and replace the code with the following.
<Grid x:Name="layoutRoot" ShowGridLines="True" Height="200" Width="350" Background="Orange">
<Grid.RowDefinitions>
<RowDefinition Height="32*" />
<RowDefinition Height="121*" />
</Grid.RowDefinitions>
<TextBlock Text="PROFILE"
FontFamily="Verdana"
FontSize="14"
FontWeight="Bold"
Foreground="White"
Margin="14,20,-14,99"
Grid.RowSpan="2">
</TextBlock>
<Grid Grid.Row="1" ShowGridLines="True" Background="White">
<Grid.ColumnDefinitions>
<ColumnDefinition Width="144*" />
<ColumnDefinition Width="256*" />
</Grid.ColumnDefinitions>
<Grid.RowDefinitions>
<RowDefinition Height="50*" />
<RowDefinition Height="50*" />
<RowDefinition Height="50*" />
<RowDefinition Height="50*" />
<RowDefinition Height="50*" />
</Grid.RowDefinitions>
<TextBlock Text="Name :" FontFamily="Verdana" Grid.Row="1" Grid.Column="0" FontSize="14" FontWeight="Bold" Foreground="Green" Margin="14,10,-14,21" Grid.RowSpan="2" ></TextBlock>
<TextBlock Text="About Me :" FontFamily="Verdana" Grid.Row="2" Grid.Column="0" FontSize="14" FontWeight="Bold" Foreground="Green" Margin="14,10,-14,21" Grid.RowSpan="2" ></TextBlock>
<TextBlock Text="Country :" FontFamily="Verdana" Grid.Row="3" Grid.Column="0" FontSize="14" FontWeight="Bold" Foreground="Green" Margin="14,10,-14,21" Grid.RowSpan="2" ></TextBlock>
<TextBlock Text="Vijai Anand.R" FontFamily="Verdana" Grid.Row="1" Grid.Column="1" FontSize="14" FontWeight="Bold" Foreground="Green" Margin="14,10,-14,21" Grid.RowSpan="2"></TextBlock>
<TextBlock Text="SharePoint Developer" FontFamily="Verdana" Grid.Row="2" Grid.Column="1" FontSize="14" FontWeight="Bold"Foreground="Green"
Margin="14,10,-14,21" Grid.RowSpan="2"></TextBlock>
<TextBlock Text="India" FontFamily="Verdana" Grid.Row="3" Grid.Column="1" FontSize="14" FontWeight="Bold" Foreground="Green"Margin="14,10,-14,21" Grid.RowSpan="2"></TextBlock>
</Grid>
</Grid>
MainPage.xaml:
-
Right click on the solution, Add => New Item.
-
Select Silverlight User Control and enter the Name as Grid.xaml.
-
Click Ok.
-
Open the Grid.xaml and replace the code with the following. (Register the Namespace xmlns:XamlFiles="clr-namespace:SilverlightApplication13)
<UserControl xmlns:sdk="http://schemas.microsoft.com/winfx/2006/xaml/presentation/sdk" x:Class="SilverlightApplication13.MainPage" xmlns="http://schemas.microsoft.com/winfx/2006/xaml/presentation" xmlns:x="http://schemas.microsoft.com/winfx/2006/xaml" xmlns:d="http://schemas.microsoft.com/expression/blend/2008" xmlns:mc="http://schemas.openxmlformats.org/markup-compatibility/2006" xmlns:XamlFiles="clr-namespace:SilverlightApplication13" mc:Ignorable="d" d:DesignHeight="250" d:DesignWidth="350">
<Grid x:Name="LayoutRoot">
<sdk:TabControl >
<sdk:TabItem Header="StackPanel">
<XamlFiles:StackPanel></XamlFiles:StackPanel>
</sdk:TabItem>
<sdk:TabItem Header="Canvas">
<XamlFiles:Canvas></XamlFiles:Canvas>
</sdk:TabItem>
<sdk:TabItem Header="Grid">
<XamlFiles:Grid></XamlFiles:Grid>
</sdk:TabItem>
</sdk:TabControl>
</Grid> </UserControl>
Result: