Introduction
In this tutorial we will see some of the extenders provided by AJAX Toolkit. We can enhance the functionality of TextBox.
In this tutorial both ways of adding extenders are mentioned; i.e. in mark up source and in design time.
We will discuss the following textbox extenders:
- Watermark Extender
- Filtered TextBox
- Masked Edit TextBox and Masked Edit Validator
- Calendar Extender
- Validator Callout Extender
- Auto Complete Extender
- Password Strength Extender
1. Watermark Extender
Watermark is an untouchable text; that usually helps us for guidance. Consider you are typing your data (e.g. First name, last name, etc.) into the text box. You can have watermark text to guide you for the process.
The following image displays the watermark in the text box for searching.

As soon as you click inside the textbox to type, the watermark becomes invisible.
The following steps will help you to use watermark extender for the textbox.
- Add a textbox to the web page.
- Add extenders by clicking the arrow flag on the top right corner of the text box.
- Select Watermark Extender from the available list.
- Now in the property page of the textbox you can see the extender's property as in the following figure.
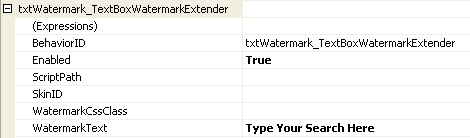
- As above you can change the property you wanted and you will get your watermark for your textbox.
The mark up source for the extender is as follows:
<asp:TextBox ID="txtWatermark" runat="server" Width="200px"></asp:TextBox>
<cc1:TextBoxWatermarkExtender ID="txtWatermark_TextBoxWatermarkExtender" runat="server"
Enabled="True" TargetControlID="txtWatermark" WatermarkText="Type Your Search Here">
</cc1:TextBoxWatermarkExtender>
2. Filtered TextBox
While developing an application we are more concerned about the user inputs. As we treat the user as crazy, meaning the user can give anything as input. While taking the search or query or the data, we need to filter it.
We can extend our textbox to filter the user input. The available filter type options are as follows:
- Numbers (Only numbers can be taken as input.)
- Uppercase letters (Only Uppercase letters can be taken into input)
- Lowercase letters (Only Lowercase letters can be taken into input)
- Custom (Character list can be added for customizing the user input)
The basic idea behind filtered text box is that, the user cannot type Invalid characters into the textbox. The following procedure is followed for achieving filtering.
- Add a textbox to the web page.
- Add extenders by clicking the arrow flag on the top right corner of the text box.
- Select Filtered Textbox Extender from the available list.
- Now in the property page of the textbox you can see the extender's property as in the following figure.
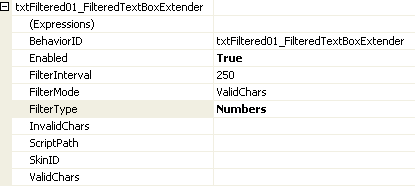
- As above you can change the property you wanted and you will get your filtered textbox.
The mark up source for the extender is as follows:
<asp:TextBox ID="txtFiltered01" runat="server" Width="200px"></asp:TextBox>
<cc1:FilteredTextBoxExtender ID="txtFiltered01_FilteredTextBoxExtender" runat="server"
Enabled="True" FilterType="Numbers" TargetControlID="txtFiltered01">
</cc1:FilteredTextBoxExtender>
3. Masked Edit TextBox and masked edit validator
In some cases you will be demanding a textbox which can take input as numbers only and it would be display as a valid date or valid number or even time. Here is the solution for you, masked edit extender for textbox provides you the textbox which can format user input into valid number, date and time.
We can mask a particular textbox for the following mask types:
- Date
- Number
- Time
- DateTIme
Consider the following figures, which displays date and number as masked type.

We can achieve masked edit textbox by following the below steps.
- Add a textbox to the web page.
- Add extenders by clicking the arrow flag on the top right corner of the text box.
- Select MaskedEdit Textbox Extender from the available list.
- Now in the property page of the textbox you can see the extender's property as in the following figure.
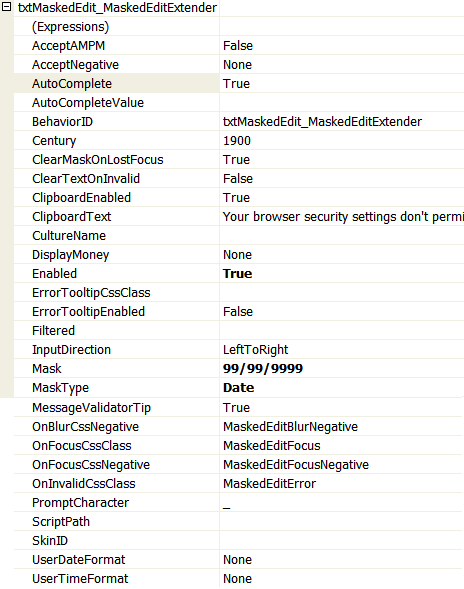
- As you can see from the above figure by changing some properties we can achieve the masked edit textbox.
The markup source for the extender is as follows.
<asp:TextBox ID="txtMaskedEdit" runat="server" Width="200px"></asp:TextBox>
<cc1:MaskedEditExtender ID="txtMaskedEdit_MaskedEditExtender" runat="server"
Enabled="True" Mask="99/99/9999" MaskType="Date" TargetControlID="txtMaskedEdit"/>
<cc1:MaskedEditValidator ID="MaskedEditValidator1" runat="server" ControlExtender="txtMaskedEdit_MaskedEditExtender" ControlToValidate="txtMaskedEdit" Display="Dynamic" EmptyValueMessage="A Date is Required" InvalidValueMessage="The Date is Invalid" IsValidEmpty="False" TooltipMessage="Please Enter a Date"/>
4. Calendar Extender
This is an extender which provides a calendar control dynamically and provides the date when it is chosen.
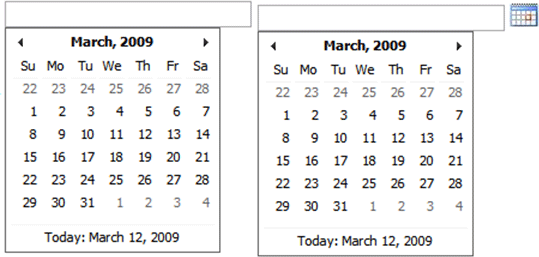
We can use a particular textbox to show the calendar dynamically. The following figure describes our requirement.
The following steps are to be followed to achieve the above.
- Add a textbox to the web page.
- Add extenders by clicking the arrow flag on the top right corner of the text box.
- Select Calendar extender for textbox from the available list.
- Now in the property page of the textbox you can see the extender's property as in the following figure.
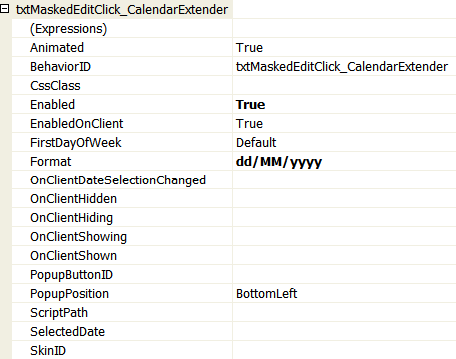
- As from the above figure you can see we can change specific properties the calendar can be popped up. Note that to use image to pop up calendar use PopupButtonId property.
The mark up source for the extender is shown below.
<asp:TextBox ID="txtMaskedEditButton" runat="server" Width="200px"></asp:TextBox>
<cc1:CalendarExtender ID="txtMaskedEditButton_CalendarExtender" runat="server" Enabled="True"
Format="dd/MM/yyyy" PopupButtonID="imgCalendar" TargetControlID="txtMaskedEditButton"/>
<asp:Image ID="imgCalendar" runat="server" ImageUrl="~/Calendar.JPG" />
5. Validator Callout Extender
This extender is not exactly related to textbox, but it is related to Required Field Validator control. You could remember the Required Field Validator when it shows the error message it shows the message as it is labeled. Here adding this extender we can make the message as a callout.
The figure below describes the whole picture of using this.

Looks great isn't it. To use this extender you have to follow the below steps.
- Add a textbox to the web page.
- Add a RequiredFieldValidator and associate it with the target textbox.
- Add extenders by clicking the arrow flag on the top right corner of the RequiredFieldValidator.
- Select ValidatorCallout extender for RequiredFieldValidator from the available list.
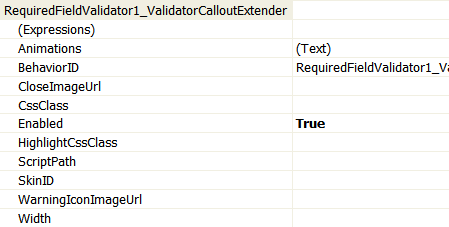
- Now in the property page of the RequiredFieldValidator you can see the extender's property as in the following figure.
The markup source for the extender is shown below.
<asp:RequiredFieldValidator ID="RequiredFieldValidator1" runat="server" ControlToValidate="txtCalloutValidator"
Display="None" ErrorMessage="Field cannot be empty"/>
<cc1:ValidatorCalloutExtender ID="RequiredFieldValidator1_ValidatorCalloutExtender"
runat="server" Enabled="True" TargetControlID="RequiredFieldValidator1"/>
6. Auto Complete Extender
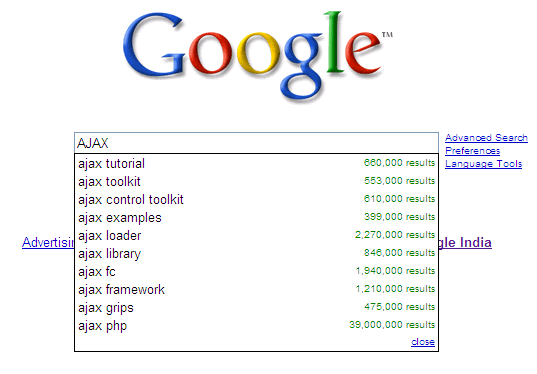
This is an extender which helps the user to find out suggestions. You might have visited Google's suggestion page. It looks like the following figure.
Link: http://www.google.com/webhp?complete=1&hl=en
This is being used along with web service, which gives the related words for the search text.
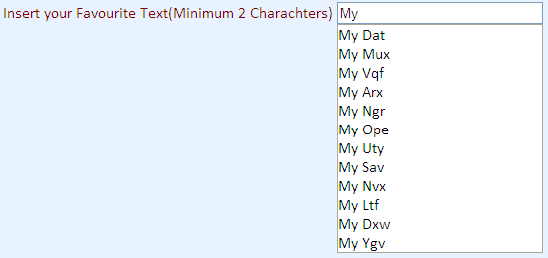
We will use a simple version of this. The following figure shows about the basic idea about using the extender.
To achieve AutoComplete extender work for our textbox we need to have the Web Service where the logic for the word suggestion is written. We will use a simple logic.
The following code is for the Web Service.
[WebService(Namespace = "http://tempuri.org/")]
[WebServiceBinding(ConformsTo = WsiProfiles.BasicProfile1_1)]
[System.Web.Script.Services.ScriptService]
public class AutoComplete : WebService
{
public AutoComplete()
{
}
[WebMethod]
public string[] GetCompletionList(string prefixText, int count)
{
if (count == 0)
{
count = 10;
}
Random random = new Random();
List<string> items = new List<string>(count);
for (int i = 0; i < count; i++)
{
char c1 = (char)random.Next(65, 90);
char c2 = (char)random.Next(97, 122);
char c3 = (char)random.Next(97, 122);
items.Add(prefixText + c1 + c2 + c3);
}
return items.ToArray();
}
}
Now to add this extender to the textbox you need to follow the below steps.
- Add a textbox to the web page.
- Add extenders by clicking the arrow flag on the top right corner of the text box.
- Select AutoComplete extender for textbox from the available list.
- Now in the property page of the textbox you can see the extender's property as in the following figure.

The markup source for the above extender is as follows.
<asp:TextBox ID="TextBox1" runat="server" Width="200px" />
<cc1:AutoCompleteExtender ID="TextBox1_AutoCompleteExtender" runat="server"
Enabled="True" TargetControlID="TextBox1" ServicePath="AutoComplete.asmx"
ServiceMethod="GetCompletionList" MinimumPrefixLength="2" CompletionInterval="1000"
EnableCaching="true" CompletionSetCount="12"/>
7. Password Strength Extender
This is an excellent extender available for textbox. Usually for passwords we are not sure whether it is a strong password or not. Now AJAX is providing the extender for this, through this we can allow how many characters have to be allowed.
The following figure displays a sample password strength extender's work.

To use this extender in your textbox you need to follow the below steps:
- Add a textbox to the web page.
- Add extenders by clicking the arrow flag on the top right corner of the text box.
- Select PasswordStrength extender for textbox from the available list.
- Now in the property page of the textbox you can see the extender's property as in the following figure.
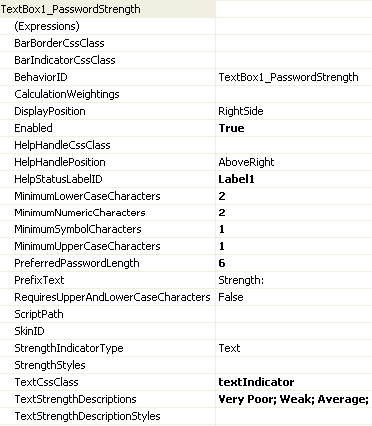
- We can have the Strength Indicator in two types such as Progress Indicator and Text Indicator.
The markup source for the extender is as followed:
<asp:TextBox ID="TextBox1" runat="server" Width="200px"/>
<cc1:PasswordStrength ID="TextBox1_PasswordStrength" runat="server"
Enabled="True" TargetControlID="TextBox1" DisplayPosition="RightSide"
StrengthIndicatorType="Text" PreferredPasswordLength="6" PrefixText="Strength: "
TextStrengthDescriptions="Very Poor; Weak; Average; Strong; Excellent"
MinimumNumericCharacters="2" MinimumLowerCaseCharacters="2"
MinimumUpperCaseCharacters="1" MinimumSymbolCharacters="1"
HelpStatusLabelID="Label1” TextCssClass="textIndicator"/>