Silverlight AutoCompleteBox Control
If you type a keyword or character in a Google or Live search boxes, you see your word is being typed automatically based on the character you type. This control that provides this functionality is called an AutoCompleteBox. This article demonstrates how to create and use a AutoCompleteBox control in Silverlight using XAML and C#.
Note: The AutoCompleteBox control is a part of Silverlight Toolkit. This article is written by using the Silverlight Toolkit November 2008 that you can download from here: Silverlight Toolkit - Release: Silverlight Toolkit November 2008. This control may be a part of Silverlight in near future versions.
Adding Silverlight Toolkit Reference
Before you can use an AutoCompleteBox control, you must download the Silverlight Toolkit. After that you need to add a reference to the library.
To add a reference, right click the References folder of your project in Solution Explorer and select Add Reference. This action will open the Add Reference dialog as you can in the following Figure 1. On this dialog, select Browse option and browse the Microsoft.Windows.Controls.dll assembly from the folder where you installed the Silverlight Toolkit. This assembly resides in the Binaries folder.

Figure 1
Once you add the reference, you will see the Microsoft.Windows.Controls added to your References dialog as you see in Figure 2.
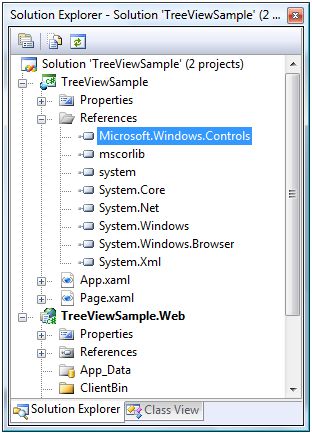
Figure 2
Now, the next step is to import the Microsoft.Windows.Controls namespace to the page. Once you type xmlns= in your page, you will see Microsoft.Windows.Controls listing in Intellisense. Select it as shown in Figure 3.
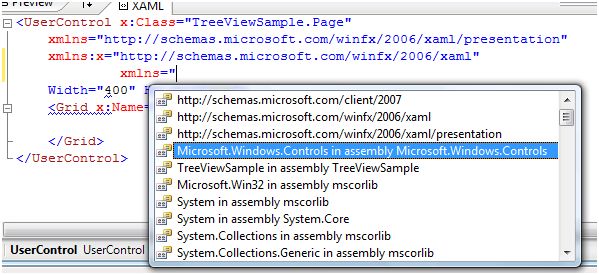
Figure 3
The final reference added to the page looks like following. As you can see here, I added name of this reference to ToolkitRef.
xmlns:ToolkitRef="clr-namespace:Microsoft.Windows.Controls;assembly=Microsoft.Windows.Controls"
Now you will see ToolkitRef in your page and once you select it, you will notice AutoCompleteBox added to the Intellisense. To add the AutoCompleteBox control to your page, just select it as you can see in Figure 4.
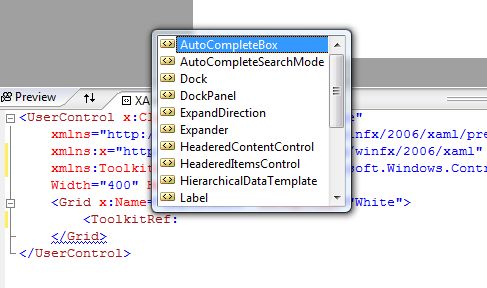
Figure 4
Creating an AutoCompleteBox
The AutoCompleteBox element represents a Silverlight AutoCompleteBox control in XAML.
<ToolkitRef:AutoCompleteBox></ToolkitRef:AutoCompleteBox>
The code snippet in Listing 1 creates an AutoCompleteBox by setting its width and height properties to 200 and 30 respectively.
<AutoCompleteBox Width="200" Height="30" />
Listing 1
The Text property of the AutoCompleteBox control represents the selected text box in the control.
string curText = ACB.Text;
Data Binding in AutoCompleteBox
Similar to other data bound controls in Silverlight, the ItemsSource property is used to bind a collection of object to the AutoCompleteBox.
The code snippet in Listing 2 creates a object collection called Authors and binds it to the AutoCompleteBox by using the ItemsSource property.
<!-- ObjectCollection -->
<UserControl.Resources>
<ToolkitRef:ObjectCollection x:Key="Authors">
<coreLib:String>Mahesh Chand</coreLib:String>
<coreLib:String>Mike Gold</coreLib:String>
<coreLib:String>Scott Lysle</coreLib:String>
<coreLib:String>Matt Cochran</coreLib:String>
<coreLib:String>Raj Kumar</coreLib:String>
<coreLib:String>Nipun Tomar</coreLib:String>
<coreLib:String>Sundar Lal</coreLib:String>
<coreLib:String>Praveen Kumar</coreLib:String>
<coreLib:String>Dinesh Beniwal</coreLib:String>
<coreLib:String>Renee Ward</coreLib:String>
<coreLib:String>Amber Jap</coreLib:String>
</ToolkitRef:ObjectCollection>
</UserControl.Resources>
<!-- Create a Grid and Add an AutoCompleteBox control to it -->
<Grid x:Name="LayoutRoot" Background="White">
<ToolkitRef:AutoCompleteBox Width="200"
Height="30" x:Name="ACB"
ItemsSource="{StaticResource Authors}" >
</ToolkitRef:AutoCompleteBox>
</Grid>
Listing 2
Now if you run the application and type a character in the control, you will see the list of items matching with the criteria. I type letter m and the output looks like Figure 2, where all authors start with letter m are listed.
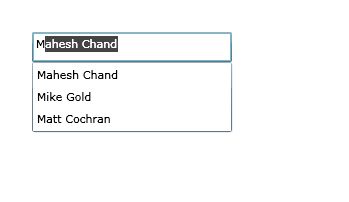
Figure 5
If you would like to disable the auto complete feature, you can set the IsTextCompletionEnabled property to false.
IsTextCompletionEnabled="True"
Summary
In this article, I discussed how we can create and use an AutoCompleteBox control in Silverlight. The article also showed how to bind a collection of items to the control.