

This article has been
excerpted from book "A Programmer's Guide to ADO.NET in C#".
The first step is to drag and drop an OleDbDataAdapter component from the
toolbox's Data tab. As you drop the OleDbDataAdapter on the page. The Data
Adapter Configuration Wizard pops up on the screen. You then follow these simple
steps: At the generate the SQL Statement page, select the EmployeeID, FirstName,
LastName, Title, City, and Address fields from the Employees table, as shown in
Figure 7-30.
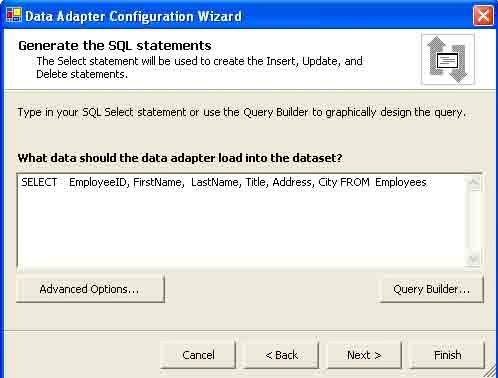
Figure 7-30. Generating a SQL statement using the Query Builder
The Finish buttons adds a data adapter and a connection object to the project.
Now if you view the code of your page using the View Code option, you see the
wizard has added an OleDbDataAdapter, an OleDbConnection, and four OleDbCommand
variables to your project. The variables look like this:
protected System.Data.OleDb.OleDbDataAdapter
oleDbDataAdapter1;
protected System.Data.OleDb.OleDbCommand
oleDbSelectCommand1;
protected System.Data.OleDb.OleDbCommand
oleDbInsertCommand1;
protected System.Data.OleDb.OleDbCommand
oleDbUpdateCommand1;
protected System.Data.OleDb.OleDbCommand
oleDbDeleteCommand1;
protected System.Data.OleDb.OleDbConnection
oleDbConnection1;
Generating a DataSet from Data Adapter
The next Step is to generate a data a dataset from the data adapter. To generate
a dataset from the OleDbDataAdapter, right-click on the OleDbDataAdapter, and
click the generate dataset menu option. The option brings up the Generate
Dataset page, as shown in figure 7-31. The Default name of the dataset is
DataSet1.
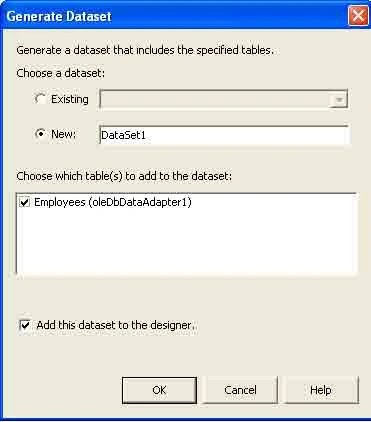
Figure 7-31. Generating a dataset using the data adapter's generate Dataset
option
This page actually a class called DataSet1, which comes from the DataSet class.
This class looks like figure 7-32 in Class View.
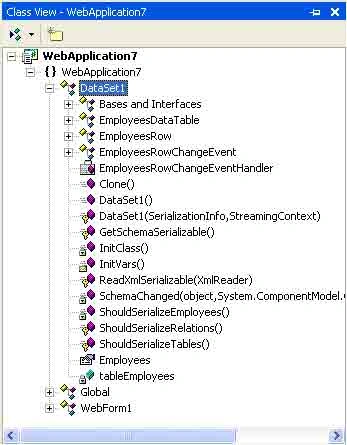
Figure 7-32. The Class View representation of the Data Set1 class
This action also adds one DataSet variable, named dataset11, to your project
(See Figure 7-33).

Figure 7-33. The data Set11 variable generated by the data adapter
You'll be using this data set11 in your application; it represents a dataset
having data from the Employees table (The SQL statement you saw in Figure 7-30).
Creating a DataView and Connecting It With a Data Set
The Next step is to connect the dataset to a data view. To do so, drop a
DataView from the toolbox's Data tab onto the page and set its Table property to
dataset11.Employee, as shown in Figure 7-34.
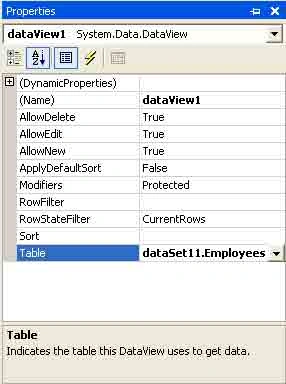
Figure 7-34. Setting the Table property of as data view
Dropping a data view control to the page adds a data view control named as
dataView1.
Binding a DataGrid
Now set the data grid control's DataSource property to the data view. I set
DataGrid.DataSource property to dataView1, as shown in figure 7-35.
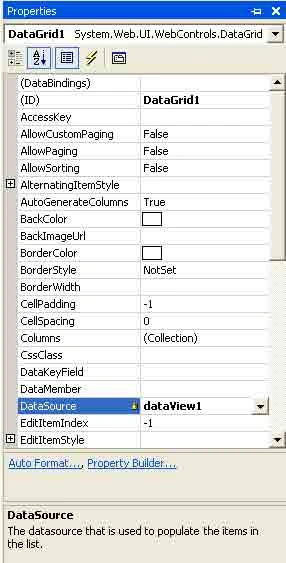
Figure 7-35. Setting the DataGrid's DataSource property
Filling DataSet
You're almost there. Now the only thing you need to do is to call the data
adapter's Fill method and fill the dataset, and you're all set. Call the
oleDbDataAdapter1.Fill method with dataset11 as the only argument on the
Page_Load event and then call the DataGrid1.DataBind method to bind data grid
with the data. Lsting 7-5 shows how do to this.
Listing 7-5. The dataSet from DataAdapter
private
void Page_Load(object
sender, System.EventArgs e)
{
// Put user code to
Initialize the page here
oleDbDataAdapter1.Fill(dataSet11);
DataGrid1.DataBind();
}
Now run the project, the output of the project looks like Figure 7-36.
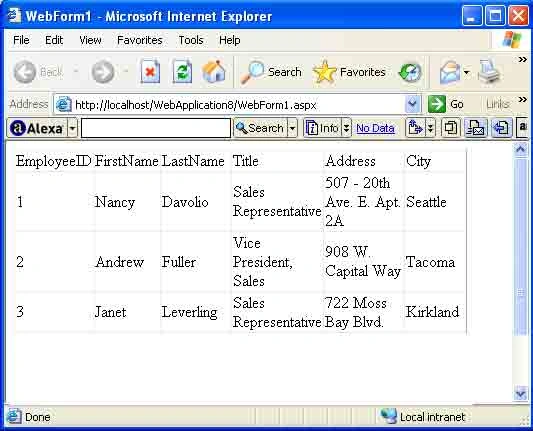
Figure 7-36. Viewing data in a data grid using the design time data binding
method
As you can see from the previous discussion, by writing only two lines of code,
you've developed a database application.
Conclusion
Hope this article would have helped you in understanding how to
Create a Data Adapter in ADO.NET.
See other articles on
the website also for further reference.
 |
This essential guide to Microsoft's ADO.NET overviews C#, then leads you toward deeper understanding of ADO.NET. |
Join the conversation! Your thoughts help the community grow.