

Introducing WPF TreeView
A TreeView represents data in a hierarchical view in a parent-child relationship where a parent node can be expanded or collapsed. The left sidebar of Windows Explorer is an example of a TreeView.
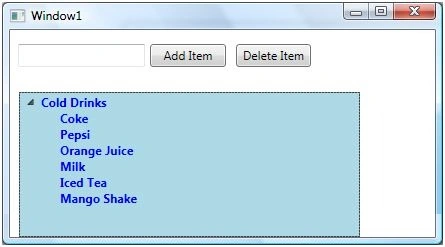
In this tutorial, we will create a WPF application that will add and delete TreeView items dynamically. The UI looks like the following where anything entered in the TextBox will be added to the TreeView as a child node.
The TreeView tag represents a WPF TreeView control in XAML.
<TreeView></TreeView>
The Width and Height properties represent the width and the height of a TreeView. The Name property represents the name of the control, which is a unique identifier of a control. The Margin property tells the location of a TreeView on the parent control. The horizontal alignment and vertical alignment properties are used to set horizontal and vertical alignments.
The following code snippet sets the name, height, and width of a TreeView control. The code also sets the horizontal alignment to the left and the vertical alignment to the top.
<TreeView Margin="10,10,0,13"
          Name="TreeView1"
          HorizontalAlignment="Left"
          VerticalAlignment="Top"
          Width="194"
          Height="200" />
Adding Items to a WPF TreeView
A TreeView control hosts a collection of TreeViewItem. The Header property is the text of the item that is displayed on the view. The following code snippet adds a parent item and six child items to a TreeView control.
<TreeView Margin="10,10,0,13" Name="TreeView1" HorizontalAlignment="Left" VerticalAlignment="Top" Width="194" Height="200">
    <TreeViewItem Header="Cold Drinks">
        <TreeViewItem Header="Coke"/>
        <TreeViewItem Header="Pepsi"/>
        <TreeViewItem Header="Orange Juice"/>
        <TreeViewItem Header="Milk"/>
        <TreeViewItem Header="Iced Tea"/>
        <TreeViewItem Header="Mango Shake"/>
    </TreeViewItem>
</TreeView>
By default, the parent node is collapsed but when you click on it, the expanded view looks like Figure 1.

Figure 1. TreeView with items
Adding WPF TreeView Items Dynamically using C#
In the previous section, we saw how to add items to a TreeView at design time from XAML. We can add items to a TreeView from the code.
Let's change our UI and add a TextBox and a button control to the page. The XAML code for the TextBox and Button controls looks like the following.
<TextBox Height="23"
         Width="127"
         Margin="8,14,0,0"
         HorizontalAlignment="Left"
         VerticalAlignment="Top"
         Name="textBox1" />
<Button Height="23"
        Width="76"
        Margin="140,14,0,0"
        HorizontalAlignment="Left"
        VerticalAlignment="Top"
        Name="button1"
        Click="button1_Click">Add Item</Button>
The final UI looks like Figure 2. On the Add Item button click the event handler, we are going to add a new item to the first parent node of the TreeView.
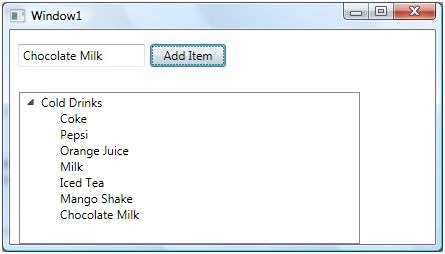
Figure 2
On the button click event handler, we add the content of TextBox to the TreeViewItem by calling TreeViewItem.Items.Add method. The following code adds TextBox contents to the TreeViewItem items.
private void button1_Click(object sender, RoutedEventArgs e)
{
    TreeViewItem newChild = new TreeViewItem();
    newChild.Header = textBox1.Text;
    Parent.Items.Add(newChild);
}
On the button click event handler, we add the content of TextBox to the TreeView by calling TreeViewItem.Items.Add method.
Now if you enter text in the TextBox and click the Add Item button, it will add the contents of the TextBox to the TreeView.
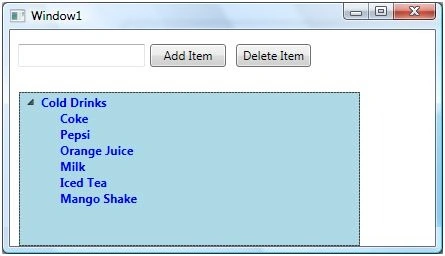
Figure 3. Adding TreeView items dynamically
Deleting WPF TreeView Items
We can use TreeView.Items.Remove or TreeView.Items.RemoveAt method to delete an item from the collection of items in the TreeView. The RemoveAt method takes the index of the item in the collection.
Now, we have modified our application and added a new button called Delete Item. The XAML code for this button looks like below.
<Button Height="23" Margin="226,14,124,0" Name="DeleteButton" VerticalAlignment="Top" Click="DeleteButton_Click"> Delete Item</Button>
The button click event handler looks like the following. On this button click, we find the index of the selected item and call TreeView.Items.RemoveAt method ais s follows
private void DeleteButton_Click(object sender, RoutedEventArgs e) {
TreeView1.Items.RemoveAt(TreeView1.Items.IndexOf(TreeView1.SelectedItem));
}
The above code removes root items from the TreeView, not the subitems. To remove sub-items first, we need to find the selected item and then we need to call TreeViewItem.Items.RemoveAt method.
Styling a WPF TreeView Items
A TreeView control is placed inside a StackPanel that contains a ScrollVewer control so when the width or height of the panel is more than the visible area, the scroll viewer gets active and provides horizontal and vertical scrolling functionality.
To style a TreeView, we can use individual TreeViewItems and set their properties. Alternatively, we can use System. Resources and set Style property. The following code snippet sets TreeViewItem foreground, font size, and font-weight properties.
<Window.Resources>
    <Style TargetType="{x:Type TreeViewItem}">
        <Setter Property="Foreground" Value="Blue" />
        <Setter Property="FontSize" Value="12" />
        <Setter Property="FontWeight" Value="Bold" />
    </Style>
</Window.Resources>
The new TreeView looks like Figure 4.
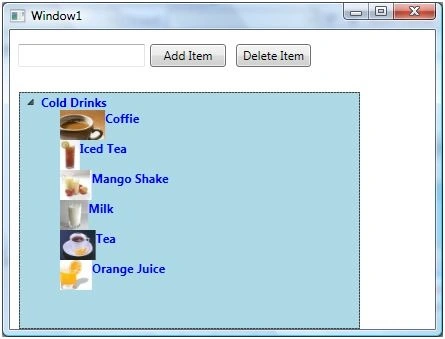
Figure 4. Formatted TreeView
Loading Images in a WPF TreeView
We can put any controls inside a TreeViewItem such as an image and text. To display an image beside some text, I simply put an Image and TextBlock control within a StackPanel. The Image. Source property takes the name of the image you would like to display in the Image control and TextBlock.Text property takes a string that you would like to display in the TextBlock.
The following code snippet adds an image and text to a TreeViewItem. The key here is to add images and text to the header of TreeViewItems.
<TreeViewItem Name="Child1">
    <TreeViewItem.Header>
        <StackPanel Orientation="Horizontal">
            <Image Source="coffie.jpg" Height="30" />
            <TextBlock Text="Coffee" />
        </StackPanel>
    </TreeViewItem.Header>
</TreeViewItem>
After changing my code for all 5 TreeViewItems, the TreeView looks like Figure 5.
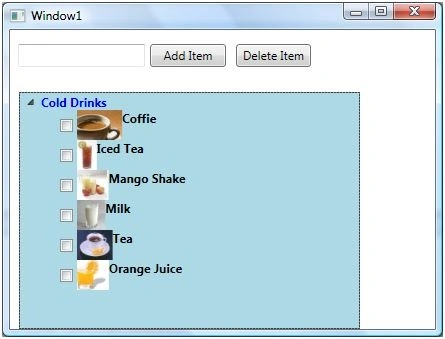
Figure 5. TreeViewItems with Image and text
WPF TreeView with CheckBoxes
If you put a CheckBox control inside TreeViewItems, you generate a TreeView control with checkboxes in it. The CheckBox can host controls within it as well. For instance, we can put an image and text block as the content of a CheckBox.
The following code snippet adds a CheckBox with an image and text to a TreeViewItem.
<TreeViewItem Name="Child1">
    <TreeViewItem.Header>
        <CheckBox Name="CoffeeCheckBox">
            <StackPanel Orientation="Horizontal">
                <Image Source="coffie.jpg" Height="30" />
                <TextBlock Text="Coffee" />
            </StackPanel>
        </CheckBox>
    </TreeViewItem.Header>
</TreeViewItem>
I changed the code of TreeViewItems and added the following CheckBoxes to the items. As you may see, I have set the name of the CheckBoxes using the Name property. If you need to access these CheckBoxes, you may access them in the code using their Name property.
<TreeViewItem Name="Child1">
    <TreeViewItem.Header>
        <CheckBox Name="CoffeeCheckBox">
            <StackPanel Orientation="Horizontal">
                <Image Source="coffie.jpg" Height="30" />
                <TextBlock Text="Coffee" />
            </StackPanel>
        </CheckBox>
    </TreeViewItem.Header>
</TreeViewItem>
<TreeViewItem Name="Child2">
    <TreeViewItem.Header>
        <CheckBox Name="IcedTeaCheckBox">
            <StackPanel Orientation="Horizontal">
                <Image Source="IcedTea.jpg" Height="30" />
                <TextBlock Text="Iced Tea" />
            </StackPanel>
        </CheckBox>
    </TreeViewItem.Header>
</TreeViewItem>
<TreeViewItem Name="Child3">
    <TreeViewItem.Header>
        <CheckBox Name="MangoShakeCheckBox">
            <StackPanel Orientation="Horizontal">
                <Image Source="MangoShake.jpg" Height="30" />
                <TextBlock Text="Mango Shake" />
            </StackPanel>
        </CheckBox>
    </TreeViewItem.Header>
</TreeViewItem>
<TreeViewItem Name="Child4">
    <TreeViewItem.Header>
        <CheckBox Name="MilkCheckBox">
            <StackPanel Orientation="Horizontal">
                <Image Source="Milk.jpg" Height="30" />
                <TextBlock Text="Milk" />
            </StackPanel>
        </CheckBox>
    </TreeViewItem.Header>
</TreeViewItem>
<TreeViewItem Name="Child5">
    <TreeViewItem.Header>
        <CheckBox Name="TeaCheckBox">
            <StackPanel Orientation="Horizontal">
                <Image Source="Tea.jpg" Height="30" />
                <TextBlock Text="Tea" />
            </StackPanel>
        </CheckBox>
    </TreeViewItem.Header>
</TreeViewItem>
<TreeViewItem Name="Child6">
    <TreeViewItem.Header>
        <CheckBox Name="OrangeJuiceCheckBox">
            <StackPanel Orientation="Horizontal">
                <Image Source="OrangeJuice.jpg" Height="30" />
                <TextBlock Text="Orange Juice" />
            </StackPanel>
        </CheckBox>
    </TreeViewItem.Header>
</TreeViewItem>
Now, the new TreeView looks like Figure 6.

Figure 6. TreeView with CheckBoxes
Summary
This tutorial showed how to use a WPF TreeView control using XAML and C#. You also learned how to add checkboxes and images to TreeView items.
Ramesh PalaniappanPosted Aug 29, 2016, 2:47 AM
Good one
Sam HobbsPosted Dec 28, 2015, 7:36 PM
In "Adding TreeView Items Dynamically" the button1_Click method uses "Parent" but the XAML for it is not shown, correct? It is a TreeViewItem.
Ayappan APosted Aug 19, 2014, 8:52 AM
good
yogesh sanghiPosted Jul 6, 2012, 5:51 PM
Hey Mahesh, thanks for the post. I want to display an XML document in a treeview, which I am able to do it, but I am not able to figure out how do I set the foreground color of treeview items based on certain values which are XML attributes.
Mahesh ChandPosted Jun 27, 2012, 12:57 PM
To answer your second comment Amit, a code can be written in several different ways. Same applies to a problem. I can go home using 4 different road. It depends on what I choose. I may not choose the shortest or the fastest road. But you are most welcome to share your expertise and code. I am not saying this is the perfect article but what I am saying is, we would love to see some code samples from expert like yourself.
Mahesh ChandPosted Jun 27, 2012, 12:53 PM
Amit, this article was written in 2009 when there was not too much information on TreeView. Now there is much more and people have learned more. This is for beginner only. I believe, you have passed that stage. We would love to see more complex articles/sample code if you don't mind sharing with us. Cheers!
Amit KohanPosted Jun 27, 2012, 12:22 PM
your sample only adds one items to the tree at each event ... nothing new in that so i did not learn anything new in there. your delete is buggy and code bails out and crashes ... also what i was looking for was how to add child to a parent which I guess you have not done it so got your message "good luck with that" . the truth is this kind of coding in xaml is not a big deal and also won't be accepted since you better using mvvm which apparently you have not wpf is awesome and all that but less people know it and that is what i'm not enjoy it.
Amit KohanPosted Jun 27, 2012, 12:16 PM
I'm wondering why these kind of blogs are not complete. don't get me wrong I'm not saying it doesn't give you information but in fact it can be confusing for a newbie. These techniques are not advanced ones so it basically targets newbies like me. if you write the above xaml and then add the next block of xaml your page/form will be a mess. won't it be more helpful if author takes his time and explain step by step. this way this blog serving the knowledge of treeview rather art of debugging. again, let's say I'm wrong here but even using this drives compiler nuts ... it has no idea what "Items" is so as you see if you want to help and offer a complete article it is better to share the details yes even namespaces being used if not then at least few people are happy here and continue you work. Thanks for reading it.
rsCodePosted Jun 14, 2012, 12:56 PM
Hi Mahesh, Thanks for the post. I am working on MVVM model where in iam using treeview. Iam trying to disable treeview item whenever cut opeartion is performed on it. Do u have any suggestions about this? Thanks
David AzariaPosted Dec 14, 2011, 1:45 AM
very good, thanks
cheng leiPosted Dec 12, 2011, 2:20 AM
Thank's!
Mena rajPosted Apr 4, 2011, 10:49 AM
How do i achieve the result i want above? thanks, Menaka
N a shariffPosted Dec 30, 2010, 5:44 AM
how to iterate through treeview control?
KjartanPosted Nov 23, 2010, 3:35 PM
How can we add Rename capability to the treeview items? For example, I would like to be able to rename "Cold Drinks", the top node, to something else. Others seem to be suggesting use of a styled TextBox for this purpose, but an example would be most helpful. Thanks!
ahmad abbad abbadPosted Aug 26, 2010, 5:52 AM
Hello Mr.Shand I was wondering if you have any clue on styling the scrollbar of a tree view in wpf and thank you for all of your tutorials they are just great Regards, Ali Baba
stgnPosted Jun 9, 2010, 10:59 AM
How can the TreeViewItems be sorted alphabetically?
Mohan RoshPosted Apr 19, 2010, 2:31 AM
Hi can i Bind treeview?
cristian montenegroPosted Mar 26, 2010, 10:01 AM
hi, your example is wow!!! but, how add children items in code behind¿?, you only add childs to one parent, but if this childs have childs also¿? how do it¿? tanks cristian
ChristopherPosted Feb 2, 2010, 9:26 PM
I have two treeview objects on my form. The first one contains parent and children nodes like the following: Home |---cHome Login |---cLogin Billing | ---cBilling1 ---cBilling2 ---cBilling3 | Water ----cWater If the user clicks on a parent node then clicks the "Add >" button, I want to move the selected parent and his children from the first treeview to the second treeview. If the user clicks on a child node then clicks the "Add >" button, I want to move the selected child and any children from the first treeview to the second treeview. How can I easily code this?
Senthil KumarPosted Dec 8, 2009, 12:38 AM
I am in need to parse the check box checked treeviewnode. In my project user has to check the checkbox in treeview node, so I need to get what are all tree view nodes has been checked by user.
Cuong Do DinhPosted Sep 28, 2009, 10:05 PM
Dear sir, Thank for your code. I want to known, how can I get information in item, which I selected?
Hemant ChaudhariPosted Sep 2, 2009, 1:15 AM
Hi, i am having one issue if i have name as my_test In Tree View i see text as mytest
MichaelPosted Jul 29, 2009, 10:02 AM
for reference, what i've done is private StackPanel CreateHeader(string name, double min, double max) { StackPanel sp = new StackPanel(); sp.Orientation = Orientation.Horizontal; sp.Margin = new Thickness(0, 0, 0, 0); Label lbl = new Label(); lbl.Content = name; sp.Children.Add(lbl); Slider sld = new Slider(); sld.Name = "sld" + name; sld.Width = 100; sld.Minimum = min; sld.Maximum = max; sld.Value = (min + max) / 2; sp.Children.Add(sld); return sp; }
MichaelPosted Jul 29, 2009, 9:41 AM
Great article, however is it possible to implement the controls in the header dynamically, i.e. from the c#? At the moment i'm creating the TreeViewItems like this: TreeViewItem newItem = new TreeViewItem(); newItem.Header = reflectionnodeclass.Name; newItem.Focusable = false; tvDataStructure.Items.Add(newItem); Can I add the stackbox and checkbox controls to it as well from the c#? Thanks!
Vikas VaidyaPosted Feb 27, 2009, 4:39 AM
tried to cover most of the cases with treeview. Good One!
JamesPosted Feb 11, 2009, 5:05 PM
Thank you! There are so many dead end examples concerning the "Treeview" control.
Sebastian IchimPosted Nov 28, 2008, 10:50 AM
nice tutorial. could you provide please also support to add image and check box for any new item when user press button1_Click? Thank you, Sebi.
steevePosted Oct 21, 2008, 8:56 AM
good tutorial.thanck you Mahesh.