A very useful file access feature under ASP.NET is its file upload capability. ASP.NET 2.0 introduces a new FileUpload server control that makes the process of uploading files to a server very simple.
With the FileUpload control, a user is allowed to select a single file and upload to the server. It requires a small amount of code lines, as you will see in this article.
Old style of file uploading
In the previous version of ASP.NET 1.x there was an HTML control that was rendered as an input control of type.
This control used an <input type="file"> element on your Web page to enable the end user to upload files to the server. To use the file, however, you had to make a couple of modifications to the page. For example, you were required to add enctype="multipart/form-data" to the page's <form> element.
How FileUpload Control works?
It displays a text box control and a browse button that allow users to select a file to upload to the server. The user can either type the file name and path into the text box or can select thought the browse button and select the file.
The FileUpload control is inherited from the WebControl class.
FileUpload control doesn't cause the PostBack
The FileUpload control doesn't cause the PostBack to the Web server. You must explicitly provide a control or mechanism to allow the user to submit the specified file. You can use Button control to do the PostBack. The PostBack cause the file to be uploaded to the server as posted data. At the server the page code doesn't run until the file is uploaded to the server memory.
The code that you write to save the specified file should call the SaveAs method, which saves the contents of a file to a specified path on the server. Typically, the SaveAs method is called in an event-handling method for an event that raises a post back to the server.
Some of the properties and methods of FileUpload Control are as:
Properties
|
Property |
Description |
|
FileName |
Returns the full path and name of the uploaded file. |
|
ContentType |
The Multipurpose Internet Mail Extension (MIME) type of the uploaded file. |
|
ContentLength |
The size in bytes of the uploaded file. |
Methods
|
Methods |
Description |
|
SaveAs(Path) |
Saves the uploaded file to the specified path. |
.aspx file code
<%@ Page Language="C#" AutoEventWireup="true" CodeFile="Default.aspx.cs" Inherits="_Default" %>
<!DOCTYPE html PUBLIC "-//W3C//DTD XHTML 1.0 Transitional//EN" "http://www.w3.org/TR/xhtml1/DTD/xhtml1-transitional.dtd">
<html xmlns="http://www.w3.org/1999/xhtml">
<head runat="server">
<title>Untitled Page</title>
</head>
<body>
<form id="form1" runat="server">
<div>
<b>Select your resume</b>
<asp:FileUpload runat="server" Style="top: 15px; left: 142px; position: absolute;
height: 22px; width: 217px" ID="FileUpload1" />
<br />
<br />
<asp:Button ID="save" Text="Finish" runat="server" OnClick="save_Click" Style="top: 51px; left: 227px; position: absolute; height: 26px; width: 53px" />
<br />
<br />
<asp:Label ID="OuputLabel" runat="server"></asp:Label><br /><br />
<asp:Label ID="FileSizeFormat" runat="server"></asp:Label>
</div>
</form>
</body>
</html>
Code behind aspx.cs file
using System;
using System.Configuration;
using System.Data;
using System.Linq;
using System.Web;
using System.Web.Security;
using System.Web.UI;
using System.Web.UI.HtmlControls;
using System.Web.UI.WebControls;
using System.Web.UI.WebControls.WebParts;
using System.Xml.Linq;
public partial class _Default : System.Web.UI.Page
{
protected void Page_Load(object sender, EventArgs e)
{
}
protected void save_Click(object sender, EventArgs e)
{
if (FileUpload1.HasFile)
{
// Checking for the file size less than 5 mb
if (FileUpload1.FileBytes.Length < 5242880)
{
// Checking for the file format word only
if (FileUpload1.PostedFile.ContentType == "application/msword")
{
OuputLabel.Text = "File Length : " +
FileUpload1.FileBytes.Length +
"<br/>" +
"File Name: " +
FileUpload1.FileName +
"<br/>" +
"Multipurpose Internet Mail Extension (MIME) Type : " +
FileUpload1.PostedFile.ContentType;
FileUpload1.SaveAs(MapPath("~/uploaded_files/" + FileUpload1.FileName));
FileSizeFormat.Text = "File Uploaded Sucessfully!!!";
}
else
{
FileSizeFormat.Text = "Invalid file format doesn;t match doc!!!";
}
}
else
{
FileSizeFormat.Text = "Sorry! the file can't be uploaded size exceeds!!!";
}
}
else
{
OuputLabel.Text = "No file selected for uploading!!!";
}
}
}
Code Review
In the above program we have used a FileUpload control to upload a file to the server. We have placed a button which will PostBack. This event will upload the file to the server doing some validation.
In the code we have validate the file size of less than 5 mb and the file format should be msword only (doc or rtf extension).
Output of the above code:
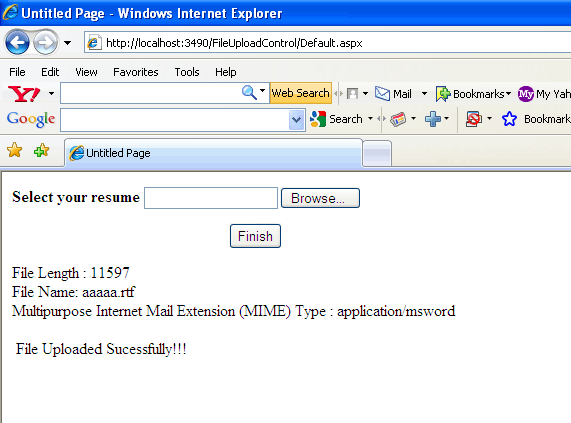
After the file is selected it will check for size and file type than will display file length, file name along with extension and MIME type of file. If the validation and correct than only the file will be uploaded.
Conclusion
I hope that this article would have helped you in understanding the FileUpload control. Please share it if you know more about this article. Your feedback and constructive contributions are welcome.