The CreateUserWizard control provides the user interface for the MembershipProvider object that communicates with your Web site's user data store to create new user accounts in the data store. The CreateUserWizard relies on the MembershipProvider to create the user and disable them if necessary.
CreateUseWizardSteps -
-
CreateUserWizardStep: Pre-defined wizard step with the create user display and logic added.
-
CompleteWizardStep: Pre-defined wizard step that shows the successful completion of the wizard.
-
Collection of WizardSteps: Each WizardStep contains a discrete piece of content to be displayed to the user. Only one WizardStep will be displayed at a time.
-
Navigation Buttons: The navigation area below each WizardStep that contains the navigation buttons to go the next and pervious steps in the CreateUserWizard.
-
SideBar: An optional element that contains a list of all WizardSteps and provides a means to skip around the WizardSteps in a random order.
-
Header: An optional element to provide consistent information at the top of the WizardStep.
CreateUserWizard control properties represented by text boxes, such as UserName, are accessible during all phases of the page life cycle. The control will pick up any changes made by the end user by means of the TextChanged event raised by the text boxes.
The CreateUserWizard control can optionally send e-mail messages to new users if you have configured an SMTP mail server to send e-mail. For more information, see the MailDefinition property.
By default, the CreateUserWizard control will accept a user name and password from the Web site visitor. Based on the requirements of the site's MembershipProvider object, the CreateUserWizard control will optionally accept an e-mail address, represented by the Email property, and a password recovery confirmation question and answer, represented by Question and Answer. For a table showing all required and optional controls for CreateUserWizard, see CreateUserStep.
Note - If AutoGeneratePassword is set to true and the PasswordStrengthRegularExpression property is set in the application's Web.config file, you could potentially generate a password that does not pass the regular expression strength test. In this case, creating a user raises an error that indicates an invalid password.
The CreateUserWizardStep step is the first step within the CreateUserWizard control, and is a required step. By default, the AllowReturn property is set to false to keep the user from returning to the CreateUserWizardStep step and accidentally attempting to create another user account with the same credentials. If EnableViewState is set to false, the AllowReturn property is not maintained in view state and you must include logic in your application to maintain the AllowReturn value.
The CreateUserWizard control uses Internet e-mail services to send login information to users. There are inherent security risks with sending passwords in e-mail. You should determine whether these security risks are acceptable to your site.
The CreateUserWizard Events.
-
ContinueButtonClick - Raised when the user clicks the Continue button in the last wizard step.
-
CreatingUser - Raised by the wizard before it creates the new user through the membership API.
-
CreatedUser - After the user has been created successfully, the control raised the event.
-
CreateUserError - If the creation of the user was not successful, the evet is raised.
-
SendingMail - The control can send an email to the created user if a mail server is configured. This event is raised by the control before the email is sent so that you can modify the contents of the mail message.
-
SendMailError - If the control was unable to sent the message. For example - because the mail server was unavailable, this event raised.
This control has two default steps. One for general user information like username, password, email and second for displaying configuration message.
<asp:CreateUserWizard ID="CreateUserWizard1" runat="server" />
<WizardSteps>
<asp:CreateUserWizardStep ID="CreateUserStep" runat="server">
</asp:CreateUserWizardStep> <asp:CompleteWizardStep ID="MessageStep" runat="server"> <contenttemplate>
.aspx content -
<asp:CreateUserWizard ID="CreateUserWizard1" runat="server" BackColor="#F7F6F3" BorderColor="#E6E2D8" BorderStyle="Solid" BorderWidth="1px" Font-Names="Verdana" Font-Size="0.8em" DisableCreatedUser="True" DisplaySideBar="True"oncreatinguser="CreateUserWizard1_CreatingUser">
<SideBarStyle BackColor="#5D7B9D" BorderWidth="0px" Font-Size="0.9em" VerticalAlign="Top" />
<SideBarButtonStyle BorderWidth="0px" Font-Names="Verdana" ForeColor="White" />
<ContinueButtonStyle BackColor="#FFFBFF" BorderColor="#CCCCCC" BorderStyle="Solid"
BorderWidth="1px" Font-Names="Verdana" ForeColor="#284775" />
<NavigationButtonStyle BackColor="#FFFBFF" BorderColor="#CCCCCC" BorderStyle="Solid"
BorderWidth="1px" Font-Names="Verdana" ForeColor="#284775" />
<HeaderStyle BackColor="#5D7B9D" BorderStyle="Solid" Font-Bold="True" Font-Size="0.9em"
ForeColor="White" HorizontalAlign="Center" />
<CreateUserButtonStyle BackColor="#FFFBFF" BorderColor="#CCCCCC" BorderStyle="Solid"
BorderWidth="1px" Font-Names="Verdana" ForeColor="#284775" />
<TitleTextStyle BackColor="#5D7B9D" Font-Bold="True" ForeColor="White" />
<StepStyle BorderWidth="0px" />
<WizardSteps>
<asp:CreateUserWizardStep ID="CreateUserStep" runat="server">
<ContentTemplate>
<table>
<tr>
<th>User Information</th>
</tr>
<tr>
<td>Username:</td>
<td>
<asp:TextBox runat="server" ID="UserName" />
<asp:RequiredFieldValidator runat="server" ID="RequiredFieldValidator9" ControlToValidate="UserName"
ErrorMessage="Username is required." />
</td>
</tr>
<tr>
<td>Password:</td>
<td>
<asp:TextBox runat="server" ID="Password" TextMode="Password" />
<asp:RequiredFieldValidator runat="server"
ID="RequiredFieldValidator10" ControlToValidate="Password"
ErrorMessage="Password is required." />
</td>
</tr>
<tr>
<td>Confirm Password:</td>
<td>
<asp:TextBox runat="server" ID="ConfirmPassword" TextMode="Password" />
<asp:RequiredFieldValidator runat="server" ID="RequiredFieldValidator13" ControlToValidate="ConfirmPassword"
ErrorMessage="Confirm Password is required." />
</td>
</tr>
<tr>
<td>Email:</td>
<td>
<asp:TextBox runat="server" ID="Email" />
<asp:RequiredFieldValidator runat="server" ID="RequiredFieldValidator11" ControlToValidate="Email"
ErrorMessage="Email is required." />
</td>
</tr>
<tr>
<td>Question:</td>
<td>
<asp:TextBox runat="server" ID="Question" />
<asp:RequiredFieldValidator runat="server" ID="RequiredFieldValidator12" ControlToValidate="Question"
ErrorMessage="Question is required." />
</td>
</tr>
<tr>
<td>Answer:</td>
<td>
<asp:TextBox runat="server" ID="Answer" />
<asp:RequiredFieldValidator runat="server" ID="RequiredFieldValidator14" ControlToValidate="Answer"
ErrorMessage="Answer is required." />
</td>
</tr>
<tr>
<td colspan="2">
<asp:CompareValidator ID="PasswordCompare" runat="server" ControlToCompare="Password"
ControlToValidate="ConfirmPassword" Display="Dynamic" ErrorMessage="The Password and Confirmation Password must match."></asp:CompareValidator>
</td>
</tr>
<tr>
<td colspan="2">
<asp:Literal ID="ErrorMessage" runat="server" EnableViewState="False"></asp:Literal>
</td>
</tr>
</table>
</ContentTemplate>
</asp:CreateUserWizardStep>
<asp:CompleteWizardStep ID="MessageStep" runat="server">
<contenttemplate>
<table>
<tr>
<td>
<table style = "height: 100%; width: 100%;">
<tr>
<td align = "center" colspan = "2">Complete</td></tr>
<tr>
<td>Your account has been successfully created.</td></tr>
<tr>
<td align = "right" colspan = "2">
<asp:button runat="server" validationgroup = "Createuserwizard1"
commandname = "Continue" id="ContinueButton" causesvalidation = "False"
text = "Continue" />
</td></tr>
</table>
</td></tr>
</table>
</contenttemplate>
</asp:CompleteWizardStep>
</WizardSteps>
</asp:CreateUserWizard>
Looks like this, now fill all required information :
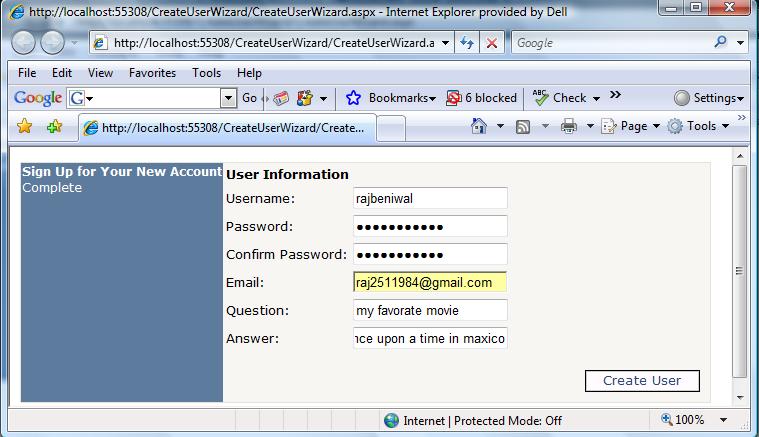
Figure 1.
If this username already exist in database the message should looks like this.
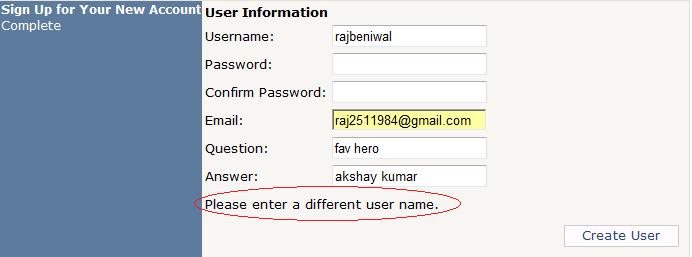
Figure 2.
After submitting successfully you will see this step

Figure 3.
You can see all stored information in database too using server explorer.

This is it.