The XmlDataSource control is a data source control that presents XML data to data-bound controls. The XmlDataSource control can be used by data-bound controls to display both hierarchical and tabular data. The XmlDataSource control is typically used to display hierarchical XML data in read-only scenarios. Because the XmlDataSource control extends the HierarchicalDataSourceControl class, it works with hierarchical data. The XmlDataSource control also implements the IDataSource interface and works with tabular, or list-style, data.
The XmlDataSource typically loads XML data from an XML file, which is specified by the DataFile property. XML data can also be stored directly by the data source control in string form using the Data property. If you want to transform the XML data before it is displayed by a data-bound control, you can provide an Extensible Sylesheet Language (XSL) style sheet for the transformation. As with the XML data, you typically load the style sheet from a file, indicated by the TransformFile property, but you can also store it in string form directly using the Transform property.
The XmlDataSource control is commonly used in read-only data scenarios where a data-bound control displays XML data. However, you can also use the XmlDataSource control to edit XML data. To edit the XML data, call the GetXmlDocument method to retrieve an XmlDataDocument object that is an in-memory representation of the XML data. You can use the object model exposed by the XmlDataDocument and XmlNode objects it contains or use an XPath filtering expression to manipulate data in the document. When you have made changes to the in-memory representation of the XML data, you can save it to disk by calling the Save method.
Let's start now by diagrams :
First of all make a new ASP.NET Website using Microsoft Visual Studio 2008, like Figure1.

Figure1.
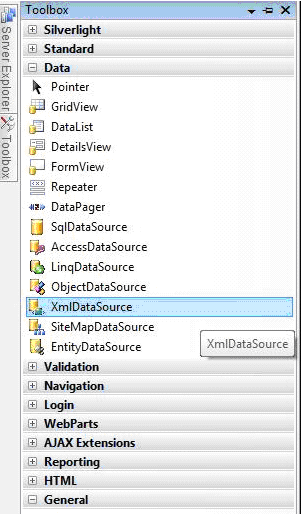
Now drag and drop a XmlDataSource and a TreeView control from toolbox.

Figure2.
Now add a new XML file in your solution sile.

Figure3.
Now this is my XML file.
<?xml version="1.0" encoding="utf-8" ?>
<MyFavourates>
<Favourate Name="Web Sites">
<Sites Name = "www.c-sharpcorner.com" />
<Sites Name = "www.vbdotnetheaven.com" />
<Sites Name = "www.longhorncorner.com" />
<Sites Name = "www.modelingcorner.com" />
</Favourate>
<Favourate Name="Movies">
<Movie Name = "Once Upon a Time In Maxico" />
<Movie Name = "Perl Harbour" />
<Movie Name = "Gladiator" />
<Movie Name = "Walking Tall" />
</Favourate>
<Favourate Name="Technologies">
<Technology Name = ".NET" />
<Technology Name = "C#" />
<Technology Name = "VB.NET" />
<Technology Name = "ASP.NET" />
<Technology Name = "WPF" />
<Technology Name = "WCF" />
</Favourate>
</MyFavourates>
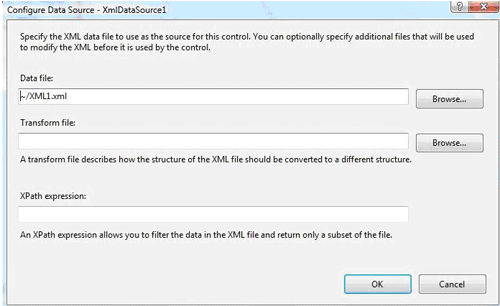
Now confgure data source.

Figure4.
Use Browse button to get XML file from your application.

Figure5.
Now put XmlDataSource Id to TreeView DataSourceID.

Figure6.
<form id="form1" runat="server">
<div>
<asp:XmlDataSource ID="XmlDataSource1" runat="server"
DataFile="~/XML1.xml"></asp:XmlDataSource>
<asp:TreeView ID="TreeView1" runat="server"
DataSourceID="XmlDataSource1" ImageSet="Contacts" NodeIndent="10">
<ParentNodeStyle Font-Bold="True" ForeColor="#5555DD" />
<SelectedNodeStyle
Font-Underline="True" HorizontalPadding="0px"
VerticalPadding="0px" />
<DataBindings>
<asp:TreeNodeBinding DataMember="Favourate" TextField="Name" />
<asp:TreeNodeBinding DataMember="Sites" TextField="Name" />
<asp:TreeNodeBinding DataMember="Movie" TextField="Name" />
<asp:TreeNodeBinding DataMember="Technology" TextField="Name" />
</DataBindings>
<NodeStyle Font-Names="Verdana" Font-Size="8pt"
ForeColor="Black" HorizontalPadding="5px"
NodeSpacing="0px" VerticalPadding="0px" />
<HoverNodeStyle Font-Underline="False" />
</asp:TreeView>
</div>
</form>
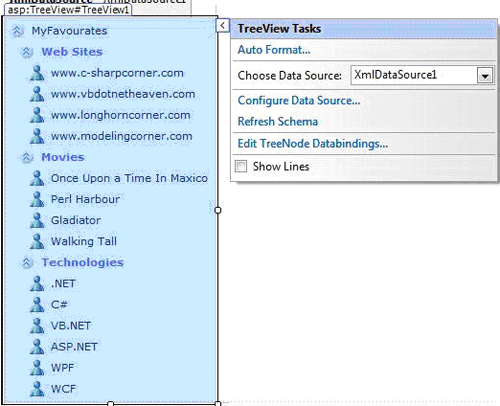
Output looks like this.

Figure7.