Introduction
Windows Workflow Foundation (WWF) 4.0 is a complete departure from previous versions of Workflow. The activities and services from WWF 4.0 are not interchangeable with previous versions. This article will show step by step process of creating simple workflow application having various basic activities like WriteLine, Assign, Switch<T>, If etc.
Some of the differences between WWF 3.5 and 4.0 are:
- In WWF 3.5, there was a code class and a designer class. The code class contained the implementation for the CodeActivity objects. It also contained the definition of the class members and the event handler code. In WF 4.0, there is no code class.
- There is no longer a state machine workflow.
- Added use of variables and arguments because there is no code file.
- There is no WorkflowRuntime class. Previously, you would have created the WorkflowRuntime class and then called its CreateWorkflow () method. With WF 4.0, the code simply calls this:
WorkflowInvoker.Invoke (new Workflow1 ());
Here I am going to create simple workflow having Order and OrderItems objects. Add data to Order /order Items and pass Order as an argument to workflow to calculate total item price for an order and Shipping Price.
Step 1: Create new Workflow Console Application
- Open Visual Studio 2010 and click on File -> New -> Project
- From the template window select Workflow -> Workflow Console Application
- Enter Project and Solution Name: OrderProducts
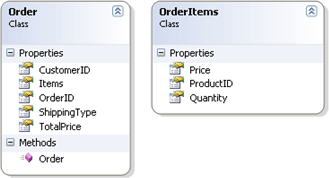
Step 2: Add new class OrderItems
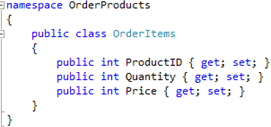
Here values can be ProductID = 1, Quantity = 10, Price = 20
Step 3: Add new class Order
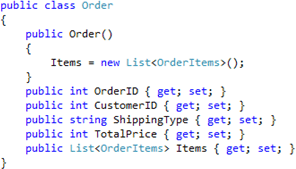
Here values can be OrderID = 1, CustomerID = 1, ShipingType = "NextDay", TotalPrice = 40 (Total Price of all items + Shipping Charges) and Items is collection of products from OrderItems class.
Step 4: Add OrderDetails activity
- Right Click OrderProducts project and click add new item
- Select Workflow -> Activity. Name = "OrderDetails.xaml"
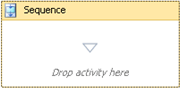
Step 5: Add sequence activity
On Toolbox, under Control Flow section drag Sequence activity.
Step 6: Create variables and arguments
- Create Variables ShippingPrice and TotalPrice. Variables are like class members to store data that can be shared between activities.

- Create argument OrderInfo of type Order class. Arguments are similar to variables, but they are intended for passing data in or out of the workflow. You can think of them as method parameters.

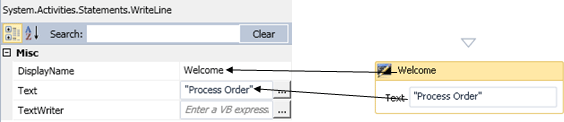
Step 7: Add WriteLine activity
On Toolbox, under primitive section drag WriteLine activity to the sequence activity.
In the properties, set DisplayName = Welcome and Text = "Process Order" as shown below
Step 8: Add ForEach<T> activity
Purpose of this activity is to get each items from OrderItems, depending on ProductID and Quantity set the item price and add this price to variable TotalPrice.
On Toolbox, under Control Flow section drag ForEach<T> activity under WriteLine activity that was added in previous step.
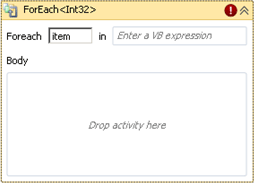
In the properties,
- Set DisplayName = OrderItems
- For TypeArgument, from dropdown list on selecting "Browse for Types…" a dialogue box pops up. Expand OrderProducts to Select OrderItems and click ok. This way type <T> in ForEach<T> is set to OrderProducts.OrderItems.
- For Values, type OrderInfo.Items. Here OrderInfo is the argument of type Order

- After setting above values, ForEach<T> activity is changed as below

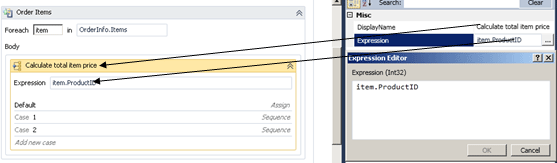
Step 9: Add Switch<T> activity
On Toolbox, under Control Flow section drag Switch<T> activity in the body of ForEach<T> activity.
In the properties box of Switch<T>
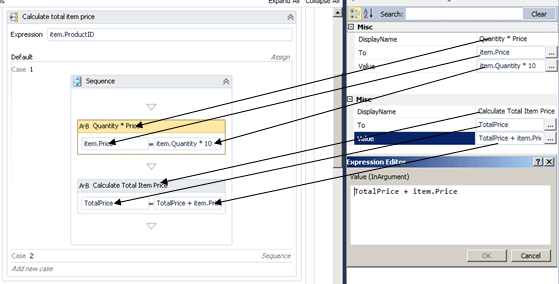
- Set DisplayName to Calculate Total Item Price
- Set Expression to item.ProductID. Here item is coming from ForEach<item>.
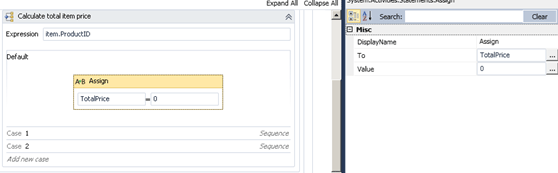
- For Default click on Add Activity and drag Assign activity (under Primitive section).
In the properties box, set To = TotalPrice (This is Property) and Value = 0.
- For Case 1 click on Add Activity and drag Sequence activity. Drag Assign activity (under Primitive section).
In the properties box,
Set DisplayName = Quantity * price, To = item.Price, Value = item.Quantity * 10
- Drag Assign activity after above assign activity.
In the properties box,
Set DisplayName = Calculate total item price, To = TotalPrice, Value = TotalPrice + item.Price
- For Case 2 click on Add Activity and drag Sequence activity. Drag Assign activity (under Primitive section).
In the properties box,
Set DisplayName = Quantity * price, To = item.Price, Value = item.Quantity * 20
- Drag Assign activity after above assign activity.
In the properties box,
Set DisplayName = Calculate total item price, To = TotalPrice, Value = TotalPrice + item.Price
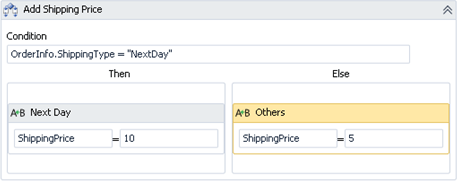
Step 10: Add If activity
On Toolbox, under Control Flow section drag If activity after ForEach<T> activity. The purpose of this activity is add Shipping Price depending on shipping type selected.
In the properties box,
- Set DisplayName -> Add Shipping Price
- Condition -> OrderInfo.ShippingType = "NextDay"
- In the Then section Drag Assign activity and Set
DisplayName -> Next Day, To -> ShippingPrice, Value -> 10
- In the Else section Drag Assign activity and
DisplayName -> Others, Set To -> ShippingPrice, Value -> 5
Step 11: Add Assign activity
On Toolbox under primitive section drag Assign activity after If activity. The purpose of this activity is to set the total price of order which is sum price of all items for an order and shipping price calculated in previous step.
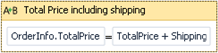
In the properties,
- Set DisplayName -> Total Price including shipping
- Set to -> OrderInfo.TotalPrice
- Set Value -> TotalPrice + ShippingPrice
Step 12: Add WriteLine activity
On Toolbox, under primitive section drag WriteLine activity. The purpose of this activity is to display order related details like OrderID, CustomerID, TotalPrice and ShippingType on console window.
In the properties,
- Set DisplayName -> Order
- Set Text -> "Customer: " + OrderInfo.CustomerID.ToString() + " | Shipping:" + OrderInfo.ShippingType + " | Total Price:" + TotalPrice.ToString() + " | Shipping Price:" + ShippingPrice.ToString()
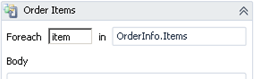
Step 13: Add ForEach<T> activity
On Toolbox, under drag ForEach<T> activity. The purpose of this activity is to display order items details like ProductID, Quantity and Price.

In the properties,
- Set DisplayName = Items
- For TypeArgument, from dropdown list on selecting "Browse for Types…" a dialogue box pops up. Expand OrderProducts to Select OrderItems and click ok. This way type <T> in ForEach<T> is set to OrderProducts.OrderItems.
- For Values, type OrderInfo.Items. Here OrderInfo is the argument of type Order
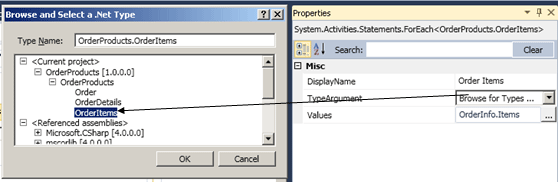
- After setting above values, ForEach<T> activity is changed as below
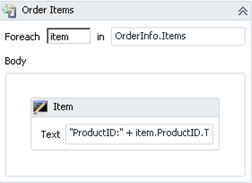
- Drag WriteLine Activity in the Body of ForEach<T> activity.
In the properties,
- Set DisplayName -> Item
- Set Text -> "ProductID:" + item.ProductID.ToString () + " | Quantity:" + item.Quantity.ToString () + " | Price: " + item.Price.ToString ()
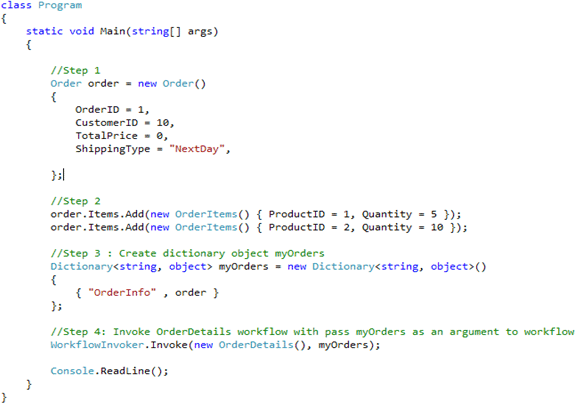
Step 14: Add Code in Program.cs to pass Order and OrderItems to above created workflow.
Purpose of this code is to create Order and Order Items as show in step 1 and 2. Create dictionary object of orders and pass that as an argument to workflow.
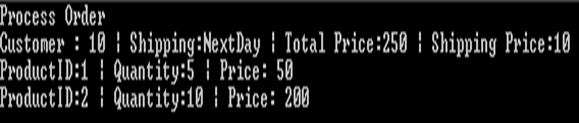
Step 15: Run the application
Conclusion:
Here I have implemented a fairly simple workflow using the workflow designer. In next article I will show you how to implement the same workflow using code instead. Any workflow can be implemented in code or with the designer; the choice is simply a matter of preference.