It may be a necessity to develop a serviced component that will be consumed from a remote machine and at the same time it must be COM in order to cover the largest kind of client needs regardless of their natures as the clients aren't only .Net applications but they could be also issued from other environments such as Visual basic 6.0, Visual C++ or even a Java client applications, therefore, DCOM that stands for distributed component object model is used.
I invite you to follow this walkthrough to understand how a DCOM application is developed from A to Z.
Walkthrough:
- First, let's start by creating a new (*.dll) application under Visual Studio 2005/2008 by selecting File>New> Project>Class library then name it Person.
- Then create a new object called Person that looks like bellow and don't forget to add reference to System.IO and System.Xml.Serialization in order to use the StreamWriter and the XmlSerializer objects.
public class Person
{
public string FirstName{get;set;}
public string LastName { get; set; }
public bool IsMale { get; set; }
public void Persist(string FilePath)
{
StreamWriter oFile = new StreamWriter(FilePath);
XmlSerializer oXmlSerializer = new XmlSerializer(typeof(Person));
oXmlSerializer.Serialize(oFile, this);
oFile.Flush();
oFile.Close();
}
}
- Add a reference to the System.Runtime.InteropServices that contains some useful classes used for exposing the initial .Net assembly to COM.
In order to be exposed to COM, an assembly has to be strongly named. It means that it must be signed before. To sign the given assembly, go to Project menu> <Project name> property. As your project is named Person then you will find exactly Person Properties… at the bottom of the Project menu.
- Select the signing tab

Figure 1.
- Check the "Sign the assembly checkbox".
- A combo box just as bellow will invite you either to create a new key pair for the assembly and store them in a *.snk file or to use an already existing *.snk file.
- Choose the first alternative
- Then set the file name in the above text box and the password in the other text boxes then click OK.
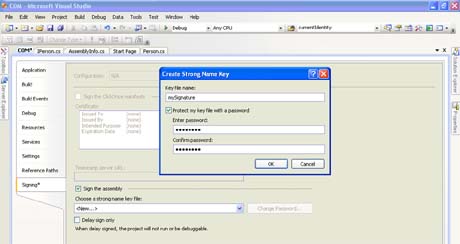
Figure 2.
- As you create a key pair, the assembly could be strongly named.
- In the solution explorer, expand the project properties node and edit the AssemblyInfo.cs then add those three attributes, if you can't find ApplicationName, ApplicationActivation and AssemblyKeyFile elements then add a reference to System.EnterpriseServices
//Those are additional attributes that have to be added to the project
[assembly:ApplicationName("Person") ]
[assembly:ApplicationActivation(ActivationOption.Library)]
[assembly: AssemblyKeyFile(@"C:\Person\Person\yournameanddate.snk")]
The first attribute indicates the application name. The second one indicates the activation option, by the way, the activation option could have one among two values either library or server.

At the difference of the COM context, within witch the Activation Option of the Application Activation attribute is set to library. This once is set to server to indicate that the serviced component will run in its own process context.
Always within the AssemblyInfo.cs, do change the ComVisible attribute to true in order to be visible to the COM client application
// Setting ComVisible to false makes the types in this assembly not visible
// to COM components. If you need to access a type in this assembly from
// COM, set the ComVisible attribute to true on that type.
[assembly: ComVisible(true)]
Remarque about the GUID:
At the contrast of the .Net serviced component that is identified by the IP address and a given serial port. The COM serviced component is identified by the GUID that stands for globally unique identifier. It is a 128-bit integer (16 bytes) that could be used across all computers and networks as a COM assembly unique identifier.
// The following GUID is for the ID of the typelib if this project is exposed to COM
[assembly: Guid("a383a2de-fbf7-4195-cb2e-zb929e027f6a")]
- Now, turn back to the Person class because there are some modifications and tasks that one should do before exposing the assembly to COM.
- In fact when you expose the assembly to COM, the client application will interact with your serviced component via interface. Therefore you have to extract an interface from your class as follow.
a) Go to Refactor menu then select extract interface, but first be sure to put the cursor inside the class.
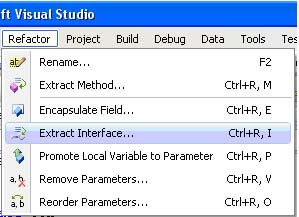
Figure 3.
b) Choose all members of the Person class then click OK
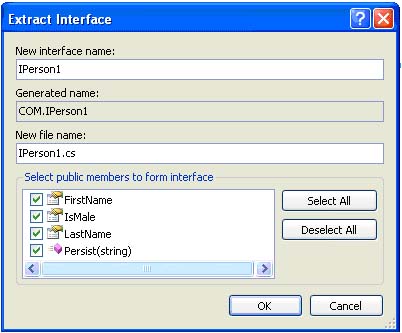
Figure 4.
- Decorate the class with [ClassInterface( ClassInterfaceType.None)]
- In the other side, Person class inherits from System.EnterpriseServices.ServicedComponent as an obligation, because all the classes exposed to COM must inherits from this class , the resulted class must look like this
namespace COM
{
[ClassInterface( ClassInterfaceType.None)]
public class Person : System.EnterpriseServices.ServicedComponent, COM.IPerson
{
public string FirstName{get;set;}
public string LastName { get; set; }
public bool IsMale { get; set; }
public void Persist(string FilePath)
{
StreamWriter oFile = new StreamWriter(FilePath);
XmlSerializer oXmlSerializer = new XmlSerializer(typeof(Person));
oXmlSerializer.Serialize(oFile, this);
oFile.Flush();
oFile.Close();
}
static public Person Retrieve(string FilePath)
{
StreamReader oFile = new StreamReader(FilePath);
XmlSerializer oXmlSerilizer = new XmlSerializer(typeof(Person));
Person oPerson = oXmlSerilizer.Deserialize(oFile) as Person;
return oPerson;
}
}
}
- Don't forget to change the accessibility of the interface to public
using System;
namespace COM
{
public interface IPerson
{
string FirstName { get; set; }
bool IsMale { get; set; }
string LastName { get; set; }
void Persist(string FilePath);
}
- Finally, build the project, and verify if there aren't any error within the application.
- Now it is the ultimate step, so open the SDK command prompt Start>All programs>Accessories>Command prompt then type this
- Now, you will expose your serviced component to be largely consumed by different client applications within a remoting context, to perform that, you have to browse to Start>Configuration panel>Administration tools>Serviced components.
- Open the management console and expand the tree then localize the Person COM serviced component
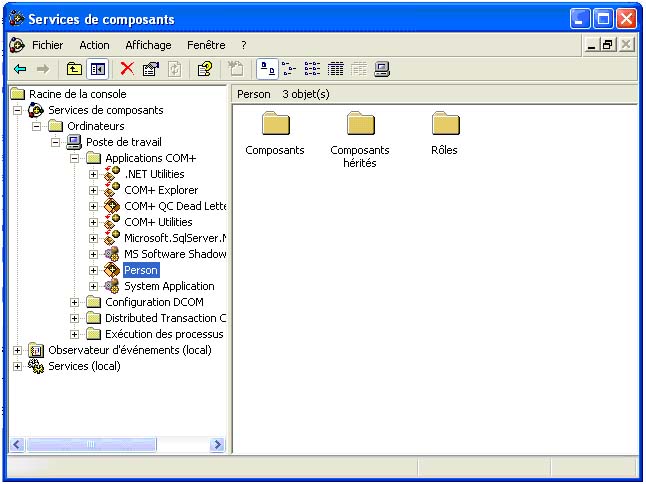
Figure 5.
- Then export it by right clicking the Person application as bellow

Figure 6.
- Then the bellow window appears, in fact this dialog box will lead you to generate an (*.msi)

Figure 7.
File that it will be deployed easily in the remoting machines. So in the browse machine, put the path where you exactly want your component to be deployed, and then check the server application radio because you don't need a proxy in this case, but check the application proxy if you have to install your COM in the distant machine so that a proxy class that represent the remote serviced component will be generated and exposed to the client. Other important issue, if you want to prefix the users and roles and embed information about them for a pure security purposes based on roles and identities, then check export the identity of users and roles check box. Also, there is another important issue, is that you have to check the save application as COM+ 1.0, if you want to ship your product according to this format. After that, click next then finally click finish and an (*.msi) file will be generated of you.
24. Browse to the location where the (*.msi) is generated

Figure 8.
Lastly, the serviced component is ready to be distributed and consumed. That's it. Now, to consume DCOM serviced component, you should first determine the nature of the client application whether it is a .Net client application or other kind of client applications.
In this case, I will be concerned only by the first kind of clients as the others are out of the scope of this article. Now, concerning the .Net client application the .Net remoting is the only way to consume a DCOM services as the DCOM protocol is not supported in such context. In the other side, two ways those could be proposed to consume a DCOM service namely the Singleton server object or Single call server object. But you ask me how to consume a DCOM serviced component using .Net remoting and at the same time it doesn't inherits the Marshal By Ref Object class, I answer you, remember that the class Person inherits the class Serviced Component and this last one inherits the Marshal By Ref Object something that renders the COM distributed, hence, it could be consumed through a .Net remoting like any other .Net server side applications.
Good Dotneting!!!