The jQuery bind() method attaches an event handler to elements, whereas unbind() detaches an existing event handler from elements. Use basic HTML code to create the HTML elements. The following is the HTML code I used for this tutorial.
HTML
- <!DOCTYPE html>
- <html>
-
- <head></head>
-
- <body>
- <div>
- <div class="objects">
- <div class="obj obj-01"><img src='https://pbs.twimg.com/profile_images/601645996360138752/JXX6TiZa_400x400.png'></div>
-
- <div class="obj obj-02"><img src='https://pbs.twimg.com/profile_images/601645996360138752/JXX6TiZa_400x400.png'></div>
-
- <div class="obj obj-03"><img src='https://pbs.twimg.com/profile_images/601645996360138752/JXX6TiZa_400x400.png'></div>
-
- <div class="obj obj-04"><img src='https://pbs.twimg.com/profile_images/601645996360138752/JXX6TiZa_400x400.png'></div>
-
- <div class="obj obj-05"><img src='https://pbs.twimg.com/profile_images/601645996360138752/JXX6TiZa_400x400.png'></div>
- </div>
- </div>
- </body>
-
- </html>
The preceding HTML code defines the div element groups and inserts an image inside a child div element using an IMG tag.
CSS
Use CSS code to make the look and feel for all the HTML elements as we used before in the HTML part. The following is the CSS code I have used in this tutorial.
- body {
- background - color: #00FFCC;
- }
- div img {
- border-radius:15px;
- max-width: 100px;
- max-height: 100px;
- }
- .obj { width:100px; height:100px; margin:10px; padding: 5px;
- }
- .objects div { float: left; }
Before adding the CSS code be sure it covers the entire browser display area. The preceding CSS code defines the entire HTML element design process.
jQuery
The first step in the jQuery scripting part is to include the required jQuery library reference in the head element of your page.
- <script src="https://ajax.googleapis.com/ajax/libs/jquery/1.11.3/jquery.min.js"></script>
The following is the complete jQuery and JavaScript code I used in this tutorial.
- $(document).ready(function(){
- $('.obj').one('click', function() {
- $(this).unbind('click');
- $(this).fadeOut('slow');
- return false;
- })
- });
The preceding jQuery scripting code improves the performance of the application and it defines the entire HTML element UI functionality and effects.
Complete code
The following is the complete HTML, CSS and jQuery scripting codes I used in this tutorial.
- <!DOCTYPE html>
- <html>
-
- <head>
- <style>
- body {
- margin: 50px 50px;
- padding: 0px;
- text-align: center;
- background-color: #00FFCC;
- }
-
- div img {
- border-radius: 15px;
- max-width: 100px;
- max-height: 100px;
- }
-
- .obj {
- width: 100px;
- height: 100px;
- margin: 10px;
- padding: 5px;
- }
-
- .objects div {
- float: left;
- }
- </style>
- <script src="https://ajax.googleapis.com/ajax/libs/jquery/1.11.3/jquery.min.js"></script>
- <script>
- $(document).ready(function() {
- $('.obj').one('click', function() {
- $(this).unbind('click');
- $(this).fadeOut('slow');
- return false;
- })
- });
- </script>
-
- <body>
- <div>
- <div class="objects">
- <div class="obj obj-01"><img src='https://pbs.twimg.com/profile_images/601645996360138752/JXX6TiZa_400x400.png'></div>
-
- <div class="obj obj-02"><img src='https://pbs.twimg.com/profile_images/601645996360138752/JXX6TiZa_400x400.png'></div>
-
- <div class="obj obj-03"><img src='https://pbs.twimg.com/profile_images/601645996360138752/JXX6TiZa_400x400.png'></div>
-
- <div class="obj obj-04"><img src='https://pbs.twimg.com/profile_images/601645996360138752/JXX6TiZa_400x400.png'></div>
-
- <div class="obj obj-05"><img src='https://pbs.twimg.com/profile_images/601645996360138752/JXX6TiZa_400x400.png'></div>
- </div>
- </div>
- </body>
-
- </html>
Output
1. Open the main Index html file in the web browser.
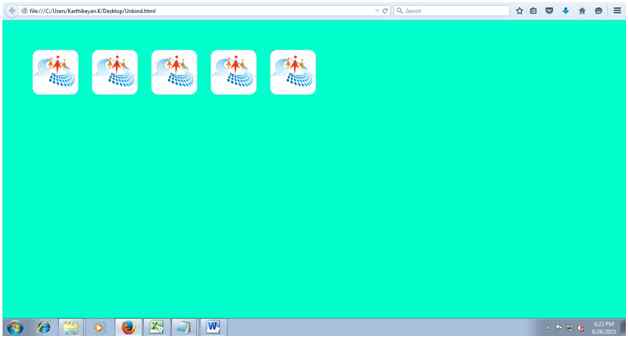 Figure 1:
 Main index page
2. Press the div image element.
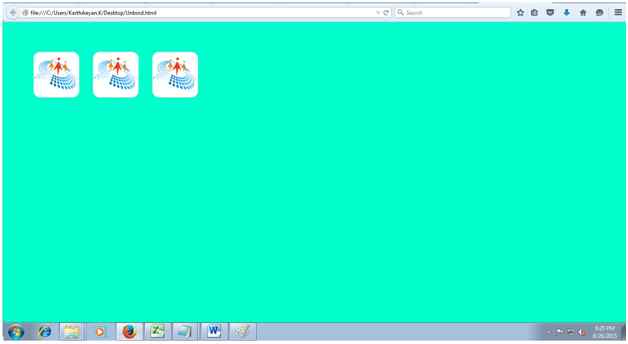 Figure 2:
 Unbind event
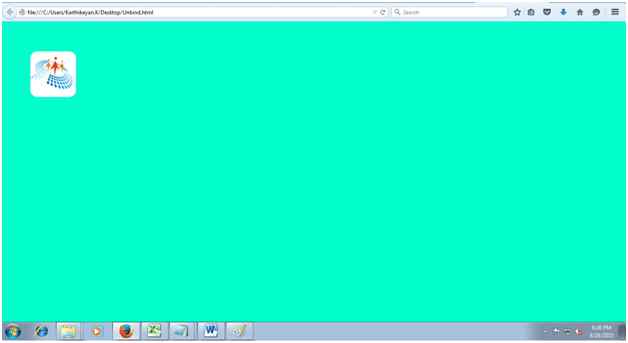 Figure 3:
 Unbind event
ConclusionI hope you liked this useful article. It will be useful for jQuery beginners. Please provide your valuable feedback and suggestions.
Live demo link:
JsfiddleReferences