Blue Theme Orange Theme Green Theme Red Theme
 
Dundas Dashboard
Home | Forums | Videos | Photos | Downloads | Blogs | E-Books | Interviews | Jobs | Beginners | Training
 | Consulting  
Submit an Article Submit a Blog 
 Login Close
User Id:
Password:
 
Forgot Password
Forgot Username
Why Register
 Jump to
Skip Navigation Links
TechnologyExpand Technology
WebsiteExpand Website
 Resources  
Close
 Our Network  
Close
Search :       Advanced Search »
Home » Silverlight » Silverlight Button Control

Silverlight Button Control

This tutorial demonstrates how to create and use a Button control in Silverlight using XAML and C#.

Author Rank:
Technologies: .NET 3.0 and 3.5, Silverlight,Visual C# .NET
Total downloads : 77
Total page views :  8195
Rating :
 0/5
This article has been rated :  0 times
   Print Read/Post comments Post a comment  Rate  
   Email to a friend  Bookmark  Similar Articles  Author's other articles  
Download Files:
ButtonSample.zip
 
Become a Sponsor


Related EbooksTop Videos


Silverlight Button Control

This article demonstrates how to create and use a Button control in Silverlight using XAML and C#.

Creating a Button

The Button element represents a Silverlight Button control in XAML.


<Button/>


The Width and Height attributes of the Button element represent the width and the height of a Button. The Content property of the Button element sets the text of a button. The x:Name attribute represents the name of the control, which is a unique identifier of a control.


The code snippet in Listing 1 creates a Button control and sets the name, height, width, and content of a Button control.


Button x:Name="DrawCircleButton" Height="80" Width="150"

                Content="Draw Circle" >

</Button>

Listing 1

The output looks like Figure 1.
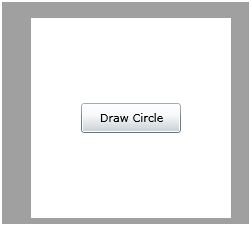
Figure 1

As you can see from Figure 1, by default the Button is place in the center of the page. We can place a Button control where we want by using the Margin, VerticalAlignment and HorizontalAlignment attributes that sets the margin, vertical alignment, and horizontal alignment of a control.

The code snippet in Listing 2 sets the position of the Button control in the left top corner of the page.

<Button x:Name="DrawCircleButton" Height="30" Width="100"

        Content="Draw Circle"

        Margin="10,10,0,0" VerticalAlignment="Top"

        HorizontalAlignment="Left">

</Button>

Listing 2

Adding a Button Click Event Handler

The Click attribute of the Button element adds the click event handler. The following code adds the click event handler for a Button.

<Button x:Name="DrawCircleButton" Click="DrawCircleButton_Click">

</Button>

The code for the click event handler looks like following.

private void DrawCircleButton_Click(object sender, RoutedEventArgs e)

{


}

Now, whatever code you write in the click event handler that will be executed on the Button click. The code listed in Listing 3 creates a circle on the Button click event handler.

private void DrawCircleButton_Click(object sender, RoutedEventArgs e)

{

    // creates a Circle

    Ellipse circle = new Ellipse();

    circle.Width = 200;

    circle.Height = 200;

    circle.Fill = new SolidColorBrush(Colors.Yellow);

    circle.Stroke = new SolidColorBrush(Colors.Black);

    circle.StrokeThickness = 4;


    LayoutRoot.Children.Add(circle);

}

Listing 3

Formatting a Button

Not let's get a little creative. How about we create a Button control with a border formatting, background, and foreground of the Button?

The BorderBrush property of the Button sets a brush to draw the border of a Button. You may use any brush to fill the border. The following code snippet uses a linear gradient brush to draw the border with a combination of red and blue color.

<Button.BorderBrush>

    <LinearGradientBrush StartPoint="0,0" EndPoint="1,1" >

        <GradientStop Color="Blue" Offset="0" />

        <GradientStop Color="Red" Offset="1.0" />

    </LinearGradientBrush>

</Button.BorderBrush>


The Background and Foreground properties of the Button set the background and foreground colors of a Button. You may use any brush to fill the border. The following code snippet uses linear gradient brushes to draw the background and foreground of a Button.


<Button.Background>

    <LinearGradientBrush StartPoint="0,0" EndPoint="1,1" >

        <GradientStop Color="Blue" Offset="0.1" />

        <GradientStop Color="Orange" Offset="0.25" />                   

        <GradientStop Color="Green" Offset="0.75" />

        <GradientStop Color="Red" Offset="1.0" />

    </LinearGradientBrush>

</Button.Background>

<Button.Foreground>

    <LinearGradientBrush StartPoint="0,0" EndPoint="1,1" >                   

        <GradientStop Color="Orange" Offset="0.25" />

        <GradientStop Color="Green" Offset="1.0" />                   

    </LinearGradientBrush>

</Button.Foreground>

The new Button looks like Figure 2.
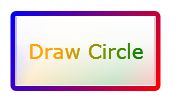
Figure 2


Mouse Rollover Formatting

How about giving some affects to your Button control when a mouse is over the Button and mouse leaves the Button area? We can achieve this by adding MouseEnter and MouseLeave event handler. The code listed in Listing 4 sets the background and foreground colors of a Button on mouse enter and mouse leave event handlers.

private void DrawCircleButton_MouseEnter(object sender, MouseEventArgs e)

{

    DrawCircleButton.Background = new SolidColorBrush(Colors.Yellow );

    DrawCircleButton.Foreground = new SolidColorBrush(Colors.Green);

}


private void DrawCircleButton_MouseLeave(object sender, MouseEventArgs e)

{

    DrawCircleButton.Background = new SolidColorBrush(Colors.Red);

    DrawCircleButton.Foreground = new SolidColorBrush(Colors.Purple);

}

Listing 4

Setting Image as Background of a Button

To set an image as background of a Button, we can set an image as the Background of the Button. The following code snippet sets the background of a Button to an image. 

<Button.Background>

    <ImageBrush ImageSource="dock.jpg" />

</Button.Background>

The new output looks like Figure 3.

Figure 3

Creating a Button Dynamically

The code listed in Listing 5 creates a Button control programmatically. First, it creates a Button object and sets its width, height, contents, background and foreground and later the Button is added to the LayoutRoot.

private void CreateAButton()

{

    Button btn = new Button();

    btn.Height = 80;

    btn.Width = 150;

    btn.Content = "Click ME";

    btn.Background = new SolidColorBrush(Colors.Orange);

    btn.Foreground = new SolidColorBrush(Colors.Black);

    LayoutRoot.Children.Add(btn);

}

Listing 5


Summary

In this article, I discussed how we can create a Button control in Silverlight and C#.  We also saw how we can format a Button by setting its border, background, and foreground properties. After that, we saw you to set an image as the background of a Button. In the end of this article, we saw how to create a Button dynamically.


Login to add your contents and source code to this article
 [Top] Rate this article
 About the author
 
Mahesh Chand
Mahesh is a software developer with over 13 years of experience building systems for Financial and Banking, Engineering & Architectural, Imaging, Construction, Biological & Pharmaceuticals, Healthcare and Education industries. His expertise is Windows Forms, ASP.NET, Silverlight, WPF, WCF, Visual Studio 2010, SQL Server, and Oracle. If you are looking for a Windows Forms, ASP.NET, WPF, Silverlight, C#, VB.NET, Oracle, and SQL Server Consultant in Philadelphia area or remote location, drop me a line at MAHESH [AT] C-SHARPCORNER [DOT] COM.
Looking for C# Consulting?
C# Consulting is founded in 2002 by the founders of C# Corner. Unlike a traditional consulting company, our consultants are well-known experts in .NET and many of them are MVPs, authors, and trainers. We specialize in Microsoft .NET development and utilize Agile Development and Extreme Programming practices to provide fast pace quick turnaround results. Our software development model is a mix of Agile Development, traditional SDLC, and Waterfall models.
Click here to learn more about C# Consulting.
 
Introducing MaxV - one click. infinite control. Hyper-V Hosting from MaximumASP.
Finally – a virtual platform that delivers next-generation Windows Server 2008 Hyper-V virtualization technology from a managed hosting partner you can truly depend on. Visit www.maximumasp.com/max for a FREE 30 day trial. Hurry offer ends soon. Climb aboard the MaxV platform and take advantage of High Availability, Intelligent Monitoring, Recurrent Backups, and Scalability – with no hassle or hidden fees. As a managed hosting partner focused solely on Microsoft technologies since 2000, MaximumASP is uniquely qualified to provide the superior support that our business is built on. Unparalleled expertise with Microsoft technologies lead to working directly with Microsoft as first to offer IIS 7 and SQL 2008 betas in a hosted environment; partnering in the Go Live Program for Hyper-V; and product co-launches built on WS 2008 with Hyper-V technology.
Dynamic PDF
ceTE software specializes in components for dynamic PDF generation and manipulation. The DynamicPDF™ product line allows you to dynamically generate PDF documents, merge PDF documents and new content to existing PDF documents from within your applications.
Go.NET
Build custom interactive diagrams, network, workflow editors, flowcharts, or software design tools. Includes many predefined kinds of nodes, links, and basic shapes. Supports layers, scrolling, zooming, selection, drag-and-drop, clipboard, in-place editing, tooltips, grids, printing, overview window, palette. 100% implemented in C# as a managed .NET Control. Document/View/Tool architecture with many properties&events. Optional automatic layout.
Dundas Software
Dundas Chart for .NET is the most advanced .NET charting package available today.  With an extremely complete feature set, elegant architecture and easy implementation, Dundas Chart can quickly add advanced Charting functionality to enhance and transform ASP.NET and Windows Forms applications.  Whether you are implementing charting into internal projects, or building applications for clients, Dundas Chart offers advanced technology and advanced results to get the most out of data.
Clickatell's SMS Gateway
Clickatell's Developer Solutions allow you to SMS enable any website or application via a range of API's. Learn More about our API connections.
Free access to .NET Memory Management video
Everything you need to know about Garbage Collection, Temporary Objects, Fragmentation, Finalization and common causes of memory leaks in .NET. Watch the video here.
Microsoft Visual Studio 2010
Microsoft Visual Studio 2010 offers more to developers than any other Visual Studio release. Work more productively and collaboratively-with greater control over your work at every step. The Beta 2 can give you a head start on achieving efficiency.
 
   Print Read/Post comments Post a comment  Rate  
   Email to a friend  Bookmark  Similar Articles  Author's other articles  
Download Files:
ButtonSample.zip
 
 Post a Feedback, Comment, or Question about this article
Subject:  
Comment:  
Become a Sponsor
 Comments

 Hosted by MaximumASP  |  Found a broken link?  |  Contact Us  |  Terms & conditions  |  Privacy Policy  |  Site Map  |  Suggest an Idea  |  Media Kit
Current Version: 5.2009.6.2
 © 1999 - 2009  Mindcracker LLC. All Rights Reserved