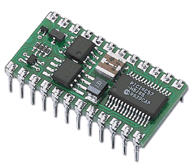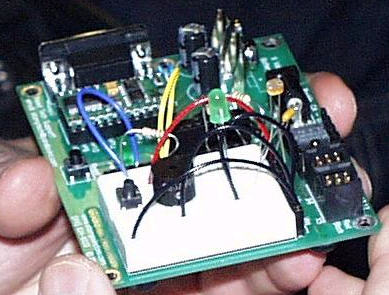

Figure 1 - "Board of Education" Circuit for the Basic Stamp II
The world is changing and technology is changing faster. You can now buy computers and computer hardware that is over 1000 times more powerful than it was 10 years ago and at a greatly reduced price. Also the world of electronics and robotics is starting to open itself up to the hobbyist at a much more affordable price with all the potential to develop your own cool complex electronic inventions.
One of the more popular microcontrollers for creating these automated gadgets is the Basic Stamp II. Figure 1 shows what is known as the "Board of Education", a simple prototype board in which you can get started creating blinking LEDS, Beeping Buzzers, and Spinning Motors within 10 minutes of receiving it from the Vendor, Parallax. It just requires a 9-volt battery and a connection to the serial port and your off and running.
The Basic II Stamp is programmed by the language its named after, Basic. The language is a combination of Basic syntax and built in key words that control the Basic Stamp II chip. The stamp can be programmed for several functions including making pins go high or low, reading the input of a pin, sending pulses, reading or writing the serial port, playing a frequency, timing, and much more. Below is a table describing some of the custom BASIC commands of the Basic Stamp II:
|
Command Example |
Description |
| LOW 14 |
Send Pin 14 Low |
| HIGH 13 |
Send Pin 13 High |
| PAUSE 1000 |
Pause for 1 second |
| DO ...LOOP UNTIL IN3 = 1 |
Loop until Pin 3 goes high |
| FREQOUT 9, 500, 1500 |
Sends a wave to pin 9 that lasts 1/2 second at 1.5khz |
| PULSOUT 6, 500 |
Send a pulse on pin 6 for a 1 millisecond |
| WRITE 7, 195 |
Write the value 195 to address 7 of the EEPROM |
| RCTIME 5, 1, time |
Measure the rc time on pin 5 and place the value in the time variable |
| DEBUG HOME, "time = ", DEC5 time |
Output the variable time to 5 decimal places to the computer from the Basic Stamp |
| DEBUGIN DEC pulse |
Enter the variable pulse into the Basic Stamp from the debug window on the computer |
Table 1 - BASIC Stamp Custom Command Examples and Descriptions
The Basic stamp BASIC compiler also supports control statements such as if..then, while, do...loop, for...next, and even select...case.
We can use the power of C# and .NET to create a code generator that generates a state engine for the BASIC STAMP from a state diagram in WithClass. Because WithClass is basically a COM Server, by creating a reference to WithClass in the Solution Explorer, we can reference the WithClass state model and all its contents from within our .NET project. Then, we simply milk the information out of the model and use the .NET System.IO namespace to write the information to a bs2 (Basic Stamp II) code file.
Simple LED Pushbutton Toggler
To demonstrate our code generator, we are going to create a simple pushbutton toggler. The way it works is that every time we push the pushbutton the LED will turn on or off depending on its previous state. Below, in Figure 2, is the schematic of our pushbutton-toggler. It uses about 5 parts: an LED (Light Emitting Diode), a pushbutton, and 3 resistors. The resistors help limit current flow through the delicate components and help "pull-up" the voltage to 5.0 volts when the voltage is high.

Figure 2 - Our pushbutton light toggler Circuit
P11 is pin 11 on our Basic Stamp. This pin will be used as an output pin either set high or low in order to activate or deactive our LED. P9 will be used as input pin to let us know if our pushbutton is pressed. The state machine for running our LED toggle circuit is shown in the WithClass diagram shown below in Figure 3:

Figure 3 - State Diagram of the LED toggle circuit.
The diagram tells us that the circuits starts in the OffState. It also tells us, that in the event pin 9 goes high(Pin 9 will go high when the user pushes the pushbutton as shown in the schematic in figure 2.), we proceed to set pin 11 to high(lighting the LED) and wait 500 milliseconds (1/2 second). The reason we wait this 1/2 second of time is to debounce the pushbutton(the button will have extraneous pulses after it is first pressed that we need to ignore). Once the pin 9 going high event occurs, we transition to the OnState. Looking at the diagram, the only way in which we can transition back to the OffState is if pin 9 goes high again. In the event pin 9 goes high from the OnState we send pin 11 low (turning off the LED), and transition back to the OffState.
Converting a State Engine into BASIC Code
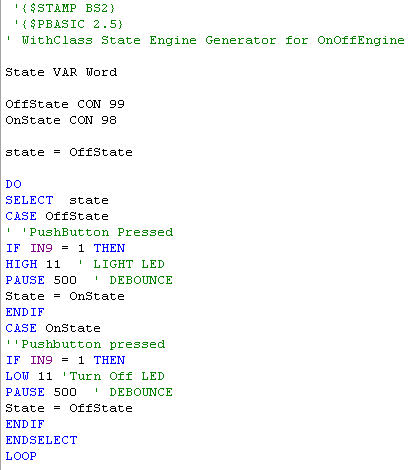
In order to build a state engine that can be generic enough to handle all state diagrams we build for the stamp, we need to pick a control structure that mimics state behavior in BASIC. The SELECT...CASE structure serves us well in this regards, because we can select a state based on a particular case and perform our transitions within each CASE. Below is the code that we want to generate for our example above:
Listing 1 - State Engine Code for the Basic Stamp II in BASIC

Each State is represented by a constant number value named after the states in our diagram. Each state name appears in a CASE in our Select statement. Transitions are handled by responding to events and conditions in IF..THEN structures. If the events fire, we carry out the action inside the IF....ENDIF control statement.
The BS2 Code Generator in .NET
Our .NET Generator is a simple Windows Form application shown in Figure 4 below:

Figure 4 - Basic Stamp Generator in .NET
Although there are many aspects of this application we can discuss, we will concentrate on how we do code generation from the WithClass model. After opening up the WithClass project from within .NET we will cycle through each state diagram contained in the WithClass project and generate a state engine SELECT...CASE structure like the one shown in Listing 1. Listing 2 shows the code for going through each diagram and generating the necessary code:
Listing 2 - Generating a Basic Stamp File for each StateDiagram in WithClass
private
void GenerateStateCode()
{
// Form output directory
OutputFileDirectoryName = this.OutputDirectoryEdit.Text;
if (OutputFileDirectoryName[OutputFileDirectoryName.Length - 1] != '\\')
OutputFileDirectoryName += "\\";
// Go through each state diagram and generate a bs2 file
wcDoc.StateDiagrams.Restart();
// set up the progress bar for the maximum number of diagrams
this.progressBar1.Minimum = 0;
this.progressBar1.Maximum = wcDoc.StateDiagrams.Count;
this.progressBar1.Value = 0;
while (wcDoc.StateDiagrams.IsLast() == false)
{
// create a bs2 file from the name of the diagram in WithClass
With_Class.StateDiagram nextDiagram = (With_Class.StateDiagram)wcDoc.StateDiagrams.GetNext();
StreamWriter sw = new StreamWriter(OutputFileDirectoryName + nextDiagram.Name + ".bs2", false);
// Generate the Basic Stamp II State Engine Code
GenerateBasicStampFile(sw, nextDiagram);
this.progressBar1.Value++;
this.statusBar1.Text = nextDiagram.Name;
sw.Close();
}
MessageBox.Show("Finished Generating Basic Stamp II Code");
}
The GenerateBasicStamp method generates the full code necessary to run the State Engine from our Diagram. It creates the file in three stages. First it creates the header information which includes all of the directives. Then it creates the constants representing the states. Then it creates the SELECT...CASE statement needed to run the State Engine. Below is the code for creating the header info and the state constants:
Listing 3 - Genrating Header and State Constants for our State Engine for the Basic Stamp II
private
void GenerateFileHeader(StreamWriter sw, With_Class.StateDiagram stateDiagram)
{
// write basic stamp directives to the stream
sw.WriteLine(" \'{$STAMP BS2}";
sw.WriteLine(" \'{$PBASIC 2.5}");
sw.WriteLine("\' WithClass State Engine Generator for {0}", stateDiagram.Name);
sw.WriteLine("");
// write the line that creates the state variable
sw.WriteLine("State VAR Word ");
sw.WriteLine("";
}
private void GenerateStateConstants(StreamWriter sw, With_Class.StateDiagram stateDiagram)
{
stateDiagram.States.Restart();
// Loop through each state in the diagram and create a constant
// based on the state name and its internal Id in WithClass
while (stateDiagram.States.IsLast() == false)
{
With_Class.State nextState = stateDiagram.States.GetNext();
// Write next constant to stream
sw.WriteLine("{0} CON {1}", nextState.Name, nextState.Id);
}
sw.WriteLine("");
}
The crux of the state engine code is in the GenerateStateSelect method. This method builds the Select statement by looping through each state in the diagram and then in each state, it loops through all transitions leaving the state. The loops extract the information from the states and the transitions contained in WithClass and build BASIC code from the extracted information. Listing 4 shows how this is done using C# and .NET.
Listing 4 -The Select State Structure Generator