

Introduction
Validating user input has always been a challenging task for the Web developers. We not only want validation of logic executing in the browser, but we also must validate the logic running on the Server. The client side logic gives the users instant feedback on the information they entered into a Web page and is an expected feature in today’s applications. Meanwhile, the server validation logic is in place because you should never trust information arriving from the network.
Image source Google
When you look at the bigger picture, you will realize how logic is only one piece of the validation story. You also need to manage the user-friendly and localized error messages associated with the validation logic. We should always place an error message in our UI and provide some mechanism for the user to recover gracefully from the validation failures.
When we talk about the validation in MVC framework context, we primarily focus on validating the model value. Has the user provided a required value? Is the value in range etc.?
In this article, we will see how data annotations work in MVC framework. We will see how annotations go beyond just validation. For keeping this article simple and easily understandable, I am dividing data annotation validation in two parts.
In this article, we will discuss all the predefined data annotation validation listed in System.ComponentModel.DataAnnotations namespace.
Prerequisite
For easy understanding of this article, you should have minimal ASP.Net MVC knowledge. At least, you should be aware about controller view models etc. in MVC and how to create a basic application using ASP.Net MVC.
Overview
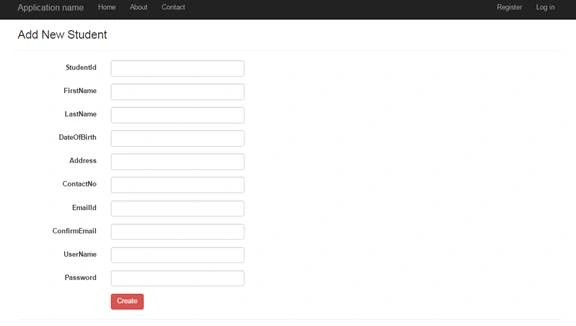
For this article, we create an Application i.e ASP.NET MVC Application and named it as DataAnnotationsValidations (you can download the source code for better understanding) and we are using Student Model Class that contains student relation information in which we are going to validate using Data Annotation.
- public class StudentModel
- {
- public Guid StudentId
- {
- get;
- set;
- }
- public string FirstName
- {
- get;
- set;
- }
- public string LastName
- {
- get;
- set;
- }
- public DateTime DateOfBirth
- {
- get;
- set;
- }
- public string Address
- {
- get;
- set;
- }
- public string ContactNo
- {
- get;
- set;
- }
- public string EmailId
- {
- get;
- set;
- }
- public string ConfirmEmail
- {
- get;
- set;
- }
- public string UserName
- {
- get;
- set;
- }
- public string Password
- {
- get;
- set;
- }
- }
Student Controller
- using System.Web.Mvc;
- using DataAnnotationsValidations.Models;
- namespace DataAnnotationsValidations.Controllers
- {
- public class StudentController: Controller
- {
- // GET: Student
- public ActionResult Index()
- {
- return View();
- }
- // GET: Student/Create
- public ActionResult Create()
- {
- return View();
- }
- // POST: Student/Create
- [HttpPost]
- public ActionResult Create(StudentModel student)
- {
- try
- {
- if (ModelState.IsValid)
- {
- return RedirectToAction("Index");
- }
- return View();
- } catch
- {
- return View();
- }
- }
- }
- }
Create Student View
- @model DataAnnotationsValidations.Models.StudentModel
- @{
- ViewBag.Title = "Add Student";
- }
- <h3>Add New Student</h3>
- @using (Html.BeginForm())
- {
- @Html.AntiForgeryToken()
- <div class="form-horizontal">
- <hr />
- @Html.ValidationSummary(true, "", new { @class = "text-danger" })
- <div class="form-group">
- @Html.LabelFor(model => model.StudentId, htmlAttributes: new { @class = "control-label col-md-2" })
- <div class="col-md-10">
- @Html.EditorFor(model => model.StudentId, new { htmlAttributes = new { @class = "form-control" } })
- @Html.ValidationMessageFor(model => model.StudentId, "", new { @class = "text-danger" })
- </div>
- </div>
- <div class="form-group">
- @Html.LabelFor(model => model.FirstName, htmlAttributes: new { @class = "control-label col-md-2" })
- <div class="col-md-10">
- @Html.EditorFor(model => model.FirstName, new { htmlAttributes = new { @class = "form-control" } })
- @Html.ValidationMessageFor(model => model.FirstName, "", new { @class = "text-danger" })
- </div>
- </div>
- <div class="form-group">
- @Html.LabelFor(model => model.LastName, htmlAttributes: new { @class = "control-label col-md-2" })
- <div class="col-md-10">
- @Html.EditorFor(model => model.LastName, new { htmlAttributes = new { @class = "form-control" } })
- @Html.ValidationMessageFor(model => model.LastName, "", new { @class = "text-danger" })
- </div>
- </div>
- <div class="form-group">
- @Html.LabelFor(model => model.DateOfBirth, htmlAttributes: new { @class = "control-label col-md-2" })
- <div class="col-md-10">
- @Html.EditorFor(model => model.DateOfBirth, new { htmlAttributes = new { @class = "form-control" } })
- @Html.ValidationMessageFor(model => model.DateOfBirth, "", new { @class = "text-danger" })
- </div>
- </div>
- <div class="form-group">
- @Html.LabelFor(model => model.Address, htmlAttributes: new { @class = "control-label col-md-2" })
- <div class="col-md-10">
- @Html.EditorFor(model => model.Address, new { htmlAttributes = new { @class = "form-control" } })
- @Html.ValidationMessageFor(model => model.Address, "", new { @class = "text-danger" })
- </div>
- </div>
- <div class="form-group">
- @Html.LabelFor(model => model.ContactNo, htmlAttributes: new { @class = "control-label col-md-2" })
- <div class="col-md-10">
- @Html.EditorFor(model => model.ContactNo, new { htmlAttributes = new { @class = "form-control" } })
- @Html.ValidationMessageFor(model => model.ContactNo, "", new { @class = "text-danger" })
- </div>
- </div>
- <div class="form-group">
- @Html.LabelFor(model => model.EmailId, htmlAttributes: new { @class = "control-label col-md-2" })
- <div class="col-md-10">
- @Html.EditorFor(model => model.EmailId, new { htmlAttributes = new { @class = "form-control" } })
- @Html.ValidationMessageFor(model => model.EmailId, "", new { @class = "text-danger" })
- </div>
- </div>
- <div class="form-group">
- @Html.LabelFor(model => model.ConfirmEmail, htmlAttributes: new { @class = "control-label col-md-2" })
- <div class="col-md-10">
- @Html.EditorFor(model => model.ConfirmEmail, new { htmlAttributes = new { @class = "form-control" } })
- @Html.ValidationMessageFor(model => model.ConfirmEmail, "", new { @class = "text-danger" })
- </div>
- </div>
- <div class="form-group">
- @Html.LabelFor(model => model.UserName, htmlAttributes: new { @class = "control-label col-md-2" })
- <div class="col-md-10">
- @Html.EditorFor(model => model.UserName, new { htmlAttributes = new { @class = "form-control" } })
- @Html.ValidationMessageFor(model => model.UserName, "", new { @class = "text-danger" })
- </div>
- </div>
- <div class="form-group">
- @Html.LabelFor(model => model.Password, htmlAttributes: new { @class = "control-label col-md-2" })
- <div class="col-md-10">
- @Html.EditorFor(model => model.Password, new { htmlAttributes = new { @class = "form-control" } })
- @Html.ValidationMessageFor(model => model.Password, "", new { @class = "text-danger" })
- </div>
- </div>
- <div class="form-group">
- <div class="col-md-offset-2 col-md-10">
- <input type="submit" value="Create" class="btn btn-danger" />
- </div>
- </div>
- </div>
- }
Now, we are going to discuss the validation available in data annotation only by one.
Note
Data annotations are the attributes that we can find in the System.ComponentModel.DataAnnotations namespace. These attributes provide Server side validation and the framework also supports client side validation.
Required
We will force the student to give their first name and last name, we can decorate the FirstName and LastName properties of the student Model with required attributes.
- [Required]
- public string FirstName
- {
- get;
- set;
- }
- [Required]
- public string LastName
- {
- get;
- set;
- }
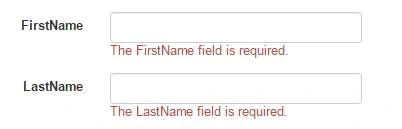
These attributes raise a validation error, if either property value is null or empty. Like all the built in validation attributes the required attributes deliver both client side and server side validation.
With these attributes in place, if someone tries to submit the page without proving the FirstName and LastName, they will see the default error, shown above.
Attributes based on validation ensures that our client and server side validation rules are kept in synchronization because they have been declared in one place.
StringLength
We are forcing the user to enter his name but what happens if he enters a name with enormous length? For student LastName, we will set maximum 60 characters that can be entered. Hence, for doing that, we must decorate LastName with StringLength attributes.
- [Required]
- [StringLength(60)]
- public string LastName
- {
- get;
- set;
- }
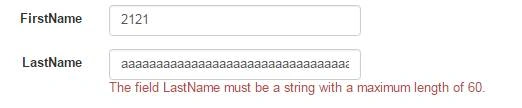
We notice that we can attack multiple validation attributes on the single properties. MinimumLength is an optional named parameter we can use to specify the minimum length for a string.
- [Required]
- [StringLength(60, MinimumLength = 4)]
- public string LastName
- {
- get;
- set;
- }
RegularExpression
Regular expressions are an efficient means to enforce the shape and contains a string value. Suppose, we need to validate the Email ID of the student without sending the Email and Regular expression attributes will do it for us in the way, shown below:
- [RegularExpression(@ "\A(?:[a-z0-9!#$%&'*+/=?^_`{|}~-]+(?:\.[a-z0-9!#$%&'*+/=?^_`{|}~-]+)*@(?:[a-z0-9](?:[a-z0-9-]*[a-z0-9])?\.)+[a-z0-9](?:[a-z0-9-]*[a-z0-9])?)\Z")]
- public string EmailId
- {
- get;
- set;
- }

We will see how to display user friendly error message in a later part of this article.
Range
The Range attributes specifies the minimum and maximum constrains for a numerical number, as shown below:
- [Range(18, 30)]
- public int Age
- {
- get;
- set;
- }
- [Range(typeof(double),"00.00","100.49")]
Compare to ensure two properties of a model has same value. For example, Email ID and confirm email ID.
- [RegularExpression(@ "\A(?:[a-z0-9!#$%&'*+/=?^_`{|}~-]+(?:\.[a-z0-9!#$%&'*+/=?^_`{|}~-]+)*@(?:[a-z0-9](?:[a-z0-9-]*[a-z0-9])?\.)+[a-z0-9](?:[a-z0-9-]*[a-z0-9])?)\Z")]
- public string EmailId
- {
- get;
- set;
- }
- [Compare("EmailId")]
- public string ConfirmEmail
- {
- get;
- set;
- }

Display
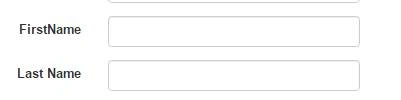
Display attribute sets the friendly name for the model properties. We can use the Display attributes to fix the name for label for LastName field.
- [Required]
- [StringLength(60, MinimumLength = 4)]
- [Display(Name = "Last Name")]
- public string LastName
- {
- get;
- set;
- }
ScaffoldColumn
The ScaffoldColumn attribute hides the properties from HTML helper such as EditorForModel and DisplayForModel,
- [ScaffoldColumn(false)]
- public string Address
- {
- get;
- set;
- }
DisplayFormat
DisplayFormat attribute handles formatting option for the properties via named parameters. We can provide an alternative text for display, when property is null. We can also specify data format string, currency symbol etc. Suppose we have student income property for which we want to set currency symbol, which is shown below:
- [DisplayFormat(ApplyFormatInEditMode = true, DataFormatString = "{0:c}")]
- public Decimal Income
- {
- get;
- set;
- }
ReadOnly
If we decorate an attribute with ReadyOnly attribute, the user can not set that property's value.
- [ReadOnly(true)]
- public Decimal Income
- {
- get;
- set;
- }
DataType attributes enable us to provide the runtime information about the specific purpose of the properties. For example, a property of type string can have various scenarios as it might hold Email address, URL or a password. There are various data types that includes Currency, Date, Time, Password and MultilineText etc.
- [DataType(DataType.Password)]
- public string Password
- {
- get;
- set;
- }

Custom Error Message and Localization
Every validation attribute allows you to pass the name parameter with custom error message. We can configure the default error message with a user friendly error message as we need to pass the custom error message with ErrorMessage named attribute shown below:
- [RegularExpression(@ "\A(?:[a-z0-9!#$%&'*+/=?^_`{|}~-]+(?:\.[a-z0-9!#$%&'*+/=?^_`{|}~-]+)*@(?:[a-z0-9](?:[a-z0-9-]*[a-z0-9])?\.)+[a-z0-9](?:[a-z0-9-]*[a-z0-9])?)\Z", ErrorMessage = "Invalid Email Id")]
- public string EmailId
- {
- get;
- set;
- }
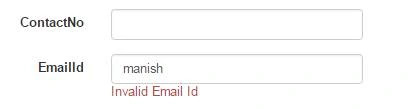
The ErrorMessage can also have a single format item in the string. The built in attributes format provide the properties name with a user friendly message.
- [Required(ErrorMessage="Your {0} is required")]
- [StringLength(60,MinimumLength =4,ErrorMessage ="{0} should be between 4 to 60 Char")]
- public string LastName { get; set; }

If we create an Application with globalization and localization features then this string message will be not sufficient. Hence, in this case, we can configure the error message with the resource string.
- [Required(ErrorMessageResourceType = typeof(ErrorMessage), ErrorMessageResourceName = "LastName")]
- public string LastName { get; set; }
Validation and Model Binding
By default, ASP.Net MVC framework executes validation logic during model binding. In Controller side, we need to check
- if (ModelState.IsValid)
- {
- }
- if(TryUpdateModel(newStudent)){}
- if (ModelState.IsValidField("LastName") == false)
- if (ModelState["LastName"].Errors.Count > 0)
- @Html.ValidationMessageFor(model => model.Password)
In this article, we learned about the built in data annotation validation in ASP.Net MVC framework. If you have any question or comments regarding this article, please post it in the comment section of this article. In the next article, we will learn to create a custom validation in ASP.NET MVC. Thank you for reading this article. I hope you like it.
Shivaji KakadPosted Dec 25, 2020, 2:18 PM
Thanks Manish Kumar Choudhary for detailed explanation/description. It's really informative.
Vaibhav KamblePosted Apr 3, 2019, 9:15 AM
Comapre attributes with mvc5
prateek bhardwajPosted May 20, 2018, 7:36 AM
Hi Manish, i am hard working, technically good but still an underpaid developer. could you please help me or give me tips to become a successful developer?
JackPosted Dec 4, 2017, 11:39 AM
Nice Article, Keep Sharing :)
Sally PepinPosted Oct 18, 2017, 4:47 PM
MODEL STATE IS VALID is not working. I'm having just one warning instead the 8 of my application.Help.
Hamid KhanPosted Sep 18, 2017, 8:24 AM
Great................
Ganapati PanapanaPosted Sep 9, 2017, 4:50 AM
Nice one, Keep posting new
Jhonny EDMPosted Jun 10, 2017, 11:21 AM
Nice, Thank For article.
Smit ThakurPosted Jan 9, 2017, 4:35 AM
Well explained.. Thank you
G ArunPosted Jun 3, 2016, 10:37 AM
Nice
Vignesh ManiPosted Jun 3, 2016, 9:36 AM
Nice
AniPosted Jun 3, 2016, 1:56 AM
well explained article. thank you very much
Mysura ReddyPosted Jun 3, 2016, 12:31 AM
Nice article. explained clearly. good job