

Overview: To develop application over a
Windows Phone platform, we have two popular and modern options: Silverlight and
XNA.
Silverlight is known to enable web developers to create stunning interfaces with
the combination of controls, text, vector graphic, media, animation, and data
binding that can run on a number of platforms and browsers.
Meanwhile XNA is a gaming platform that supports 2D and 3D games meant for Xbox
360, console, and PC.
Silverlight and Window Phone: In developing a Windows Phone application, we can
select one of the two options, which are Silverlight and XNA
Below I have shared some useful points regarding Silverlight with Window phone
- Uses the same base library.
- Integrated with the hardware.
- Integrated with Operating system.
- Uses out of browser model.
Applications using Silverlight in Windows Phone
fully apply navigation techniques in Silverlight 3. Using the frame container,
navigation can naturally be easy to handle, and the navigation to go back is
integrated to the button on the hardware
Visual Studio and Window Phone Development : In the template provided for
application development using the Silverlight platform, there are five types of
project we can choose, depending on what we need.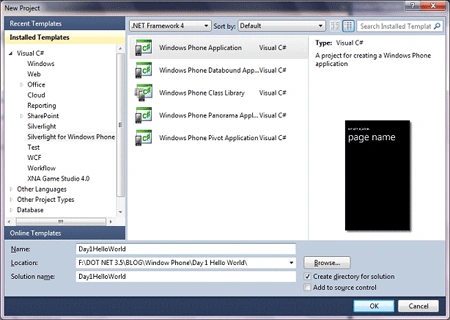
- Window phone application provides an empty page with no control.
- Window phone list application which provides a sample scenario for mater detail data application.
- Window phone panorama application which provides a sample usage of panorama navigation in the application.
- Window phone pivot application which provides sample usage of pivot navigation in the application.
- Window phone class library is to build components that can be reused in other projects.
Window Phone project and default files:
By Default, a project will consist of these files: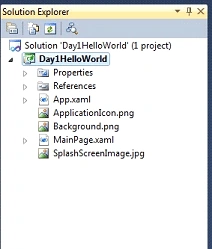
- App.xaml / App.xaml.cs : The application entry point which initializes resources and layout of the application.
- MainPage.xaml /MainPage.xaml.cs : Defines the page with interface in the application.
- Backgroud.png: A graphic file which shows as the application's icon in the application list. This icon can be replaced.
- SplashScreenImage.png: A graphic file that is displayed when the application is launched.
- Properties\ AppManifest.xml: Manifest file for application package generation purposes.
- Properties \ AssemblyInfo.cs: Assembly file that contains information regarding the name and version of metadata attached to the assembly that is generated.
- Properties \ WMAppManifest.xaml: Manifest file with specific metadata regarding windows phone application that defines icon name, initial page etc.
Window Phone Application Life Cycle:
Model execution on a Windows Phone has a complete cycle, from when the
application is launched until it is deactivated. This execution model is
designed to provide a fast, responsive experience at all times. This causes the
Windows Phone to only be able to run one application at a time. This is to
prevent the device from being slow or unresponsive due to the existence of
background applications.
Below are some important terms to understand
- Tombstoning: A procedure in which operating system deactivates the application process as user exits the application. Operating system preserves any information about application's state. When the application is re-launched, the operating system re-starts the process and sends the last know state from before the application was turned off.
- Page State: A state regarding the application page. It includes the scroll position or text filed content.
- Application State: Application condition in which there is no specific association to any page. The condition can be modified using PhoneApplicationService class.
- Persistence data: Data shared by application. This data is stored and retrieved from isolated storage, i.e. application setting.
- Transient State: Transient data are those related to the instance of application. Transient data is stored in state dictionary provided by PhoneApplicationService. Example of transient data is web service query.
Now till now I have discussed about important
State in Window phone application, now it's time to look into Life Cycle in
window Phone.
Below I am discussing about Life Cycle in ascending order.
- Launching: A Windows Phone
application is launched when it is called either because the user pressed
the Back button to said application, selected from application list, or from
tiles in the main screen. Regardless of the way it is called, an instance of
the application will be created, and as the application starts running,
Launching event is started.
Points to remember:
--The application preferably should not retrieve any data from isolated storage. Since the event is generated before the application is active or displayed, doing tasks that consume time, such as accessing isolated storage, may cause unwanted user experience because it slows down the application's launch time.
--Accessing isolated storage, or calling network related actions, should be done asynchronously when application has been loaded.
--When an application is launched, it should look like an entirely new instance.
Running: After launching event is handled the application will start running. In this condition, application defines its condition when the users, for example, navigate through the application page.
Point to remember:
--The only activity that can happen is application incrementally stores data or settings in order to reduce the amount of data to be stored as the application's state changes.
Applications using small amount of data, this becomes ignorable.
--Closing: A sample scenario that starts closing event is when the user presses the device's Back button on an application's initial page.
--Deactivating: When a running application is replaced by another, the previous one will be deactivated. There are several scenarios as to how this event is started. Below are few of them
----By pressing the Start button or due to timeout when the main screen is locked
----An application can also be deactivated by the invocation of a Launcher or Chooser default applications that enables users to do common tasks on a mobile device, such as taking pictures or sending emails.
Points to remember:
- Unlike when it is closed, an application that launches Deactivating event will enter tombstoned condition. This means that the application is no longer running, but the operating system records the application's conditions and stores several data related to it.
- Activating: After an application is
deactivated and enters tombstoned condition, it is very likely to be
reactivated. Applications can be invoked as a new application instance from
Start. Users may also start application from another application, causing
the tombstoned application to never be launched again.
The following below image elaborates the application's workflow for better understanding.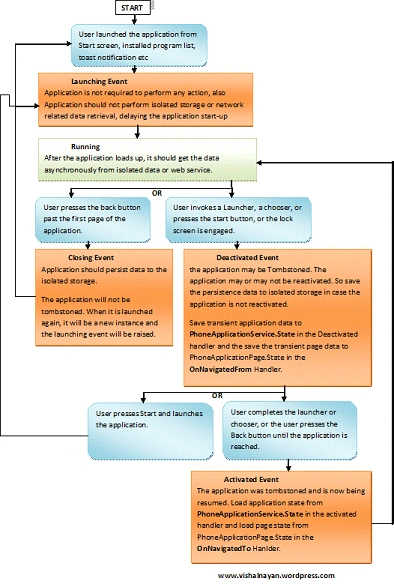
- How to secure Window Phone Application: Silverlight for Windows Phone is designed with several built-in features to support security aspects. Windows Phone applications run in limited environment, Sandbox, thus limiting their access to file system or other application files like any other .NET applications. This assures that applications will not affect operating system or certain features in the device, such as camera or email. From the development point of view, this means that developers only need to know how to call tasks related to the operating system or those features through managed-code, because they cannot directly invoke the features. And this is where Launchers and Choosers come in. Since applications may not access file system whilst several scenarios require data storage, Silverlight provides isolated storage, in which we can store data. It is isolated because an application may only access its own isolated storage. This very much simplifies codes regarding to data storage in our application.
We can use below namespaces for applying security code inside the application.
- System.Security.Principal: Gives information regarding user management and role management.
- System.Security.Permissions : exposes features on access to certain resources.
- System.Security.Cryptography : Provides encryption and hash functions.
System requirement for developing Window Phone application: To begin development and learn how to build Windows Phone applications, we need Windows Phone Developer Tools set. It includes Visual Studio 2010 Express for Windows Phone, Windows Phone Emulator, XNA Game Studio, and Expression Blend for Windows Phone.
- Operating System: Windows 7 and Windows
Vista
--Windows Vista (x86 and x64) ENU Service Pack 2 all editions other than Starter
--Windows 7 (x86 and x64) ENU – all editions other than Starter - Hard disk with a minimum 3GB free space
- Recommend 2 GB of memory
- Graphic card that supports DirectX 10 with WDDM 1.1 driver
If we have already installed Visual Studio
Professional or later versions, an additional Add-In for Visual Studio will
automatically be installed. It can be obtained from this link.
So now we got the idea about window phone application development so we can
start our Hello India Project.
Step 1 : Open Visual Studio Express for Windows Phone. Select File -> New
Project. Choose the Visual C# Silverlight for Windows Phone template. Select
Windows Phone Application and name the project to our liking.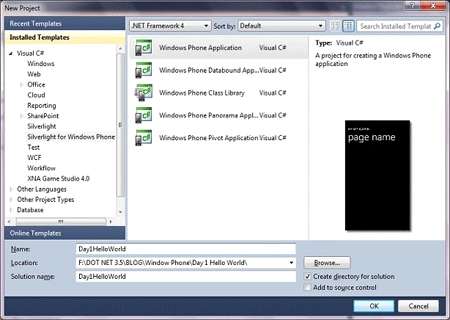
Step 2 : After the project is created, the screen will show design and
XAML markup codes. Design view shows the phone interface which enables us to see
how our program looks like during the development. For those of us who are
already familiar with Visual Studio, then the Tool Box panel, Solution Explorer,
and Properties pane will be around our main view. 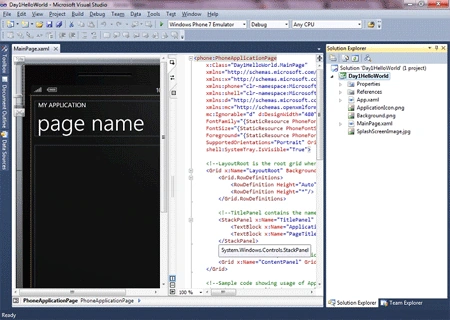
Step 3 : Add a TextBox and a Button from the ToolBox. Note that we get
the same experience in developing Silverlight for web applications. We can
easily alter the interface from the Properties pane. 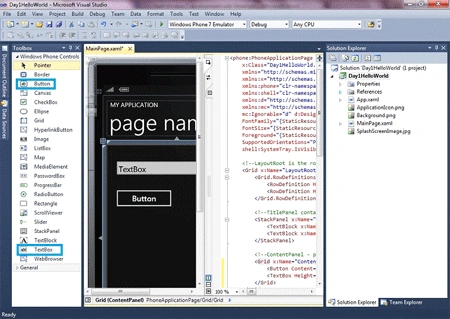
When a Button is selected, we can see that the button is highlighted with a box
outside the Button's border. The box indicates the Button's touch area. This
property is owned by every control. Change the title text in XAML into "Hello
India".
Step 4 : Double-clicking the Button will show codes behind the active
page. Add a function to change Title into "Hello +" input from available TextBox.
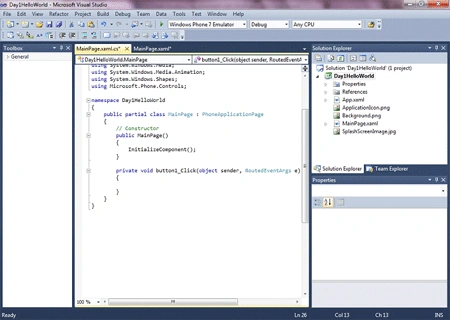
Step5 : Type this code for the Button's event handler.
private
void button1_Click(object
sender, RoutedEventArgs
e)
{
this.PageTitle.Text =
"Hello"
+ textBox1.Text;
}
Step 6 : Now we can test the simple application we have made. To deploy
and launch the application we can choose between running in an emulator or
available Windows Phone device. Since there are not many deployable Windows
Phone yet, let's use the emulator to run this simple application. Press F5 and
see the result. 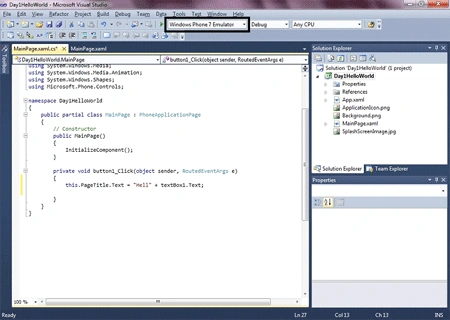
First-time deployment may take some time to process. However, the next
deployments will take less time, provided we don't shut down the emulator. Type
any text in the TextBox and press the button. The title in the page will change
according to the text inserted into TextBox.
Hurray this is our first Window Phone Application.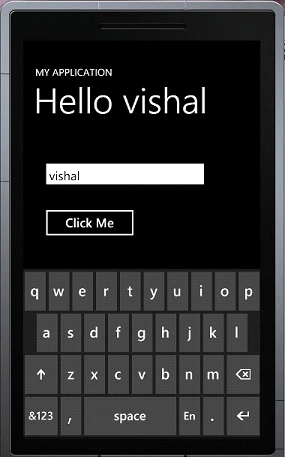
Tune for hour 2 tutorial
Thanks for Reading.
Join the conversation! Your thoughts help the community grow.