Prologue:
While discussing new features of Silverlight 5 in my previous articles today we shall discuss that but with a different topic. The important new feature in Silverlight 5 is Evaluated trust.
What is Evaluated Trust in Silverlight?
Evaluated Trust in Silverlight is for accessing the File System of a host; the accessing Silverlight Out Of Browser Application should be trusted by the Silverlight run time. How to enable Evaluated Trust? Let us discuss that in this article, stay tuned!
Evaluated Trust in Silverlight 4:
In the earlier version of Silverlight, i.e. Silverlight 4 we had only Limited Access to the file system. Limited access means that we can only access the Windows Special Folders like MyDouments.
Though, we can access the entire file system using COM interoperability. To know how to use COM in a Silverlight application please read this article.
Evaluated Trust in Silverlight 5:
In Silverlight 5, Evaluated Trust gives you access permission to the entire file system in the machine, even external storage devices like Pen Drives without using COM interoperability. Using this evaluated trust of the Silverlight application we can access [Read/Write] the files and folders anywhere if your application has Evaluated Trust.
Also the earlier version of Silverlight did not allow access to the local file systems in an In-Browser Silverlight application. But in Silverlight 5, you can access the file system in In-Browser applications also.
So we have Evaluated Trust to access the Entire File System. We should use this feature in our application, right? Okay let us develop a Silverlight Out Of Browser application which explorers the entire file system. Name the Application File Explorer in Silverlight 5.
We can see how to use this Evaluated Trust feature in Silverlight 5 Application by creating a simple Demo application called File Explorer.
Preparing the Solution:
Fire up the VS 2010; create a Silverlight application project with the name "FileExplorerInSilverlight5Beta" as shown in the figure.
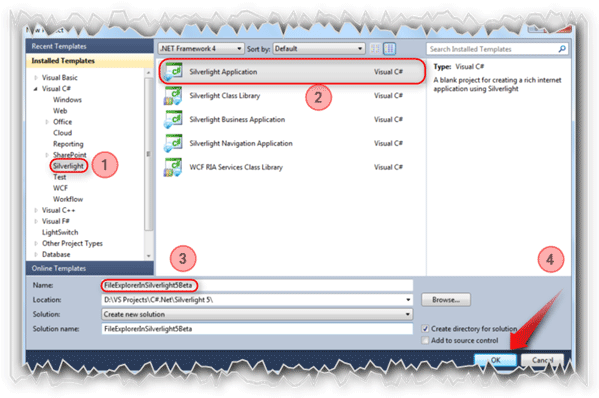
Follow the figure [No: #].
Let us make sure that we are creating a Silverlight 5 application.

After clicking the OK button in the New Project windows, a window will immediately be displayed to select the Silverlight version. So just select the Silverlight version 5.
Out Of Browser Settings:
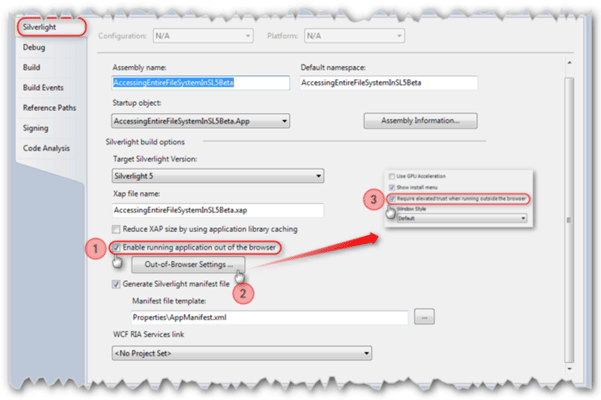
Open the Project's property window and select Silverlight. Then follow the [No: #].
The XAML:
As we are creating the File Explorer, we need to spend time on designing the Screen. Initially the XAML page will have the default grid inside the user control. Let us add a TreeView control, ListBox and TextBox.
TreeView:

The above figure shows the TreeView structure. Here the ItemsSource is bound in code-behind. The ItemTemplate specifies how the items [Nodes] in the TreeView should be.
ItemTemplate for TreeView:
The snippet of ItemTemplate is given below.
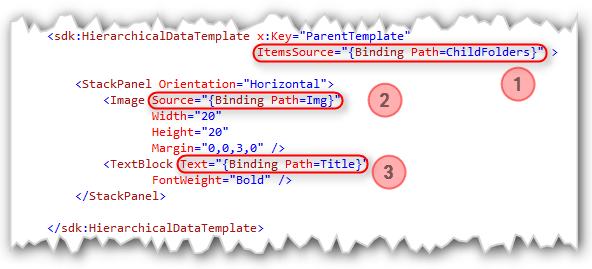
We might know that the Templates should be a UserControl Resource. This Item template is used to make the Nodes with Icon and Folder names.
The [No: 1] specifies that the item collection is for sub-folders.
In this stack panel, the image gives the icon and the text box is for the name of the folder.
Loading Folders on Demand:
If you ask "Is there any advantage of using this File Explorer", for this I can say that this File Explorer will load the folders on demand.
Yes, this application will load the child folder ONLY when the parent folder is clicked. Once the folders have been loaded then it won't unload until you press the Refresh button.
Quick Note:
The Silverlight native TreeView does not have events for Expand and Collapse. So we are loading the folders in the SelectedItemChanged event of TreeView.
When a folder is clicked we are also loading the files into the selected folder. To load the files from the selected folder we are using a ListBox in our application.

Here in this figure above the ItemsSource is bound in code-behind.
If you click on any of the files loaded you may see the content of the file that you selected but only if the file has one of the following extensions.
The supported file extensions are:
- Txt [Text files]
- Xml [Xml files]
- Bat [Batch files]
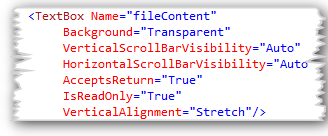
The figure above shows the text box which displays the content of the files selected.
The Code-Behind:
We have three controls that need to be bound in code-behind. For generating the parent and child folder structure we are using a class called Folder.
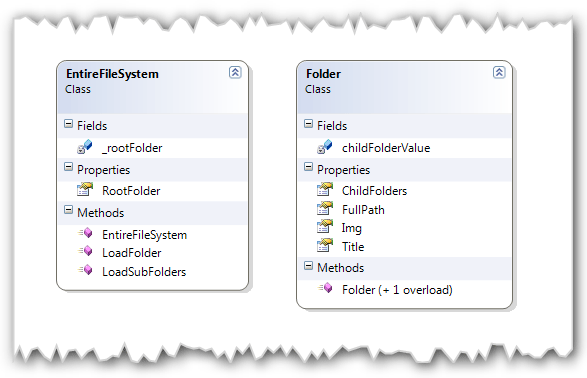
In the class snippet above, there are four properties in the Folder class.
- ChildFolders - This is of type ObservableCollection of Folder used to hold the child folders
- FullPath - This is of type string used to hold the current folders full name
- Img - This is of type BitmapImage used to hold the folder icon
- Title - This is of type string used to hold the Name of the folder
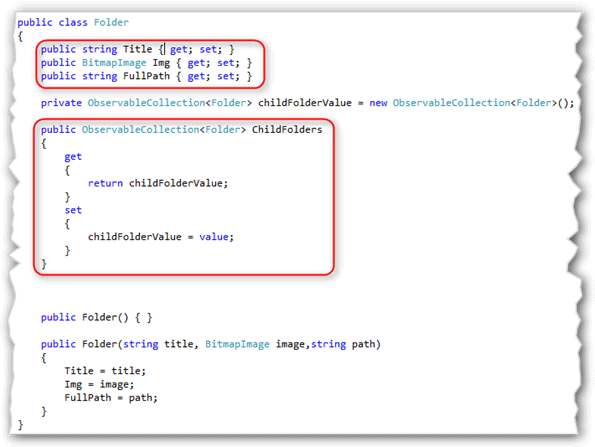
The above figure shows the Folder class snippet.
In the EntireFileSystem class we are using a RootFolder property which is of type ObservableCollection to hold the child folders.
The EntireFileSystem has two methods and one constructor.
- LoadFolder - which will be the initial folder called My Computer.
- LoadSubFolders - which will load the sub folders of the parent folder selected.

This constructor will call the LoadFolder method to load the My Computer as the initial folder.
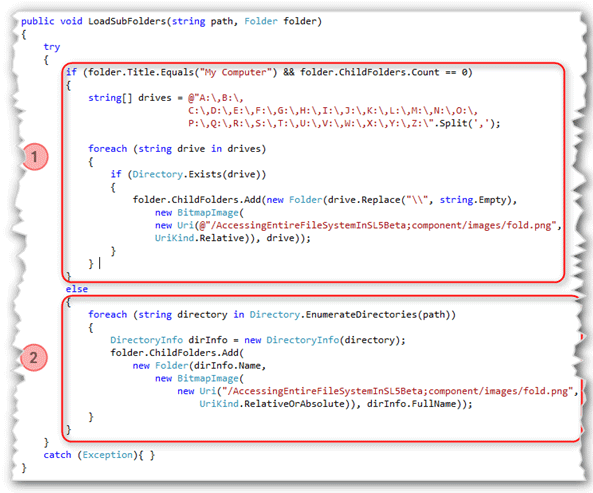
The above figure is the snippet for the LoadSubFolders method. This method will take the path of the folder and folder as parameter.
The [No: 1] section will check whether the folder clicked is My Computer or not. If so, then it will load all the available drives including the external drives (might load from the network drive I did not test that).
The [No: 2] section will be executed if the condition fails in the first section. In this section it will load all the sub-folders under the selected folder. The Path parameter gives the path of the selected folder.
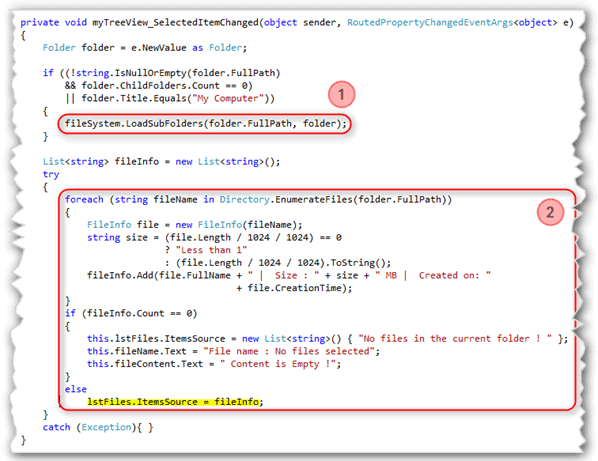
Since we are loading the files on demand, we need to write a bit of code in the SelectedItemChanged event of TreeView. In this event, while loading the sub folders, the files will be loaded into the Listbox given for the file collection.
The [No: 1] loads the drives available for read and write.
The [No: 2] will load the files available on the selected folder.
While loading the files we are appending the size of the file and the creation time with the path of the file.
On selecting any of the files listed in the ListBox it will display the content of the file selected if the file selected is text, XML or batch file.
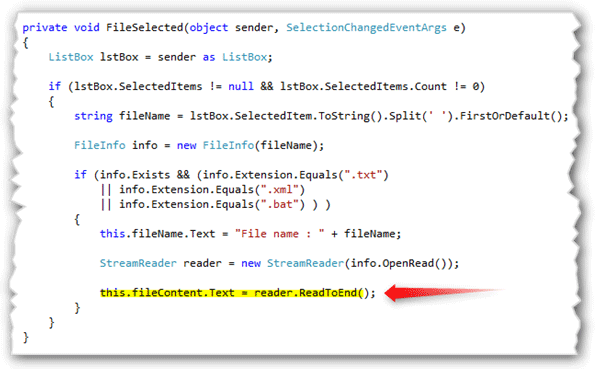
Here we are loading the content of the file selected into the Textbox.
Now the classes and their properties are ready. We have to bind the collection property with the TreeView.
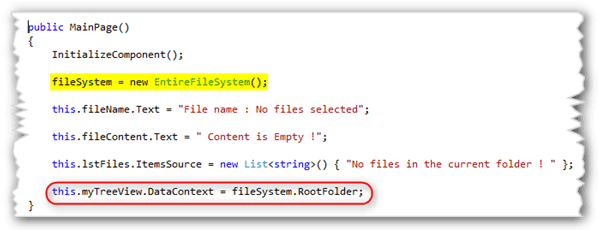
This is the main page constructor in which we are initiating the EntireFileSystem class to load the parent folder and we are binding the RootFolder property with the TreeView.
Okay, now our application is ready to show the designed File Explorer to explore the entire file system.
Hit the play button [F5].
Application in Action:
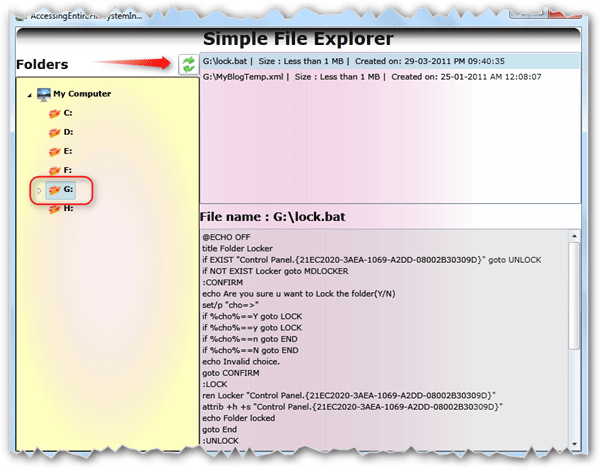
Here you can see the folders that are loaded and not loaded. The Drive G: loaded as we have selected the drive. The drives are not loaded because we have not selected them.
The arrow points to the button used to refresh the TreeView; not for reloading the selected folder.
Summary:
You see how powerful this new Evaluated Trust feature is. It allows the application to access the entire files system.
Thanks for spending your precious time here. Please provide your valuable feedbacks and comments, which enable me to give a better article the next time.
Thanks.