This article demonstrates how to use a linear gradient brush in Silverlight using XAML and C#.
Linear Gradient Brush
A linear gradient brush paints an area with a linear gradient. The LinearGradientBrush object represents a linear gradient brush. The default value linear gradient value is diagonal. The StartPoint and EndPoint properties of the LinearGradientBrush represent the start and end points of a gradient. The default values of these properties is (0, 0) and (1, 1), which is upper-left corner to lower-right corner of an area.
Figure 1 taken from MSDN shows a rectangle filled with a diagonal gradient and Figure 2 shows a rectangle filled with a gradient brush with multiple gradient stops.
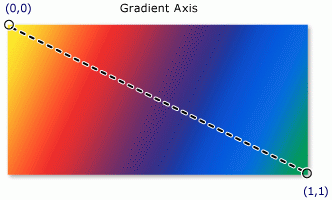
Figure 1
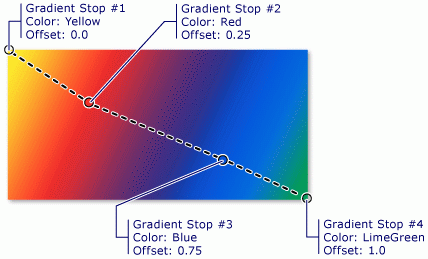
Figure 2
Creating a Linear Gradient Brush
The LinearGradientBrush element in XAML creates a linear gradient brush. The following code snippet creates a linear gradient brush with blue and red colors by setting GradientStops. The StartPoint and EndPoint values are (0, 0) and (1, 1).
<LinearGradientBrush StartPoint="0,0" EndPoint="1,1" >
<GradientStop Color="Blue" Offset="0" />
<GradientStop Color="Red" Offset="1.0" />
</LinearGradientBrush>
We can fill a shape with a gradient brush by setting a shape's Fill property to the gradient brush. The code snippet in Listing 1 creates a rectangle shape sets the Fill property to a LinearGradientBrush with blue and red colors.
<Rectangle Width="200" Height="100">
<Rectangle.Fill>
<LinearGradientBrush StartPoint="0,0" EndPoint="1,1" >
<GradientStop Color="Blue" Offset="0" />
<GradientStop Color="Red" Offset="1.0" />
</LinearGradientBrush>
</Rectangle.Fill>
</Rectangle>
Listing 1
The output looks like Figure 3.

Figure 3
Now let's apply multiple stops with multiple colors. The code snippet in Listing 2 creates a linear gradient brush with five stops.
<Rectangle Width="200" Height="100">
<Rectangle.Fill>
<LinearGradientBrush StartPoint="0,0" EndPoint="1,1" >
<GradientStop Color="Blue" Offset="0.1" />
<GradientStop Color="Orange" Offset="0.25" />
<GradientStop Color="Yellow" Offset="0.50" />
<GradientStop Color="Green" Offset="0.75" />
<GradientStop Color="Red" Offset="1.0" />
</LinearGradientBrush>
</Rectangle.Fill>
</Rectangle>
Listing 2
The new output generated by Listing 2 looks like Figure 4.
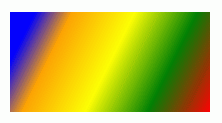
Figure 4
The CreateARectangleWithLGBrush method listed in Listing 3 draws same rectangle in Figure 4 dynamically.
public void CreateARectangleWithLGBrush()
{
// Create a Rectangle
Rectangle blueRectangle = new Rectangle();
blueRectangle.Height = 100;
blueRectangle.Width = 200;
// Create a linear gradient brush with five stops
LinearGradientBrush fiveColorLGB = new LinearGradientBrush();
fiveColorLGB.StartPoint = new Point(0, 0);
fiveColorLGB.EndPoint = new Point(1, 1);
// Create and add Gradient stops
GradientStop blueGS = new GradientStop();
blueGS.Color = Colors.Blue;
blueGS.Offset = 0.0;
fiveColorLGB.GradientStops.Add(blueGS);
GradientStop orangeGS = new GradientStop();
orangeGS.Color = Colors.Orange;
orangeGS.Offset = 0.25;
fiveColorLGB.GradientStops.Add(orangeGS);
GradientStop yellowGS = new GradientStop();
yellowGS.Color = Colors.Yellow;
yellowGS.Offset = 0.50;
fiveColorLGB.GradientStops.Add(yellowGS);
GradientStop greenGS = new GradientStop();
greenGS.Color = Colors.Green;
greenGS.Offset = 0.75;
fiveColorLGB.GradientStops.Add(greenGS);
GradientStop redGS = new GradientStop();
redGS.Color = Colors.Red;
redGS.Offset = 1.0;
fiveColorLGB.GradientStops.Add(redGS);
// Set Fill property of rectangle
blueRectangle.Fill = fiveColorLGB;
// Add Rectangle to the page
LayoutRoot.Children.Add(blueRectangle);
}
Listing 3
By simply changing the StartPoint and EndPoint values, we can generate a vertical gradient shapes. By changing a few lines below in code listed in Listing 4 generates Figure 5.
// Create a linear gradient brush with five stops
LinearGradientBrush fiveColorLGB = new LinearGradientBrush();
fiveColorLGB.StartPoint = new Point(0, 0.5);
fiveColorLGB.EndPoint = new Point(1, 0.5);
Listing 4
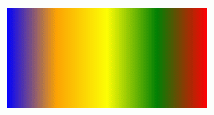
Figure 5
Summary
In this article, we saw how to create and use a linear gradient brush in Silverlight using XAML and C#.