

Windows Phone ListBox previous articles:
Introduction
Here we can make a call to the Student, send an SMS to that student and send an Email to that student. For that use this procedure.
Step 1
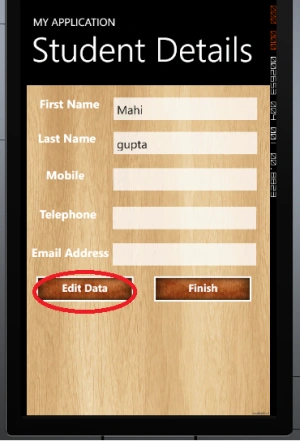
Here we continue the previous article in which we edit the data in the ListBox like this.
 Step 2
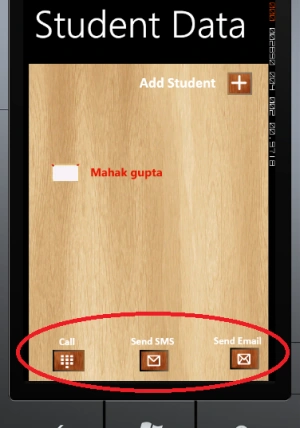
First, we use three buttons (For Call, Send SMS, Send Email) and three TextBlocks like this.
 Note
Note
- <Button Height="65" HorizontalAlignment="Left" Margin="33,532,0,0" Name="btnCall" VerticalAlignment="Top" Width="85" FontSize="18" Click="btnCall_Click" IsEnabled="True"
- Visibility="Collapsed" Grid.ColumnSpan="2">
- <Button.Background>
- <ImageBrush ImageSource="/WorkingWithListBoxInWP7;component/Image/Dialer.png" />
- </Button.Background>
- <Button.BorderBrush>
- <LinearGradientBrush EndPoint="1,0.5" StartPoint="0,0.5">
- <GradientStop Color="Black" Offset="0" />
- <GradientStop Color="#FF905E35" Offset="1" />
- <GradientStop Color="#FF3E352F" Offset="0.082" />
- </LinearGradientBrush>
- </Button.BorderBrush>
- </Button>
- <Button Height="65" HorizontalAlignment="Right" Margin="0,532,178,0" Name="btnSMS" VerticalAlignment="Top" Width="79" FontSize="18" IsEnabled="True"
- Visibility="Collapsed" Click="btnSMS_Click" Grid.Column="1">
- <Button.BorderBrush>
- <LinearGradientBrush EndPoint="1,0.5" StartPoint="0,0.5">
- <GradientStop Color="Black" Offset="0" />
- <GradientStop Color="#FF7C674E" Offset="1" />
- </LinearGradientBrush>
- </Button.BorderBrush>
- <Button.Background>
- <ImageBrush ImageSource="/WorkingWithListBoxInWP7;component/Image/Message1.png" />
- </Button.Background>
- </Button>
- <Button Height="65" HorizontalAlignment="Left" Margin="302,528,0,0" Name="btnEmail" VerticalAlignment="Top" Width="79" FontSize="18" IsEnabled="True"
- Visibility="Collapsed" Click="btnEmail_Click" Grid.Column="1">
- <Button.Background>
- <ImageBrush ImageSource="/WorkingWithListBoxInWP7;component/Image/Send%20Email1.png" />
- </Button.Background>
- <Button.BorderBrush>
- <LinearGradientBrush EndPoint="1,0.5" StartPoint="0,0.5">
- <GradientStop Color="Black" Offset="0" />
- <GradientStop Color="#FF80644A" Offset="1" />
- </LinearGradientBrush>
- </Button.BorderBrush>
- </Button>
- <TextBlock FontFamily="Calibri" FontSize="20" FontStyle="Normal" FontWeight="Bold" Height="32" HorizontalAlignment="Left" Margin="18,516,0,0" Name="txtBlkCall" Text="Call" TextAlignment="Center" VerticalAlignment="Top" Width="109" Visibility="Collapsed" Grid.ColumnSpan="2" />
- <TextBlock FontFamily="Calibri" FontSize="20" FontStyle="Normal" FontWeight="Bold" Height="32" HorizontalAlignment="Left" Margin="112,515,0,0" Name="txtBlkSMS" Text="Send
- SMS" TextAlignment="Center" VerticalAlignment="Top" Width="109" Grid.Column="1" Visibility="Collapsed" />
- <TextBlock FontFamily="Calibri" FontSize="20" FontStyle="Normal" FontWeight="Bold" Height="32" HorizontalAlignment="Left" Margin="265,514,0,0" Name="txtBlkSendEmail"
- Text="Send Email" TextAlignment="Center" VerticalAlignment="Top" Width="127" Grid.Column="1" Visibility="Collapsed" />
Here we set the Visibility=Collapsed. In this example, the buttons will be visible when we tap a single item in the ListBox For this we create a Tap event of our ListBox and we write the following code in it.
- private void lstStudentname_Tap(object sender, System.Windows.Input.GestureEventArgs e)
- {
- btnCall.Visibility = Visibility.Visible;
- btnSMS.Visibility = Visibility.Visible;
- btnEmail.Visibility = Visibility.Visible;
- txtBlkCall.Visibility = Visibility.Visible;
- txtBlkSendEmail.Visibility = Visibility.Visible;
- txtBlkSMS.Visibility = Visibility.Visible;
- }
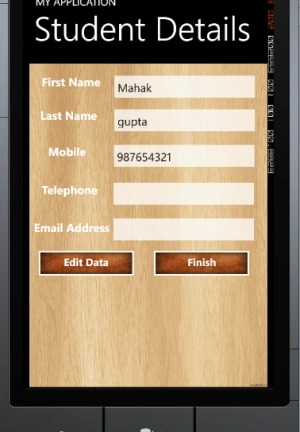
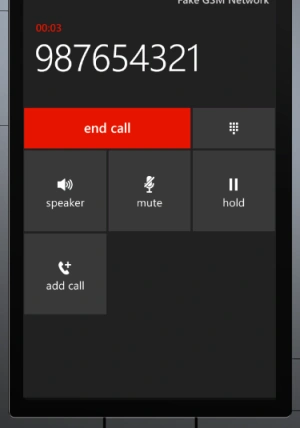
Now we will write the code for the Call Button:Output
If we cannot enter the Mobile Number then the following message will appear.
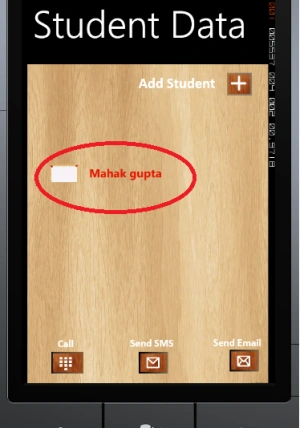
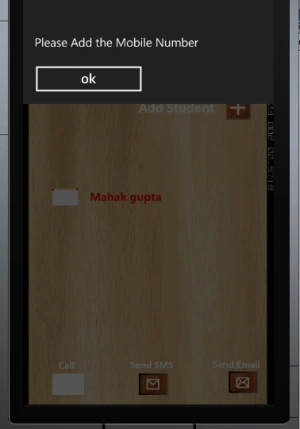 To enter a Mobile Number we should first edit the data. To do that we double-tap on the ListBox like this.
- private void btnCall_Click(object sender, RoutedEventArgs e)
- {
- var listBoxItem = lstStudentname.ItemContainerGenerator.ContainerFromIndex(lstStudentname.SelectedIndex) as ListBoxItem;
- var txtBlk = FindVisualChildByType<TextBlock>(listBoxItem, "txtBlkExtra");
- a = txtBlk.Text;
- using (StudentdataContext StudentDB = new StudentdataContext(strConnectionString))
- {
- var c = from b in StudentDB.GetTable<StudentInfo>() where b.Extra == a.ToString() select b;
- foreach (var x in c)
- {
- if (x.Mobile == "")
- {
- MessageBox.Show("Please Add the Mobile Number");
- }
- else
- {
- PhoneCallTask pct = new PhoneCallTask();
- pct.PhoneNumber = x.Mobile;
- pct.Show();
- }
- }
- }
- }
Now we will write the code to send the SMS.
First, we create a page (SendSMS.xaml) to add controls like this.
Step 5
- <Grid x:Name="ContentPanel" Grid.Row="1" Margin="12,0,12,0">
- <Grid.Background>
- <ImageBrush ImageSource="/WorkingWithListBoxInWP7;component/Image/wooden-background.jpg" />
- </Grid.Background>
- <TextBlock Height="33" HorizontalAlignment="Left" Margin="32,20,0,0" Name="txtBlkTo" Text="To" VerticalAlignment="Top" FontWeight="Bold" Width="43" FontSize="22"
- FontFamily="Portable User Interface" />
- <TextBox Height="72" HorizontalAlignment="Left" Margin="107,0,0,0" Name="txtTo" Text="" VerticalAlignment="Top" Width="343" FontSize="18" />
- <TextBlock FontSize="22" FontWeight="Bold" Height="33" HorizontalAlignment="Left" Margin="32,81,0,0" Name="txtBlkCC" Text="CC" VerticalAlignment="Top" Width="43"
- FontFamily="Portable User Interface" />
- <TextBox FontSize="18" Height="72" HorizontalAlignment="Left" Margin="107,63,0,0" Name="txtCC" Text="" VerticalAlignment="Top" Width="343" />
- <TextBlock FontSize="22" FontWeight="Bold" Height="33" HorizontalAlignment="Left" Margin="14,163,0,0" Name="textBlkSubject" Text="Subject" VerticalAlignment="Top" Width="97" FontFamily="Portable User Interface" />
- <TextBox FontSize="18" Height="72" HorizontalAlignment="Left" Margin="107,138,0,0" Name="txtSubject" Text="" VerticalAlignment="Top" Width="343" />
- <TextBlock FontSize="22" FontWeight="Bold" Height="33" HorizontalAlignment="Left" Margin="22,0,0,287" Name="textBlkBody" Text="Body" VerticalAlignment="Bottom" Width="97"
- FontFamily="Portable User Interface" />
- <TextBox FontSize="18" Height="206" HorizontalAlignment="Left" Margin="107,216,0,0" Name="txtBody" Text="" VerticalAlignment="Top" Width="343" />
- <Button Content="Send" Height="72" HorizontalAlignment="Left" Margin="280,450,0,0" Name="btnSend" VerticalAlignment="Top" Width="160" Click="btnSend_Click"
- FontWeight="Bold">
- <Button.Background>
- <ImageBrush ImageSource="/WorkingWithListBoxInWP7;component/Image/Dark%20Wooden%20Background.jpg" />
- </Button.Background>
- </Button>
- </Grid>
- </Grid>
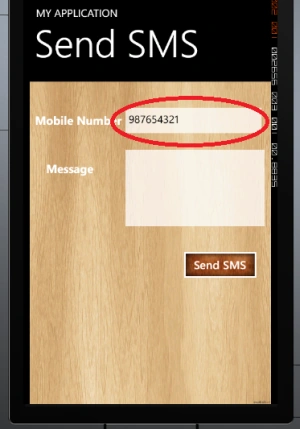
So when we click on the "Send SMS" button in MainPage we pass the following parameter (Mobile Number).
- NavigationService.Navigate(new Uri(string.Format("/SendSMS.xaml?parameter={0}", x.Mobile), UriKind.Relative));
After that we write the following code to fetch the data in the SendSMS.xaml.cs page:
 Now we will write the code for the "Send SMS" button.
- protected override void OnNavigatedTo(System.Windows.Navigation.NavigationEventArgs e)
- {
- base.OnNavigatedTo(e);
- parameterValue = NavigationContext.QueryString["parameter"];
- txtMobileNumber.Text = parameterValue.ToString();
- object sample;
- if (PS.State.TryGetValue("numbertext", out sample))
- txtMobileNumber.Text = sample as string;
- if (PS.State.TryGetValue("messagetext", out sample))
- txtMessage.Text = sample as string;
- base.OnNavigatedTo(e);
- }
Output
- private void button1_Click(object sender, RoutedEventArgs e)
- {
- if (txtMobileNumber.Text == "" || txtMessage.Text == "")
- {
- MessageBox.Show("Please Enter the Correct Data");
- }
- else
- {
- CT.To = txtMobileNumber.Text;
- CT.Body = txtMessage.Text;
- CT.Show();
- this.NavigationService.Navigate(new Uri("/MainPage.xaml", UriKind.Relative));
- }
- }
Here we send the message to the following number.
Step 6
Now we will write the code for sending an email.
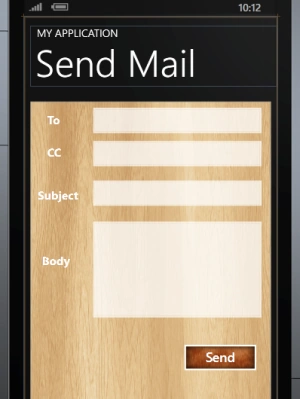
First, we create a page (SendMail.xaml) and add controls like this.
 So when we click on the "Send Email" button in the MainPage we pass the following parameter (Email Id).
After that we write the following code to fetch the data in the SendMail.xaml.cs page.
So when we click on the "Send Email" button in the MainPage we pass the following parameter (Email Id).
After that we write the following code to fetch the data in the SendMail.xaml.cs page.
Now we will write the code to send an email.
Using this example we can make a call, send SMS and send an email to that Student.
- <Grid x:Name="ContentPanel" Grid.Row="1" Margin="12,0,12,0">
- <Grid.Background>
- <ImageBrush ImageSource="/WorkingWithListBoxInWP7;component/Image/wooden-background.jpg" />
- </Grid.Background>
- <TextBlock Height="33" HorizontalAlignment="Left" Margin="32,20,0,0" Name="txtBlkTo" Text="To" VerticalAlignment="Top" FontWeight="Bold" Width="43" FontSize="22"
- FontFamily="Portable User Interface" />
- <TextBox Height="72" HorizontalAlignment="Left" Margin="107,0,0,0" Name="txtTo" Text="" VerticalAlignment="Top" Width="343" FontSize="18" />
- <TextBlock FontSize="22" FontWeight="Bold" Height="33" HorizontalAlignment="Left" Margin="32,81,0,0" Name="txtBlkCC" Text="CC" VerticalAlignment="Top" Width="43"
- FontFamily="Portable User Interface" />
- <TextBox FontSize="18" Height="72" HorizontalAlignment="Left" Margin="107,63,0,0" Name="txtCC" Text="" VerticalAlignment="Top" Width="343" />
- <TextBlock FontSize="22" FontWeight="Bold" Height="33" HorizontalAlignment="Left" Margin="14,163,0,0" Name="textBlkSubject" Text="Subject" VerticalAlignment="Top" Width="97"
- FontFamily="Portable User Interface" />
- <TextBox FontSize="18" Height="72" HorizontalAlignment="Left" Margin="107,138,0,0" Name="txtSubject" Text="" VerticalAlignment="Top" Width="343" />
- <TextBlock FontSize="22" FontWeight="Bold" Height="33" HorizontalAlignment="Left" Margin="22,0,0,287" Name="textBlkBody" Text="Body" VerticalAlignment="Bottom" Width="97"
- FontFamily="Portable User Interface" />
- <TextBox FontSize="18" Height="206" HorizontalAlignment="Left" Margin="107,216,0,0" Name="txtBody" Text="" VerticalAlignment="Top" Width="343" />
- <Button Content="Send" Height="72" HorizontalAlignment="Left" Margin="280,450,0,0" Name="btnSend" VerticalAlignment="Top" Width="160" Click="btnSend_Click"
- FontWeight="Bold">
- <Button.Background>
- <ImageBrush ImageSource="/WorkingWithListBoxInWP7;component/Image/Dark%20Wooden%20Background.jpg" />
- </Button.Background>
- </Button>
- </Grid>
- </Grid>
- using (StudentdataContext StudentDB = new StudentdataContext(strConnectionString))
- {
- var email = from b in StudentDB.GetTable<StudentInfo>() where b.Extra == a.ToString() select b;
- foreach (var x in email)
- {
- if (x.Email == "")
- {
- MessageBox.Show("Please Add the Email Address");
- }
- else
- {
- NavigationService.Navigate(new Uri(string.Format("/SendMail.xaml?parameter={0}", x.Email), UriKind.Relative));
- }
- }
- }
- protected override void OnNavigatedTo(System.Windows.Navigation.NavigationEventArgs e)
- {
- base.OnNavigatedTo(e);
- parameterValue = NavigationContext.QueryString["parameter"];
- txtTo.Text = parameterValue.ToString();
- }
- private void btnSend_Click(object sender, RoutedEventArgs e)
- {
- EmailComposeTask MYEmailTask = new EmailComposeTask();
- MYEmailTask.To = txtTo.Text;
- MYEmailTask.Cc = txtCC.Text;
- MYEmailTask.Subject = txtSubject.Text;
- MYEmailTask.Body = txtBody.Text;
- MYEmailTask.Show();
- }
Summary
In this article, we learned about Working With ListBox In Windows Phone (Send SMS, Email and Make a Call) : Part 3.
Join the conversation! Your thoughts help the community grow.