

Project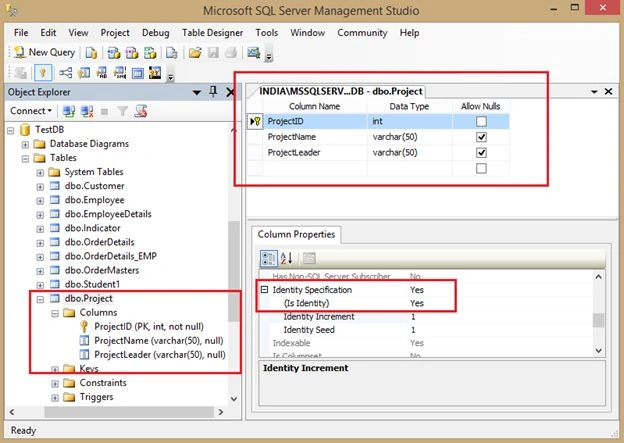
Figure 1: Project Table
The following is the script of the table:
- CREATE TABLE [dbo].[Project](
- [ProjectID] [int] IDENTITY(1,1) NOT NULL,
- [ProjectName] [varchar](50) NULL,
- [ProjectLeader] [varchar](50) NULL,
- CONSTRAINT [PK_Project] PRIMARY KEY CLUSTERED
- (
- [ProjectID] ASC
- )WITH (PAD_INDEX = OFF, STATISTICS_NORECOMPUTE = OFF, IGNORE_DUP_KEY = OFF, ALLOW_ROW_LOCKS = ON, ALLOW_PAGE_LOCKS = ON) ON [PRIMARY]
- ) ON [PRIMARY]
- GO
- SET ANSI_PADDING OFF
- GO
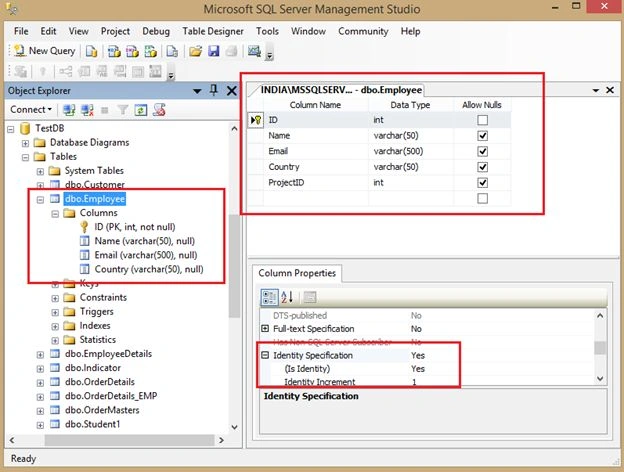
Figure 2: Employee Table
The script of the Employee table is:
- CREATE TABLE [dbo].[Employee](
- [ID] [int] IDENTITY(1,1) NOT NULL,
- [Name] [varchar](50) NULL,
- [Email] [varchar](500) NULL,
- [Country] [varchar](50) NULL,
- [ProjectID] [int] NULL,
- CONSTRAINT [PK_Employee] PRIMARY KEY CLUSTERED
- (
- [ID] ASC
- )WITH (PAD_INDEX = OFF, STATISTICS_NORECOMPUTE = OFF, IGNORE_DUP_KEY = OFF, ALLOW_ROW_LOCKS = ON, ALLOW_PAGE_LOCKS = ON) ON [PRIMARY]
- ) ON [PRIMARY]
- GO
- SET ANSI_PADDING OFF
- GO
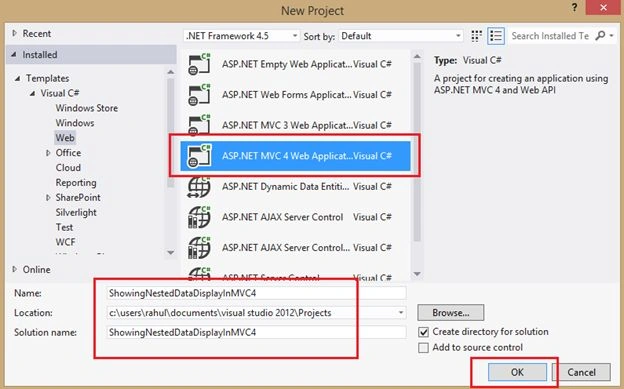
Figure 3: Creating a new Visual Studio project
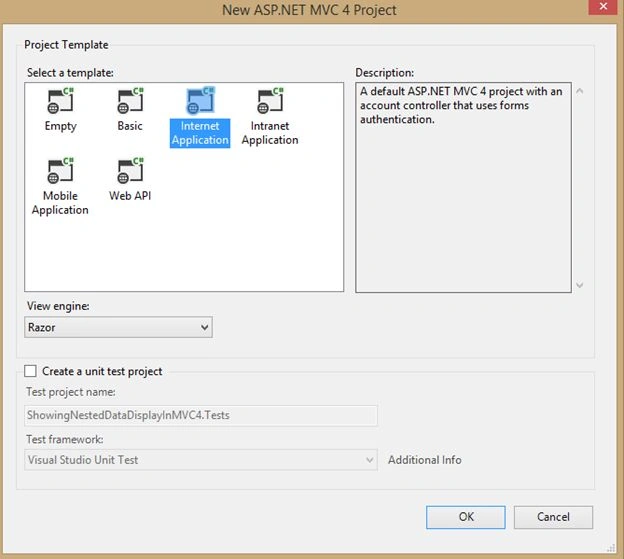
Figure 4: Visual Studio Project
Now right-click on the Project Solution Explorer and Add New ADO.NET Entity Data Model as in the following:
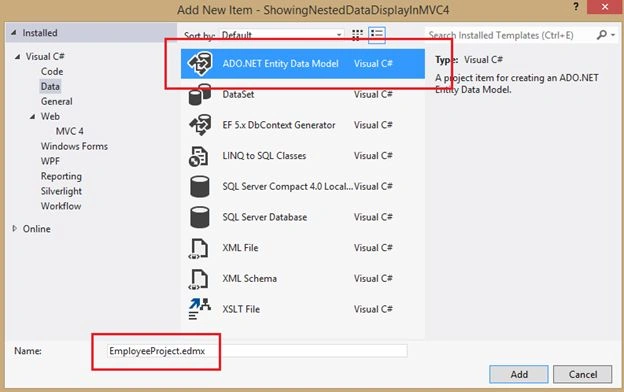
Figure 5: Add New ADO.NET Entity Data Model
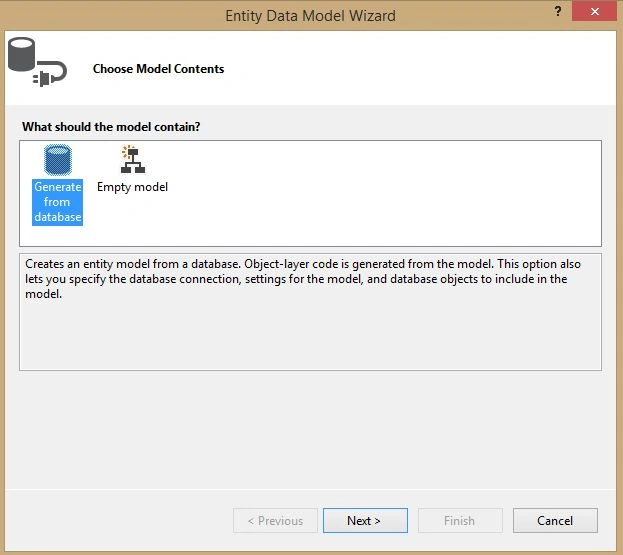
Figure 6: Choose Model Contents
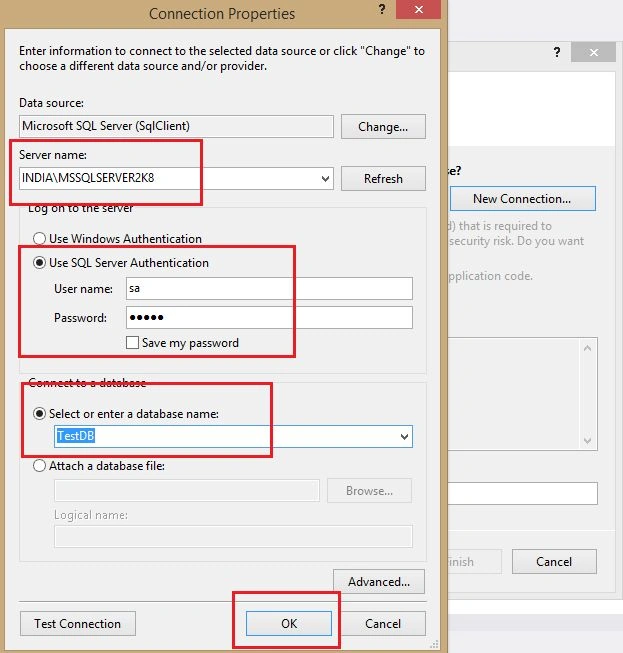
Figure 7: Connection Properties
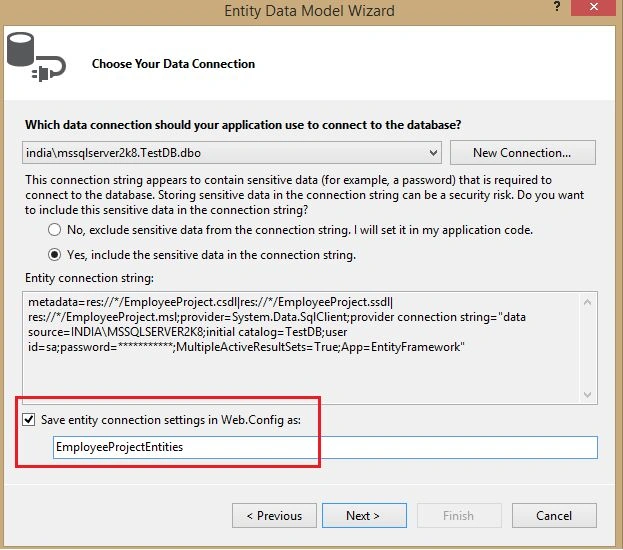
Figure 8: Choose your Data Connection
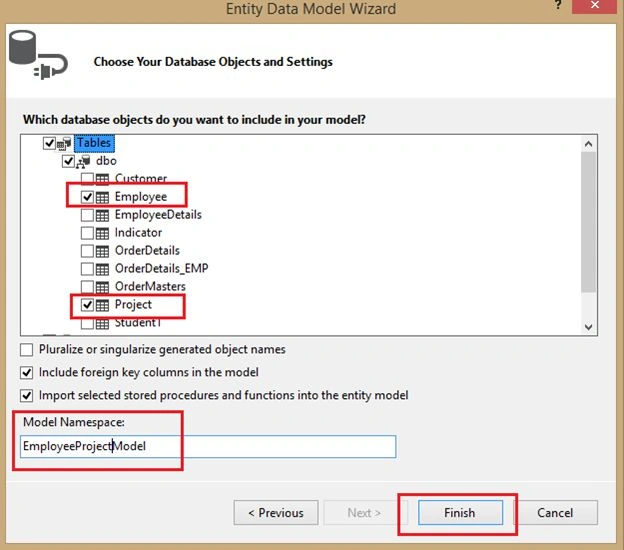
Figure 9: Choose Database objects and settings
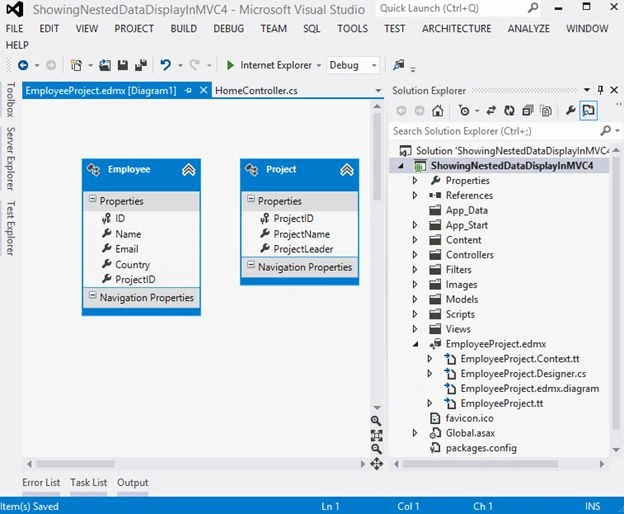
Figure 10: Tables are created
Now see the data in the tables, Project and Employee:
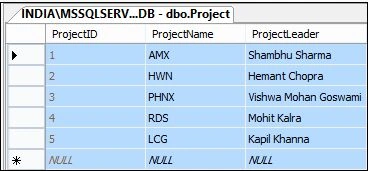
Figure 11: Added some data
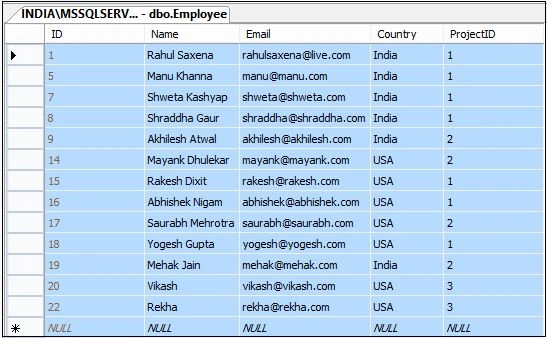
Figure 12: Employee Table
Now right-click on the Model folder inside your project's Solution Explorer and Add New Item. Now add a new class and name it EmpProject.cs.
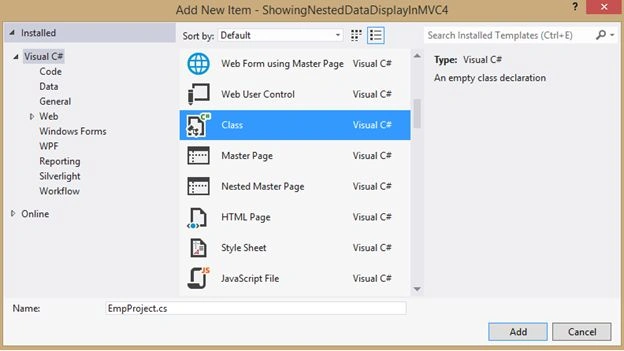
Figure 13: New class created
Write the following code snippet.
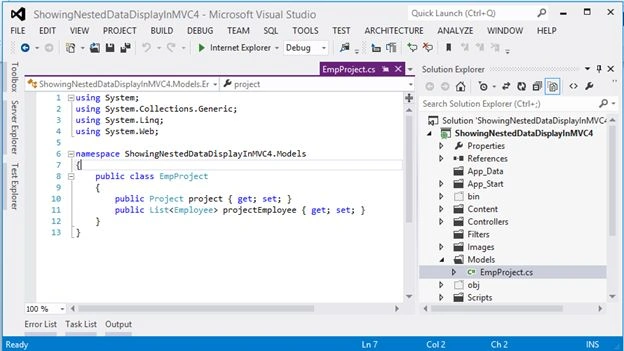
Figure 14: Code written
- using System;
- using System.Collections.Generic;
- using System.Linq;
- using System.Web;
- namespace ShowingNestedDataDisplayInMVC4.Models
- {
- public class EmpProject
- {
- public Project project { get; set; }
- public List<Employee> projectEmployee { get; set; }
- }
- }
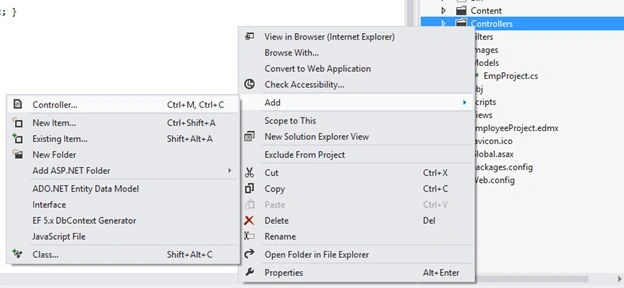
Figure 15: Add New Controller

Figure 16: Added Project Controller
Write the following code in the project's Controller:

Figure 17: Code added.
- using System;
- using System.Collections.Generic;
- using System.Linq;
- using System.Web;
- using System.Web.Mvc;
- using ShowingNestedDataDisplayInMVC4.Models;
- namespace ShowingNestedDataDisplayInMVC4.Controllers
- {
- public class ProjectController : Controller
- {
- //
- // GET: /Project/
- public ActionResult Index()
- {
- List<EmpProject> prjEMPReport = new List<EmpProject>();
- // here MyDatabaseEntities is our data context
- using (EmployeeProjectEntities dc = new EmployeeProjectEntities())
- {
- var prjRecords = dc.Project.OrderByDescending(a => a.ProjectID);
- foreach (var i in prjRecords)
- {
- var empPrjDTL = dc.Employee.Where(a => a.ProjectID == (i.ProjectID)).ToList();
- prjEMPReport.Add(new EmpProject { project = i, projectEmployee = empPrjDTL });
- }
- }
- return View(prjEMPReport);
- }
- }
- }
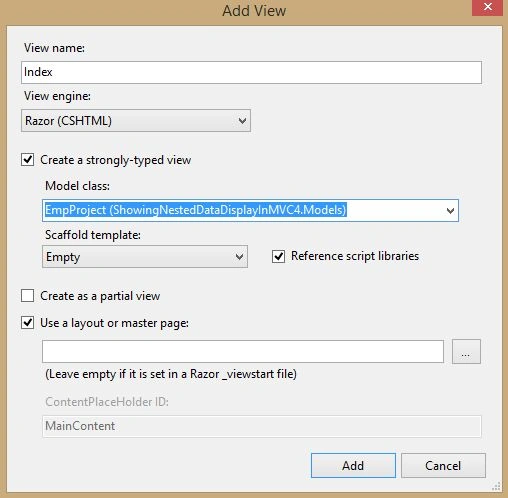
Figure 18: Add View
In Index.cshtm write the following code:
- @model IEnumerable<ShowingNestedDataDisplayInMVC4.Models.EmpProject>
- @{
- ViewBag.Title = "Displaying Data In Nested Grid View In MVC4";
- WebGrid grid = new WebGrid(source: Model, canSort: false);
- }
- <style>
- #gridT, #gridT tr {
- border: 1px solid #0D857B;
- }
- #nestedT, #nestedT tr {
- border: 1px solid #f3f3f3;
- }
- #nestedT {
- margin: 0px 0px 0px 10px;
- padding: 5px;
- width: 95%;
- }
- #nestedT th {
- font-size: 14px;
- font-weight: bold;
- background-color: green;
- }
- .recordHoverEffect {
- cursor: pointer;
- }
- .recordHoverEffect:hover {
- background-color: rgb(248, 242, 242);
- }
- .expandRecordRecord {
- background-image: url(/Images/ShowHideImage.png);
- background-position-x: -22px;
- background-repeat: no-repeat;
- }
- .collapseRecordRecord {
- background-image: url(/Images/ShowHideImage.png);
- background-position-x: -2px;
- background-repeat: no-repeat;
- }
- </style>
- @section Scripts{
- <script>
- $(document).ready(function () {
- var size = $("#main #gridT > thead > tr >th").size();
- $("#main #gridT > thead > tr >th").last().remove();
- $("#main #gridT > thead > tr").prepend("<th></th>");
- $("#main #gridT > tbody > tr").each(function (i, el) {
- $(this).prepend(
- $("<td></td>")
- .addClass("expandRecord")
- .addClass("recordHoverEffect")
- .attr('title', "Show Hide Details")
- );
- var table = $("table", this).parent().html();
- $(this).after("<tr><td></td><td style='padding:5px; margin:0px;' colspan='" + (size - 1) + "'>" + table + "</td></tr>");
- $("table", this).parent().remove();
- $(".recordHoverEffect", this).live("click", function () {
- $(this).parent().closest("tr").next().slideToggle(100);
- $(this).toggleClass("expandRecord collapseRecord");
- });
- });
- $("#main #gridT > tbody > tr td.expandRecord").each(function (i, el) {
- $(this).toggleClass("expandRecord collapseRecord");
- $(this).parent().closest("tr").next().slideToggle(100);
- });
- });
- </script>
- }
- <div id="main" style="padding: 25px; background-color: yellow;">
- @grid.GetHtml(
- htmlAttributes: new { id = "gridT", width = "900px", style = "background-color:skyblue; color:blue; font-size:14pt; font-family:TimesNewRoman;" },
- columns: grid.Columns(
- grid.Column("project.ProjectID", "Project ID"),
- grid.Column("project.ProjectName", "Project Name"),
- grid.Column("project.ProjectLeader", "Project Leader"),
- grid.Column(format: (item) =>
- {
- WebGrid subGrid = new WebGrid(source: item.projectEmployee);
- return subGrid.GetHtml(
- htmlAttributes: new { id = "nestedT", style = "background-color:red; color:white; font-size:12pt; font-family:verdana;" },
- columns: subGrid.Columns(
- subGrid.Column("ID", " Employee ID"),
- subGrid.Column("Name", "Name"),
- subGrid.Column("Email", "Email"),
- subGrid.Column("Country", "Country")
- )
- );
- })
- )
- )
- </div>
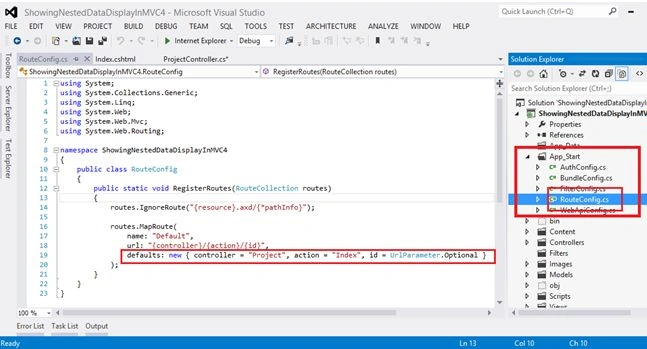
Figure 19: RouteConfig.cs
- using System;
- using System.Collections.Generic;
- using System.Linq;
- using System.Web;
- using System.Web.Mvc;
- using System.Web.Routing;
- namespace ShowingNestedDataDisplayInMVC4
- {
- public class RouteConfig
- {
- public static void RegisterRoutes(RouteCollection routes)
- {
- routes.IgnoreRoute("{resource}.axd/{*pathInfo}");
- routes.MapRoute(
- name: "Default",
- url: "{controller}/{action}/{id}",
- defaults: new { controller = "Project", action = "Index", id = UrlParameter.Optional }
- );
- }
- }
- }
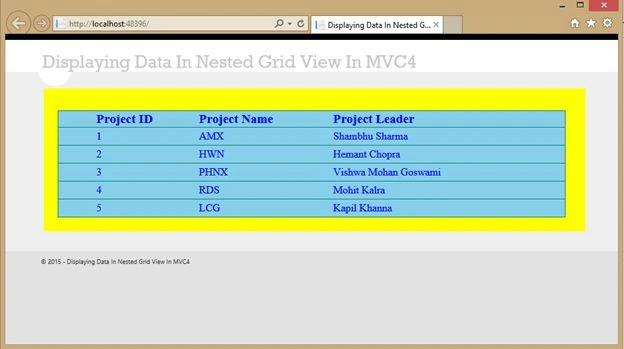
Figure 20: Output
Now go to Project ID to expand the details of this project as in the following:
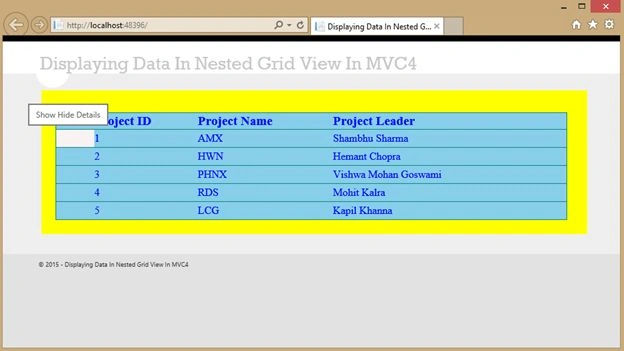
Figure 21: Expand the details
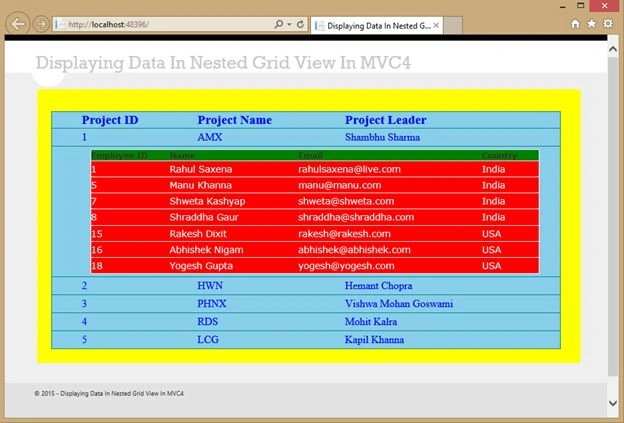
Figure 22: After expanding the details
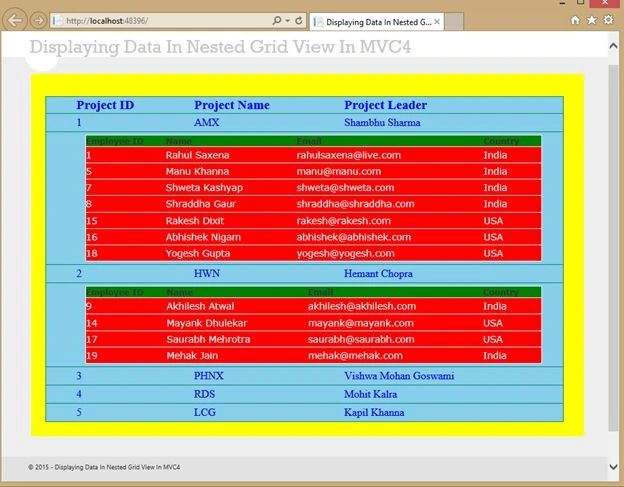
Figure 23: After expanding the details of Project ID 2
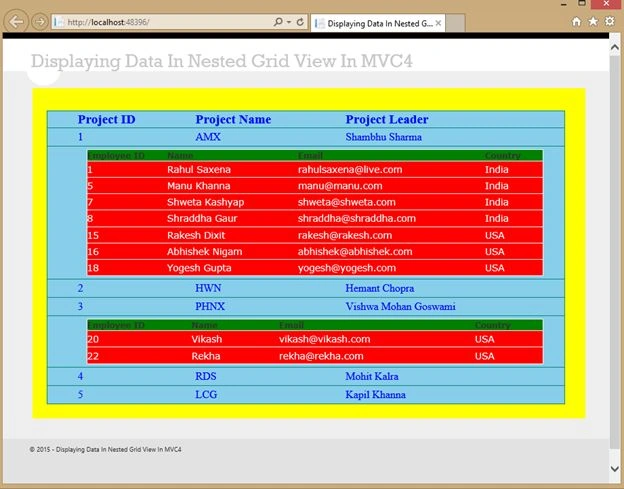
Figure 24: Details for Project ID 3
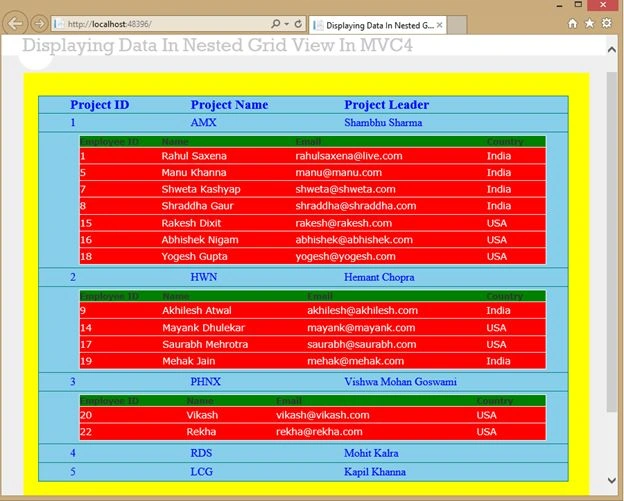
Figure 25: Details for Project ID 1, 2 and 3
manjerekar raoPosted Jul 11, 2016, 7:39 AM
What if its a manager & employee relation. and what if the 2nd level employee is again a manager and how do we show the employees for that manager. can it be done dynamically
manjerekar raoPosted Jul 11, 2016, 7:37 AM
Hi rahul
Rahul Kumar SaxenaPosted Apr 6, 2016, 1:03 PM
Thanks 2 All
Rahul Kumar SaxenaPosted Sep 17, 2015, 12:13 PM
Thanks Anil Kumar
Anil KumarPosted Sep 17, 2015, 3:51 AM
nyc article
Rahul Kumar SaxenaPosted Jul 22, 2015, 3:39 AM
Thanks Sharad...
SharadPosted Jul 22, 2015, 12:43 AM
Excellent....
Rahul Kumar SaxenaPosted Jun 12, 2015, 12:02 AM
Thanks Ramesh Maruthi
Ramesh MaruthiPosted Jun 11, 2015, 4:28 PM
Great Article Rahul sir, but even for sub-grid its better to mention canSort: false. As it makes confuse for beginners.
Rahul Kumar SaxenaPosted Jun 6, 2015, 3:19 AM
Thanks.Santhakumar Munuswamy
Santhakumar MunuswamyPosted Jun 6, 2015, 2:33 AM
Thanks for good work and well explained.
Rahul Kumar SaxenaPosted Jun 5, 2015, 2:44 PM
Thank samol sarkate
Amol SarkatePosted Jun 5, 2015, 11:54 AM
nice bro
Rahul Kumar SaxenaPosted Jun 5, 2015, 1:49 AM
thanks Sibeesh Venu bro..
Sibeesh VenuPosted Jun 5, 2015, 1:44 AM
Good one.
Rahul Kumar SaxenaPosted Jun 4, 2015, 11:10 PM
Thanks syed shanu
Syed ShanuPosted Jun 4, 2015, 8:16 PM
Nice one Rahul