Introduction
One of the best new features of the forthcoming ASP.NET 2.0 will be the ObjectDataSource control. However, as I found out in my experimentation what seems like a simple control has some complex behaviors to master to get it working properly. If (like me) you have an existing data access layer you may have to make changes to be able to use ObjectDataSource.
I found lots of brief articles on the web about ObjectDataSource (ODS) but very few covered any detail, with no complete examples and many articles "cheated" by not using business objects, but by using datasets and data readers. This article is designed to take you from first-principles to a working ASP.NET 2.0 web application with selecting, updating, inserting and deleting and concurrency checking. I will also mention a few problems you're likely to encounter along the way.
Note: this article was written using Visual Studio 2005 December 2004 CTP edition, which is based on .NET framework 2.0.41115 beta 2.
What Is "ObjectDataSource"?
ODS (as I shall call it) is a non-display control in ASP.NET 2.0 that acts as the "glue" between your data-access objects and data-bound controls on the web page. As business objects and other data source types can take on many different forms, data-bindable controls needed a consistent way to access and modify the underlying data. There is a suite of Data Source-based controls (including XMLdataSource and SQLdataSource) and SqlDataSource is just one. Data Source controls were introduced to help enable designers to create controls that bind to data with little if any code.
When building a database application it's very good practice to build a middle-tier layer (also known as a data-access-layer or DAL) which provides the business rules and hides the database SQL away from your application. Binding these DAL objects to controls in ASP.NET 1.x was not very easy and usually required code.
Important Points about ODS
ODS works in a stateless mode, like the web itself. If you use ODS to display a database record on the page, ODS calls your 'Select' function to create the object, reads the properties from that object for the data-bound control, and then disposes of it before the page has completed. So complex DAL objects which take a lot of time to set up are likely to need some thought or redesign before being used in an ObjectDataSource.
For example, my existing DAL library created a whole internal dataset for every table and every relationship in the database, rather than just for the specific table required. While great for a Win Forms application with cached data, this design was too bulky for ODS. I had to extend my DAL to have lightweight versions of the objects and add the Select, Update. Functions required for ODS.
Creating a Simple ASP.NET application To Read Data From Db And Display it using Any of the Data Bound Controls
In this example, we will create an ASP.NET 2.0 application with a DAL (a very simple one!) to demonstrate the key points. We will only attempt to read data and display it at this stage.
Create a new empty web project. Next, we need a DAL or business object. I will use Adventure Work's Department table as our database source, and we will create a cut-down DAL class that represents this table. To do this we need to store the class in our project in the special Application Code directory (or Code for Express edition), in Department.cs. So we create a class as follows.
using System.Data.SqlClient;
public class Deparment
{
private int m_deptid;
private string m_deptname;
private string m_groupname;
private SqlConnection conn=null;
private SqlCommand cmd=null;
private string connstr = ConfigurationManager.ConnectionStrings["LocalSqlServer"].ConnectionString;
#region Constructor
public Deparment()
{
//
// TODO: Add constructor logic here
conn = new SqlConnection(connstr);
cmd = new SqlCommand();
//
}
#endregion
Note I've included SqlClient library as we use SQL Server in this example.
For simplicity I'm only going to use Department table's Department id, Department Name, and Group Name. My Department class has three properties that match these three columns.
#region Public Properties
public int DepartmentId
{
get
{
return m_deptid;
}
set
{
m_deptid = value;
}
}
public string DepartmentName
{
get
{
return m_deptname;
}
set
{
m_deptname = value;
}
}
public string GroupName
{
get
{
return m_groupname;
}
set
{
m_groupname= value;
}
}
#endregion
Now all we need is a function to retrieve the data, so here it is:
#region Public Methods
public Deparment GetDeparment(int deptid)
{
string strquery = "select departmentid,name,groupname from department where departmentid=" + deptid.ToString();
conn.Open();
cmd.Connection = conn;
cmd.CommandText = strquery;
SqlDataReader objSqlDataReader=cmd.ExecuteReader();
//create a object of deparment if its true.
Deparment objdepartment = null;
if (objSqlDataReader.Read())
{
objdepartment = new Deparment();
objdepartment.DepartmentId =(Int16) objSqlDataReader["departmentid"];
objdepartment.DepartmentName = (string)objSqlDataReader["name"];
objdepartment.GroupName = (string)objSqlDataReader["groupname"];
}
conn.Close();
return objdepartment;
}
The most important thing to note about this function is that it is Static (for C++ also, shared if you use VB) ODS requires your object retrieval command to be shared so it can see the command without having to create an instance of the object first. The type of object returned is the business object that the ODS will represent. In this case we are returning individual Deparment records. In later examples we will build a collection of employees for use in controls such as DataGridView.
Next, we create a simple page to display the data. In this page we will use another cool new data bound control from ASP.NET 2.0, the Details View. This creates a bindable form from your data object, with the capabilities for editing, insertion and deletion of data.
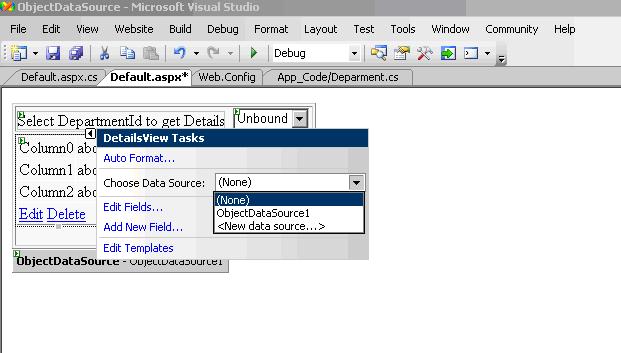
First, create a new blank page and call it Default.aspx. Mark this as the startup page for the website. Now drag the DetailsView control onto this page - it's in the toolbox under the Data group. The design pops up the new Smart Tasks pane for the control on the right, which is great because we want to create a new ObjectDataSource and link it to this DetailsView.
In the second row of the Smart Tasks pane, in "Choose Data Source", click the [...] to the right of (None) and select "New data source".
From the dialog that appears select Object. You can leave the default name of ObjectDataSource1 and click OK. You should now see the following dialog box:
Other way to do this is to drag details view control and object data source control from data tab of toolbox on to default.aspx. Once you have done that it is simple to configure controls using wizard of this controls.
First step is to configure objectdatasource control, use show SmartTag of this control by right clicking on the control. Here u will get dialog box for selecting our BL or DAL class.
In our case we will get only Department class in the dropdown list of dialog box. Select department class and say next. You will get the same dialog box with tabbed control labeled Select, Update, Insert, Delete.
In Select tab we have dropdownlist control choose appropriate method to populate Details view with data. Select GetDepartment (int deptid) method in our case and click on next here another dialog appears where we have to select our source for our specified parameter. In our case we are configuring it to collect data from Dropdown list so we have to select "control" as parameter and control id as "dropdownlist1". Here I am assuming that you have dragged dropdownlist on to default.aspx(If Not Do that)
After dragging dropdownlist configure it to show departmentid's from department table. For that create a method which returns collection of id's I am using Arraylist collection to populate Arraylist with department id's using this code shown below in Department class:
public ArrayList getDepartmentIDs()
{
ArrayList objArrayList = new ArrayList();
string strquery = "select departmentid from department ";
conn.Open();
cmd.Connection = conn;
cmd.CommandText = strquery;
SqlDataReader objSqlDataReader = cmd.ExecuteReader();
while (objSqlDataReader.Read())
{
objArrayList.Add(objSqlDataReader["departmentid"].ToString());
}
conn.Close();
return objArrayList;
}
//in default.aspx.cx file add this code//
protected void Page_Load(object sender, EventArgs e)
{
if (!IsPostBack)
{
Deparment objDeparment=new Deparment();
DropDownList1.DataSource = objDeparment.getDepartmentIDs();
DropDownList1.DataBind();
}
}
Here there Is nothing much to explain about this code. Its usual way to get data from db for populating databoud controls such as Dropdownlist.
We will discuss about configuring update and delete next in this article. Code in Html view of default.aspx look like this after configuring object data source control with select parameter.
<asp:ObjectDataSource ID="ObjectDataSource1" runat="server" SelectMethod="GetDeparment" TypeName="Deparment" >
<SelectParameters>
<asp:ControlParameter ControlID="DropDownList1" Name="deptid" PropertyName="SelectedValue"
Type="Int32" />
</SelectParameters>
</asp:ObjectDataSource>