In this article let us see the usage of DLinq Designer by an example how to create entity classes and the relationship with other classes. We will also see how to create a windows application which makes use of these classes. Using this DLinq designer we can reduce the development time and minimize the code for developing the application. We will also see the Linq queries to filter the records and to bind controls to the Data Source that is created using the objects built using the designer.
Open Visual Studio 2005 and select File-> New -> Project and select the option Linq Windows Application. Name the Project and select ok.

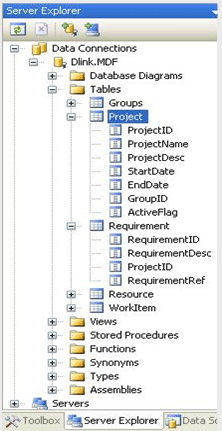
For creating the windows application, I have created the following database with two tables as Project & Requirement with the fields as listed below.
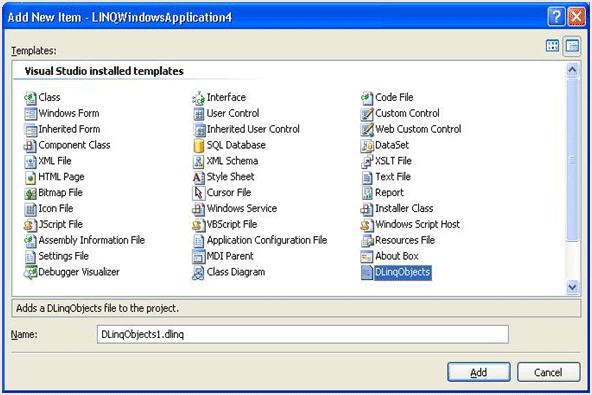
Now select the project, right click and select Add -> New Item and then select DLinqObjects from the List of Items available. The DLinqObject gets added to the project and the designer surface opens.
Expand the Server Explorer, open the database and expand the tables. Select the table "Project" from the list and then drag and drop it on the surface of the Dlinq designer. Build the project once after dropping the object on the design surface. Now if you open the DLinqObjects1.cs file, you can see the following code in it.
public partial class @__SQLEXPRESSDataContext : System.Data.DLinq.DataContext
{
public System.Data.DLinq.Table<Project> Projects;
public System.Data.DLinq.Table<Requirement> Requirements;
[System.Diagnostics.DebuggerNonUserCodeAttribute()]
public @__SQLEXPRESSDataContext() :
base(new System.Data.SqlClient.SqlConnection(global::LINQWindowsApplication4.Properties.Settings.Default.DataConnection))
{
}
}
[System.Data.DLinq.Table(Name="Project")]
public partial class Project : System.Data.DLinq.INotifyPropertyChanging, System.ComponentModel.INotifyPropertyChanged
{
private int _ProjectID;
private string _ProjectName;
private string _ProjectDesc;
private System.DateTime _StartDate;
private System.DateTime _EndDate;
private int _GroupID;
private System.Nullable<bool> _ActiveFlag;
private System.Data.DLinq.EntitySet<Requirement> _Requirements;
[System.Diagnostics.DebuggerNonUserCodeAttribute()]
public Project()
{
this._Requirements = new System.Data.DLinq.EntitySet<Requirement>(new System.Data.DLinq.Notification<Requirement>(this.Attach_Requirements), new System.Data.DLinq.Notification<Requirement>(this.Attach_Requirements));
}
[System.Diagnostics.DebuggerNonUserCodeAttribute()]
[System.Data.DLinq.Column(Name="ProjectID", Storage="_ProjectID", DBType="int NOT NULL IDENTITY", Id=true, AutoGen=true)]
public virtual int ProjectID
{
get
{
return this._ProjectID;
}
set
{
if ((this._ProjectID != value))
{
this.OnPropertyChanging("ProjectID");
this._ProjectID = value;
this.OnPropertyChanged("ProjectID");
}
}
}
The @__SQLEXPRESSDataContext is the connection object for the database connection. I used SQLExpress itself for the example. Then you can see the code for the entity table "Project" and the columns added to the designer. I have not given the code for other columns as it is similar to the field "ProjectID".
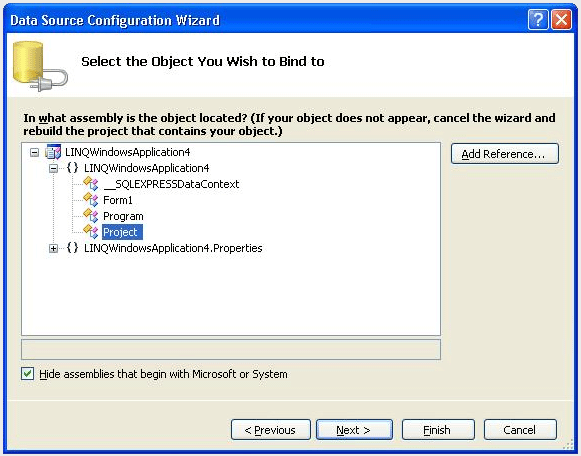
Select the menu Data -> Add New Data Sources in Visual Studio. This will open the wizard for adding data sources. The first step of the wizard will ask you to select the type of the source that will provide data to the application. Select Object from the options.
The next step will list the available objects for binding the controls. As we have the Projects entity class on the designer, this will get listed under the project name. Select the Object "Project" and select next and then Finish the wizard.
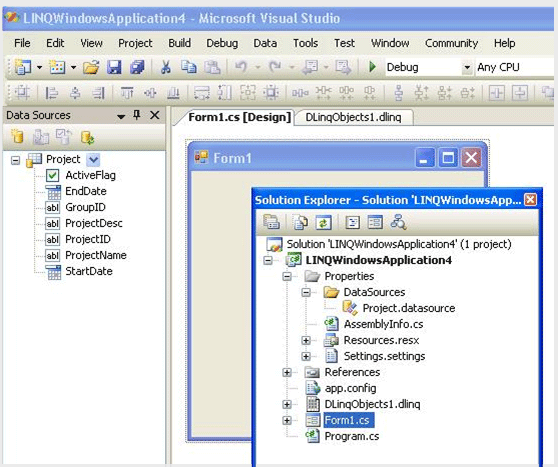
Now you can see the data source added to the project under the Data Sources folder and also you can view the properties of the data source by selection the menu Data-> Show DataSources as shown below.
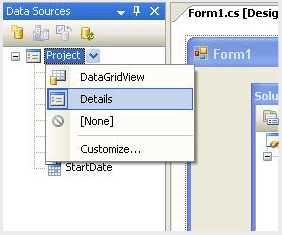
Now we are ready to Design the windows form. Open the form design surface. Now on the Data Sources explorer select the Project Datasource. You can see the following options when you select the drop down next to the Data Source "Project". This is to ease the design of the user Interface. You can choose how you want to present the UI to the user. For this example I have selected Details View.
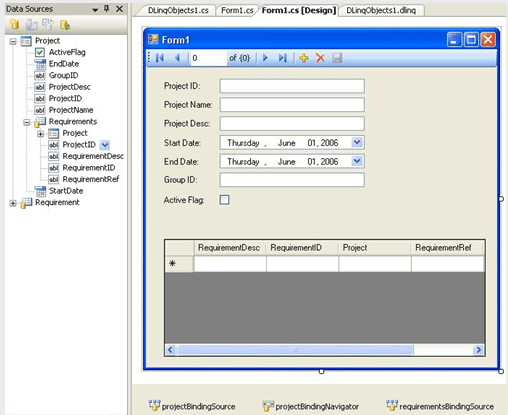
Now Drag and drop the Project Data Source on the form design surface. The Visual Studio places the corresponding data controls on the form according to the data type of the column/properties of the Table/Entity class. We don't need to select the controls and bind it manually. It's all done by the Visual Studio itself. You can also see a navigator on top of the form. This gives the flexibility of navigation on the records and also provides the editing controls in the navigation bar. This helps us to reduce the design time.

Add the following code to the form file to provide the necessary connections to the DataSource and then bind it. The con is the connection object created using the "@__SQLEXPRESSDataContext" connection which we have seen earlier.
namespace LINQWindowsApplication4
{
public partial class Form1 : Form
{
private @__SQLEXPRESSDataContext con = new @__SQLEXPRESSDataContext();
public Form1()
{
InitializeComponent();
}
private void Form1_Load(object sender, EventArgs e)
{
projectBindingSource.DataSource = con.Projects.ToBindingList();
}
}
}
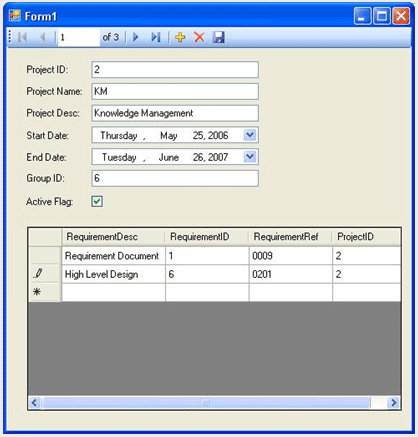
Now save the project, build it and execute it. You can see the below UI with the navigation feature also in it. The Save button is disabled as we have not enabled it and not added the code for it. Before going for the editing feature we will add another data source and a detail control for that. Let's make this application as Master Detail application.

Now close the application and go to the design and open the DLinqObject Design Surface. Now darg and drop the second table "Requirement" from the server explorer onto the Designer surface. Now you can see the following on the design surface. The Designer itself creates the Association relationship between the two entities.
Add data source for "Requirement" Object as we did previously for project entity. Use the Data Sources wizard for this.
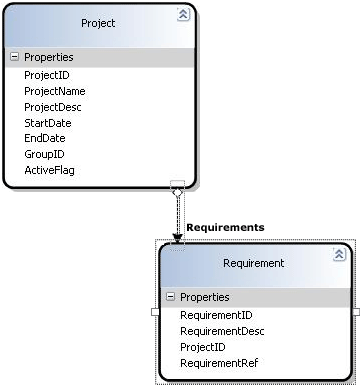
Now open the Data sources explorer and expand it. You can see Requirements as one of the property under Project Data Source which means that the requirement is one of the details of the project and requirement itself is an object with it's own properties.
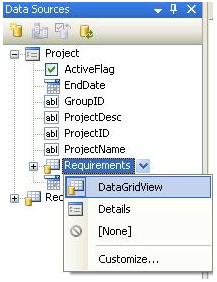

Using drop down next to the "Requirements" property, set the view as "DataGridView" so that we can see the details in a grid when we navigate through the project records.
Drag and drop the Requirements object from the Data Sources explorer onto the form design surface. Select the Save button in the navigator and open the properties window. Using properties window. Enable the save button and select the click even for the save button. Add the following code for the click event of the Save button.
private void projectBindingNavigatorSaveItem_Click(object sender, EventArgs e)
{
con.SubmitChanges();
}
Save the project and execute it. Now try navigating through the records. Try editing and saving the changes.
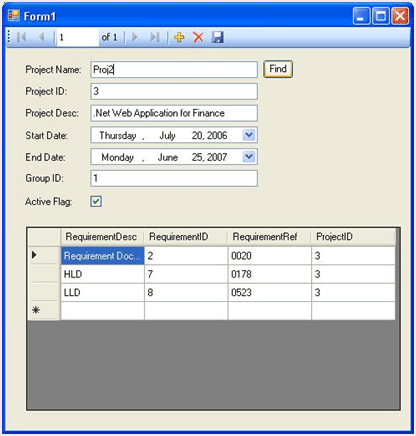
The next step what we can do is the search option on the Project name. This is very simple to achieve by using the Linq query. Lets see how we can do it.
Add a button next to the project name text box. Name it as you would want it. Here I named it as "Find". Add the following code to the Click event of the Find button.
private void FindButton_Click(object sender, EventArgs e)
{
var projs = from projects in con.Projects
where projects.ProjectName == projectNameTextBox.Text
select projects;
projectBindingSource.DataSource = projs.ToBindingList();
}
Save and execute the project. Now enter a valid project name in the project name text box and then click the Find button. This will bring you the details of the project name entered and also the corresponding Requirement details in the grid.
Summary
DLinq designer is the easy way to create the entity objects and bound the controls to the dlinq objects. We can easily create the windows form using the designer. The developer need not take more time to design the User Interface. The designer itself suggests you the controls suitable for the selected fields. The developer has to just drag and drop the fields on the form surface which will reduce the development time. The designer also has the tools for creating the class objects which inherits from the other.