

In our last two articles, we talked about how to create an editable GridView and how to make it persistent in XML. This article covers how we can take advantage of the .NET framework to print out our GridView to an available printer.
(To see the other articles in our series, Go to Editable GridView Control in C# and .NET - Part I and Editable GridView Control in C# and .NET - Part II).
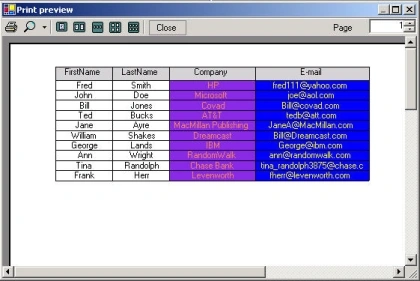
Figure 1 - Printing the GridView
.Net gives us a few controls that make printing quite easy and handle much of the details of driving the printer internally. In fact, most of our responsibility in printing the GridView control lies in graphically drawing its contents. The drawing of the GridView control is accomplished using GDI+. Below is the routine for drawing the GridView. The Print method takes a Graphics object (in the case of printing this is a Printer Graphics Object). It utilizes the Graphics Object to draw the lines, colors and text necessary to construct our grid. The hard part of drawing the grid is mathematically mapping what is on our current grid control to our drawing surface. Also we have to figure out what methods we can use from the ListView to give us our cell borders and locations of them. The Print method first prints the column header, then the cells of the GridView, and finally the gridlines and boundary of the GridView.
- [DispId(22)]
- public void Print(Graphics g) {
- Rectangle frame = this.Bounds;
- // Calculate the Height of a Cell in the Grid
- int cellHeight = GetCellBounds(1, 1).Height;
- // Calculate the values needed to locate the Extents of the Grid
- int rightExtent = GetCellBounds(1, NumberOfColumns).Right + Bounds.X;
- int bottomExtent = GetCellBounds(NumberOfRows, 1).Bottom + Bounds.Y;
- // Create a string format object that aligns the string in the center of the rectangle
- StringFormat sfcenter = new StringFormat();
- sfcenter.Alignment = StringAlignment.Center;
- // Loop through all the columns and draw the column header text and background color
- for (int j = 1; j <= this.NumberOfColumns; j++) {
- string strText = listView1.Columns[j - 1].Text;
- Color aColor = Color.LightGray;
- Color aTextColor = Color.Black;
- Rectangle cellFrame = GetCellBounds(1, j);
- cellFrame.Offset(Bounds.X, Bounds.Y); // offset to the absolute position on the form
- int nTop = cellFrame.Top;
- cellFrame.Offset(0, -(cellFrame.Y - Bounds.Y));
- cellFrame.Height += (nTop - Bounds.Top);
- g.FillRectangle(new SolidBrush(aColor), cellFrame);
- g.DrawString(strText,
- listView1.Font, new SolidBrush(aTextColor), cellFrame, sfcenter);
- }
- // Loop through all of the cells in the grid, draw background color, text color, and text for each cell
- for (int i = 1; i <= this.NumberOfRows; i++) {
- for (int j = 1; j <= this.NumberOfColumns; j++) {
- string strText = this.GetCell(i, j);
- Color aColor = this.GetCellColor(i, j);
- Color aTextColor = this.GetCellTextColor(i, j);
- Rectangle cellFrame = GetCellBounds(i, j);
- cellFrame.Offset(Bounds.X, Bounds.Y);
- g.FillRectangle(new SolidBrush(aColor), cellFrame);
- g.DrawString(strText, listView1.Font, new SolidBrush(aTextColor), cellFrame,
- sfcenter);
- }
- }
- // Loop through all the cells in the grid again. Draw all of the lines that form the borders for the cells.
- for (int i = 1; i <= this.NumberOfRows; i++) {
- Rectangle r1 = GetCellBounds(i, 1);
- r1.Offset(Bounds.X, Bounds.Y);
- g.DrawLine(Pens.Black, Bounds.X, r1.Top, rightExtent, r1.Top);
- for (int j = 1; j <= this.NumberOfColumns; j++) {
- Rectangle cellFrame = GetCellBounds(i, j);
- cellFrame.Offset(Bounds.X, Bounds.Y);
- if (i == 1) {
- g.DrawLine(Pens.Black, cellFrame.Left, Bounds.Y, cellFrame.Left, bottomExtent);
- }
- if (j == NumberOfColumns) {
- g.DrawLine(Pens.Black, cellFrame.Right, Bounds.Y, cellFrame.Right, bottomExtent);
- }
- }
- }
- // Draw the Border around the entire grid
- Rectangle rFrame = Bounds;
- rFrame.Width -= (Bounds.Right - rightExtent);
- rFrame.Height -= (Bounds.Bottom - bottomExtent);
- g.DrawRectangle(Pens.Black, rFrame);
- }
- public Rectangle GetCellBounds(int aRow, int aColumn) {
- // Get the boundary of an entire row in the ListView corresponding to the aRow index passed
- Rectangle r = listView1.Items[aRow - 1].Bounds;
- // Get the width of the column indicated by the column index passed
- int colWidth = listView1.Columns[aColumn - 1].Width;
- // Find the starting position of the column using the GetStartOfColumn function in the GridView
- int startCol = GetStartOfColumn(aColumn);
- // Shrink the ListView Item Boundary rectangle to only contain the boundary of the cell passed
- r.X += startCol;
- r.Width = colWidth;
- return r;
- }
- // The GetStartOfColumn computes a sum of all the column widths up to (but not including) the index of
- // the column passed to the function. This value is the position of the column in the grid
- public int GetStartOfColumn(int aColumn) {
- int sum = 0;
- for (int i = 1; i < aColumn; i++) {
- sum += listView1.Columns[i - 1].Width;
- }
- return sum;
- }
That's all there is to drawing the GridView in GDI+. Now we need to take advanage of the Print method in the GridView to print our GridView to the printer. In our form application we need to drag a PrintDocument object and a PrintPreviewDialog object onto the form. This gives us access to the objects printDocument1 and printPreviewDialog1 (although you can change these names if you wish in the properties window. In the properties window of printPreviewDialog1, assign the Document property to printDocument as shown in Figure 2 below:

Figure 2 - Assigning the print document to the print preview dialog

Figure 3 - Wiring up the PrintPage event
- private void printDocument1_PrintPage(object sender,System.Drawing.Printing.PrintPageEventArgs e)
- {
- // Print the GridView by passing the Printer Graphics Object thats passed into the PrintPage event handler into
- // the Print method of the GridView.
- gridView1.Print(e.Graphics);
- }
- private void PrintMenu_Click(object sender, System.EventArgs e) {
- // size the dialog to be as big as the form (+ a little more)
- printPreviewDialog1.SetBounds(ClientRectangle.X, ClientRectangle.Y, ClientRectangle.Width + 50, ClientRectangle.Height + 50);
- // Zoom the preview to 100%
- printPreviewDialog1.PrintPreviewControl.Zoom = 1.0;
- // Show the dialog
- if (printPreviewDialog1.ShowDialog() == DialogResult.OK) {}
- }
- private void PrintMenu_Click(object sender, System.EventArgs e)
- {
- printDocument1.Print();
- }
benhui liPosted Aug 5, 2007, 4:48 PM
as the above subject, for example, I want to highlight "S" of "Smith" in GridView. thanks.
Marcio RecifePosted Jul 24, 2007, 1:30 PM
I'm translating an entire application written in C# that uses a PrintPreviewDialog to visualize its reports. The problem is: how to translate/change its buttons/labels properties such as tooltiptexts and texts?
AlanPosted Jun 19, 2006, 12:19 PM
Great article but how would I print a grid control from a web page??