

Introduction
WebSocket is a protocol providing full-duplex communication channels over a single TCP connection that makes more interaction between a browser and a web server possible, facilitating the real-time data transfer from and to the server.
In this article, I will show you a sample that uses WebSocket to build a real-time application about distributing tasks.
Suppose we have a task center, there are some tasks will be published to the task center, and when the center receives some tasks, it should distribute the tasks to workers.
Let's take a look at the result at first.

There are four clients connected to the WebSocket Server, and after publishing messages via RabbitMQ management, the messages will be distributed to different clients in time.
Note
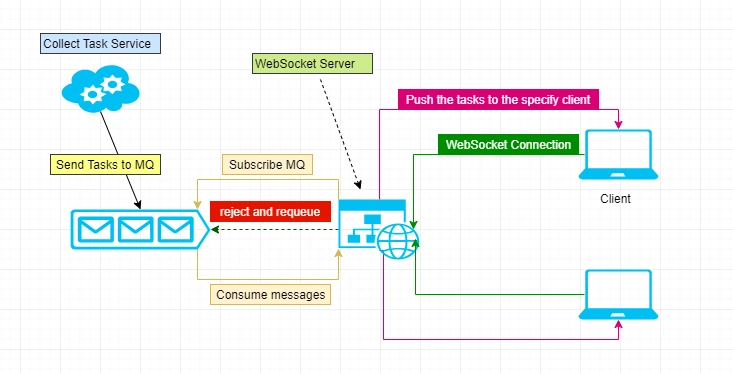
Clients means the workers, WebSocket Server means the task center and RabbitMQ management simulates sending task to the task center, and the messages means the tasks that should be handled.
And here is the architecture diagram that shows how it works.
Let's take a look on how to accomplish it.
Setup RabbitMQ
Before writing some code, we should run up the RabbitMQ server at first. The fastest way is to use Docker.
- docker run -p 5672:5672 -p 15672:15672 rabbitmq:management
WebSocket Server
This is the most important section!
At first, we should configure the WebSocket in Startup class.
- public class Startup
- {
- // other ...
- public void ConfigureServices(IServiceCollection services)
- {
- services.AddSingleton<Handlers.IDisHandler, Handlers.DisHandler>();
- services.AddControllers();
- }
- public void Configure(IApplicationBuilder app, IWebHostEnvironment env)
- {
- // other ..
- var webSocketOptions = new WebSocketOptions()
- {
- KeepAliveInterval = TimeSpan.FromSeconds(120),
- ReceiveBufferSize = 4 * 1024
- };
- app.UseWebSockets(webSocketOptions);
- app.Use(async (context, next) =>
- {
- // ws://www.yourdomian.com/push
- if (context.Request.Path == "/push")
- {
- if (context.WebSockets.IsWebSocketRequest)
- {
- WebSocket webSocket = await context.WebSockets.AcceptWebSocketAsync();
- try
- {
- var handler = app.ApplicationServices.GetRequiredService<Handlers.IDisHandler>();
- await handler.PushAsync(context, webSocket);
- }
- catch (Exception ex)
- {
- Console.WriteLine(ex.Message);
- }
- }
- else
- {
- context.Response.StatusCode = 400;
- }
- }
- else
- {
- await next();
- }
- });
- }
- }
Next step is to handle the logic about how to push messages to clients. Here create a class named DisHandler to do it.
Creating RabbitMQ connection, channel and consumer on the constructor, and the important part of the Received event of consumer.
Let's take a look at the Received event of consumer.
- consumer.Received += async (ch, ea) =>
- {
- var content = Encoding.UTF8.GetString(ea.Body);
- Console.WriteLine($"received content = {content}");
- // {"TaskName":"Demo", "TaskType":1}
- var msg = Newtonsoft.Json.JsonConvert.DeserializeObject<MqMsg>(content);
- var workIds = Worker.GetByTaskType(msg.TaskType);
- var onlineWorkerIds = _sockets.Keys.Intersect(workIds).ToList();
- if (onlineWorkerIds == null || !onlineWorkerIds.Any())
- {
- if (!ea.Redelivered)
- {
- Console.WriteLine("No online worker, reject the message and requeue");
- // should requeue here
- _channel.BasicReject(ea.DeliveryTag, true);
- }
- else
- {
- // should not requeue here, but this message will be discarded
- _channel.BasicReject(ea.DeliveryTag, false);
- }
- }
- else
- {
- // free or busy
- var randomNumberBuffer = new byte[10];
- new RNGCryptoServiceProvider().GetBytes(randomNumberBuffer);
- var rd = new Random(BitConverter.ToInt32(randomNumberBuffer, 0));
- var index = rd.Next(0, 9999) % onlineWorkerIds.Count;
- var workerId = onlineWorkerIds[index];
- if (_sockets.TryGetValue(workerId, out var ws) && ws.State == WebSocketState.Open)
- {
- // simulating handle the message an get the result.
- // put your own logic here
- var val = msg.TaskName;
- if (msg.TaskType != 1) val = $"Special-{msg.TaskName}";
- var task = Encoding.UTF8.GetBytes(val);
- Console.WriteLine($"send to {workerId}-{val}");
- // should ack here? or when to ack is better?
- _channel.BasicAck(ea.DeliveryTag, false);
- // sending message to specify client
- await ws.SendAsync(
- new ArraySegment<byte>(task, 0, task.Length),
- WebSocketMessageType.Text,
- true,
- CancellationToken.None);
- }
- else
- {
- Console.WriteLine("Not found a worker");
- }
- }
- };
When we receive a message, we should select a worker that can handle this task.
If there are no online workers, the server should reject the message and make it re-queue one more time.
If there are some online workers, the server will select a worker that can handle this task, here use a random number to simulate this scenario.
We also should ensure the connection of this worker is still open, so that the server can send messages to it.
The entry of handling WebSocket request is PushAsync method, it just maintains connections of clients, when client sends its client id to the server, it will record them, and when the client disconnects from the server, it will remove the client.
- public async Task PushAsync(HttpContext context, WebSocket webSocket)
- {
- var buffer = new byte[1024 * 4];
- WebSocketReceiveResult result =
- await webSocket.ReceiveAsync(new ArraySegment<byte>(buffer), CancellationToken.None);
- string clientId = Encoding.UTF8.GetString(buffer, 0, result.Count);
- // record the client id and it's websocket instance
- if (_sockets.TryGetValue(clientId, out var wsi))
- {
- if (wsi.State == WebSocketState.Open)
- {
- Console.WriteLine($"abort the before clientId named {clientId}");
- await wsi.CloseAsync(WebSocketCloseStatus.InternalServerError,
- "A new client with same id was connected!",
- CancellationToken.None);
- }
- _sockets.AddOrUpdate(clientId, webSocket, (x, y) => webSocket);
- }
- else
- {
- Console.WriteLine($"add or update {clientId}");
- _sockets.AddOrUpdate(clientId, webSocket, (x, y) => webSocket);
- }
- while (!result.CloseStatus.HasValue)
- {
- result = await webSocket.ReceiveAsync(new ArraySegment<byte>(buffer), CancellationToken.None);
- }
- await webSocket.CloseAsync(result.CloseStatus.Value, result.CloseStatusDescription, CancellationToken.None);
- Console.WriteLine("close=" + clientId);
- _sockets.TryRemove(clientId, out _);
- }
Nikita VPosted Apr 14, 2022, 9:42 AM
Want websocket for RFID in c#
Nicolas StubiPosted Jul 30, 2020, 9:35 AM
Nice. And what about sockets (and NOT web sockets)?
Sourav Kumar DasPosted Jan 6, 2020, 11:02 PM
Nice and useful article Sir. Thanks for sharing.