If you're new to GDI+, you might want to check out my tutorial GDI+ for Beginners
You can create different types of brushes in GDI+. In this article, I'll show you how to create various types of brushes.
Drawing GDI+ Objects
The following code draws a line, an ellipse, a curve, and a polygon object. As you can see from the code, I've used pen object to fill these objects. See more details.
protected
override void OnPaint(PaintEventArgs e)
{
Graphics g = e.Graphics;
Pen pn = new Pen(Color.Green, 10);
g.DrawLine(pn, 100, 10, 30, 10);
g.DrawEllipse( new Pen(Color.Red, 20), 20, 40, 20, 20);
g.DrawBezier( new Pen(Color.Blue, 5), new Point(50,60), new
Point(150,10), new Point(200,230), new Point(100,100) );
PointF point1 = new PointF(50.0f, 250.0f);
PointF point2 = new PointF(100.0f, 25.0f);
PointF point3 = new PointF(150.0f, 5.0f);
PointF point4 = new PointF(250.0f, 50.0f);
PointF point5 = new PointF(300.0f, 100.0f);
PointF[] curvePoints = {point1, point2, point3, point4, point5 };
g.DrawPolygon(new Pen(Color.Chocolate, 10), curvePoints);
}
Brush and Brushes Types
Brush type is an abstract base class. HatchBrush, LinearGradientBrush, PathGradientBrush, SolidBrush and TextureBrush classes are inherited from Brush class. You don't use this class directly.
All brush types are defined in System.Drawing and its helper namespaces. Before using brushes, you need to add reference to this namespace. HatchBrush and GradientBrush are defined in System.Drawing.Drawing2D namespace.
You use brushes to fill GDI+ objects with certain kind of brush. You generally call Fill methods of Graphics class to fill various objects such as Ellipse, Arc, or Polygon. There are different kinds of brushes. For example, solid brush, hatch brush, texture brush, and gradient brush.
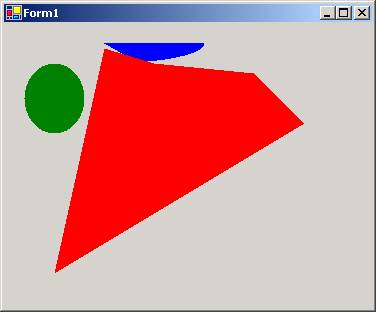
Solid Brushes
Solid brushes are normal brushes with no style. You fill GDI+ object with a color. SolidBrush type is used to work with solid brushes.
Graphics g = e.Graphics;
SolidBrush sdBrush1 =
new SolidBrush(Color.Red);
SolidBrush sdBrush2 = new SolidBrush(Color.Green);
SolidBrush sdBrush3 = new SolidBrush(Color.Blue);
g.FillEllipse(sdBrush2, 20, 40, 60, 70);
Rectangle rect = new Rectangle(0, 0, 200, 100);
g.FillPie(sdBrush3, 0, 0, 200, 40, 0.0f, 30.0f );
PointF point1 = new PointF(50.0f, 250.0f);
PointF point2 = new PointF(100.0f, 25.0f);
PointF point3 = new PointF(150.0f, 40.0f);
PointF point4 = new PointF(250.0f, 50.0f);
PointF point5 = new PointF(300.0f, 100.0f);
PointF[] curvePoints = {point1, point2, point3, point4, point5 }; g.FillPolygon(sdBrush1,
urvePoints);
The following code draws an ellipse, a pie, and a polygon.
Hatch Brushes
using
System.Drawing.Drawing2D;
The hatch brushes are brushes with a hatch style, a foreground color, and a background color. Hatches are a combination of rectangle lines and the area between the lines. The foreground color defines the color of lines; the background color defines the color of area between lines.
HatchStyle defines the hatch styles.
Member Name
- BackwardDiagonal
- Cross
- DarkDownwardDiagonal
- DarkHorizontal
- DarkUpwardDiagonal
- DarkVertical
- DashedDownwardDiagonal
- DashedHorizontal
- DashedUpwardDiagonal
- DashedVertical
- DiagonalBrick
- DiagonalCross
- Divot
- DottedDiamond
- DottedGrid
- ForwardDiagonal
The following code shows how to draw hatch brushes.
protected