Introduction:
Interacting between HTML and ASP.NET has been one of the most common coding scenarios we have come across; i.e. accessing HTMLl elements and calling JavaScript from code behind. I recently came across a situation where I wanted to add Silverlight content to an existing page and allow the HTML and Silverlight portions of the page to interact.
When we need this interaction: So let us see initially what could be probable scenarios where we need to interact / access HTML in Silverlight page.
- To make compatible: When we want to use the latest and greatest user interfaces with Silverlight, this requires compatibility with HTML. Situations could be like including a Silverlight content region to show non-essential extras alongside the critical HTML content.
- Legacy web pages: If we have an existing web page that does exactly what we want, it may make more sense to extend it with a bit of Silverlight pizzazz than to replace it outright. So the solution is to create a page that includes both HTML and Silverlight content.
- Server-side features: We know that Silverlight is a poor fit for tasks that need to access server resources or require high security, which is why it makes far more sense to build a secure checkout process with a server-side programming framework like ASP.NET. But you can still use Silverlight to display advertisements, video content, product visualizations, and other value-added features in the same pages.
So, let's try to BRIDGE this gap between Silverlight and the ordinary world of HTML.
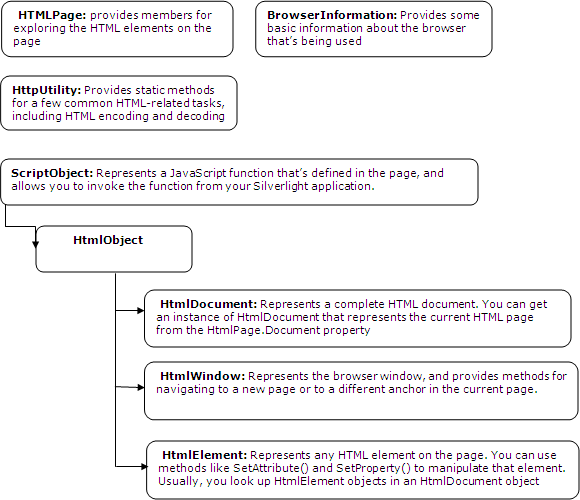
What is this BRIDGE: This BRIDGE is built using a Silverlight set of managed classes (commonly called Helper classes) that replicate the HTML DOM (document object model), and we can access these classes by namespace, System.Window.Browser.
What are these Classes and what they do?
Ok, so let's start using these classes to interact with HTML from Silverlight page.
Step 1: Create a Silverlight application and name it BrowserInteraction.
Step 2: Open main.xaml; in this project we will use multiple classes so to demonstrate each functionality; we will create a listbox to display functionality and a border to see the result.
Step 3: Create a Listbox and a border (Border is a content control, so we call show control which will display result), so the xaml looks like this:
<Grid x:Name="LayoutRoot">
<Grid.RowDefinitions>
<RowDefinition Height="*"></RowDefinition>
<RowDefinition Height="Auto"></RowDefinition>
<RowDefinition Height="3*"></RowDefinition>
</Grid.RowDefinitions>
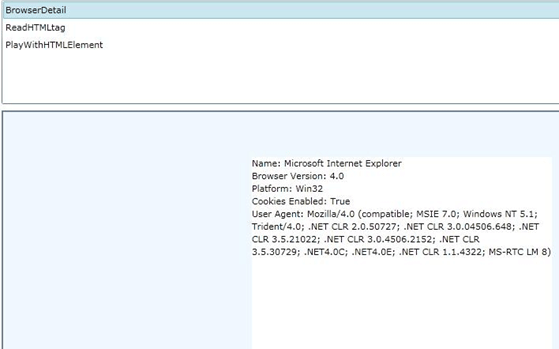
<ListBox x:Name="lst" SelectionChanged="lst_SelectionChanged">
<ListBoxItem Content="BrowserInfo"></ListBoxItem>
<ListBoxItem Content="ReadHTMLtag"></ListBoxItem>
<ListBoxItem Content="PlayWithHTMLElement"></ListBoxItem>
</ListBox>
<controls:GridSplitter Margin="0 3 " HorizontalAlignment="Stretch" Height="2"
Grid.Row="1"
></controls:GridSplitter>
<Border BorderBrush="SlateGray" Grid.Row="2" x:Name="PagePlaceholder" BorderThickness="2"
Background="AliceBlue"
></Border>
</Grid>
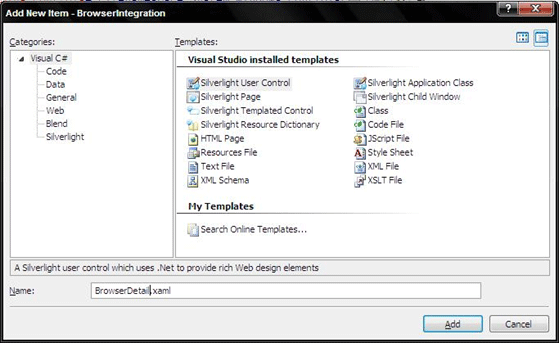
Step 4: Add silverlight page as a new element. Here we will use it to show browser information.
Write this xaml;
<UserControl x:Class="BrowserIntegration.BrowserDetail"
xmlns="http://schemas.microsoft.com/winfx/2006/xaml/presentation"
xmlns:x="http://schemas.microsoft.com/winfx/2006/xaml"
Width="400" Height="300" Loaded="UserControl_Loaded">
<Grid x:Name="LayoutRoot" Background="White" Margin="10">
<TextBlock x:Name="lblInfo" TextWrapping="Wrap" ></TextBlock>
</Grid>
</UserControl>
Step 5: In browserdetail.xaml.cs, add namespace
using System.Windows.Browser
Step 6: Write handler for UserControl_Loaded
private void LayoutRoot_Loaded(object sender, RoutedEventArgs e)
{
BrowserInformation b = HtmlPage.BrowserInformation;
lblInfo.Text = "Name: " + b.Name;
lblInfo.Text += "\nBrowser Version: " + b.BrowserVersion;
lblInfo.Text += "\nPlatform: " + b.Platform;
lblInfo.Text += "\nCookies Enabled: " + b.CookiesEnabled;
lblInfo.Text += "\nUser Agent: " + b.UserAgent;
}
Step 7: Go back in mail.xmal.cs and write a handler for listbox to call Browserdetail.xaml.
private void lst_SelectionChanged(object sender, SelectionChangedEventArgs e)
{
string newpage = ((ListBoxItem)e.AddedItems[0]).Content.ToString();
Type type = this.GetType();
Assembly asm = type.Assembly;
UserControl Page = (UserControl)asm.CreateInstance(type.Namespace + "." + newpage);
PagePlaceholder.Child = Page;
}
You can also use Navigation framework to call other Silverlight page.
Step 8: Press F5 and click Browser Info
Now this was a basic example of using managed helper class to get browser info, let us play with some other classes as well.
How about reading HTML element and displaying them in Silverlight, let's try.
Step 9: Add another usercontrol, say ReadHTMLtag.xaml.
Step 10: Add a textBlock and Loaded event
<UserControl x:Class="BrowserIntegration.ReadHTMLtag"
xmlns="http://schemas.microsoft.com/winfx/2006/xaml/presentation"
xmlns:x="http://schemas.microsoft.com/winfx/2006/xaml"
Width="400" Height="300" Loaded="UserControl_Loaded">
<Grid x:Name="LayoutRoot" Background="White">
<TextBlock x:Name="lblElementTree"></TextBlock>
</Grid>
</UserControl>
In this example, we will try to read HTML Tags from Silverlight page. The helper class which we are going to use this time is HtmlElement Class.
Step 11: Write handler for UserControl_Loaded.
You can see we created an htmlelement of DocumentElement type, which will traverse through HTML page and it have TagName property which will check for tags. Full implementation looks like this:
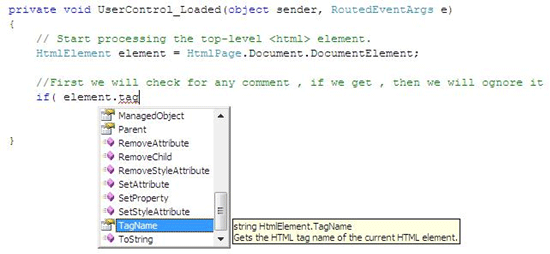
private void UserControl_Loaded(object sender, RoutedEventArgs e)
{
// Start processing the top-level <html> element.
HtmlElement element = HtmlPage.Document.DocumentElement;
ProcessElement(element, 0);
}
private void ProcessElement(HtmlElement element, int intend)
{
//First we will check for any comment , if we get , then we will ognore it
if (element.TagName == "!")
return;
// Indent the element to help show different levels of nesting.
lblElementTree.Text += new String(' ', intend * 4);
// Display the tag name.
lblElementTree.Text += "<" + element.TagName;
// Only show the id attribute if it's set.
if (element.Id != "")
lblElementTree.Text += " id=\" " + element.Id + "\"";
lblElementTree.Text += ">\n";
// Process all the elements nested inside the current element.
foreach (HtmlElement childElement in element.Children)
{
ProcessElement(childElement, 0);
}
}
Elemment.TagName = Gives the Tag name for the current HTML element.
Element.ID = Gives the identifier of the current HTML element.
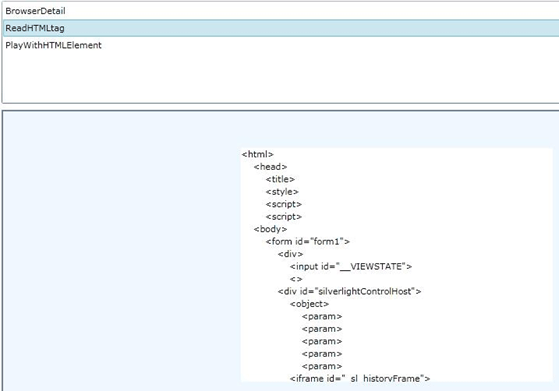
Step 12 : Press F5 and click ReadTagElement and see that through HTMLElement we read all the HTML parent and child tags
This is theoretical and little practical exercise for accesing HTML DOM, so in Part 2 we will explore the possibility of retrieving the bookmark from the current browser URL, how to open a HTML pop–up, and how to manipulate HTML elements.
Click here to read Part 2
Cheers...